Showing posts with label Tips. Show all posts

Sunday, July 30, 2017

Kumihimo with PIP Beads

Kumihimo with PIP Beads


I bought some Preciosa PIP Beads a while ago... and thought they would be perfect for kumihimo. I decided to play around with them and to do a quick project... Many bracelets later, I have now 4 design variations, a 25 page manual with all the steps, the beads sequences for each variation, the bracelet length versus wrist size, and bead numbers charts, all broken down in easy to follow steps with over 50 clear and easy to understand pictures and charts. 


How did this happen?


Kumihimo with PIP Beads


While working on this project, I fell in love with the PIP beads. They are shaped like small petals and perfectly suited for kumihimo. They lend themselves to flower designs and to dimensional geometrical designs. 


Here is what I learned along the way... 


Kumihimo Bracelet Tutorial with PIP Beads


PIPS  All Around - Design 1

My first design, very dimensional, sculptural and geometrical, has a simple bead placement with Preciosa PIPs and Miyuki 8s.

Choices
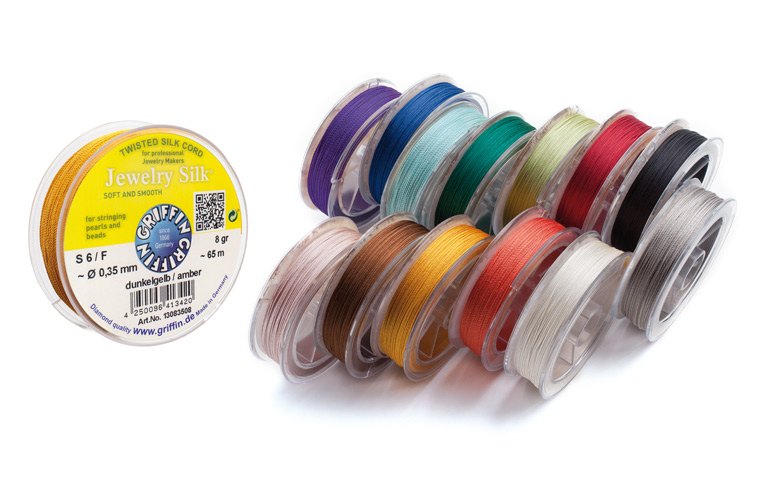
While making these, I experimented using the standard C-Lon Bead Cord and C-Lon Fine Weight Bead Cord. The result is the same, even I cannot tell which one was done with which cord, but the Fine Weight is a lot easier to work with. The beads slide up and down the cord more freely. And since I add a central cord at the braid center for my bracelets, the C-Lon Fine Weight Bead Cord with a 24 lb breaking strength is plenty strong enough. So that's settled, Fine Weight is the way to go.

Then of course there is the choice of central cord size, I played around a bit and the 1 mm Nylon Satin Cord works well. It does not add bulk to the bracelet, and it keeps the bracelet nice and flexible.

Next I decided to try a bracelet with a smaller flatter profile. The PIP All Around is round...


Kumihimo Bracelet Tutorial with PIP Beads


Half Round PIP Design - Design 2

So I designed one with PIPs (mixed with 8s) on one side and 8s on the other side. That required careful notes, charts to keep track of the bead pattern and ultimately the creation of a system to keep track of the bead sequences. I ended up coming up with a great way using spreadsheets and charts. It makes following bead patterns very simple and easy.

The bracelet is very modern, with a lower profile than the first design... It is half round.

At this point, I was really intrigued, I had developed a system to keep track of the bead placement and sequences, and I really wanted to make something with a flower design with kumihimo... So more experimentation and later... The result...


Kumihimo with PIP Beads

PIP Flowers - Design 3

Flowers like little cluster of petals placed at regular intervals on the beaded braid. So yes, now I was pretty happy, I had three design variations in three colors. I did a demo at an art center and everyone loved the bracelets. Lots of woman wanted to buy one, but they are samples not for sale... So next - time to write the manual.


Kumihimo with PIP beads


By the time I write a manual, I have already made the piece that will be in the tutorial many times. The process by then has been refined, all the production kinks are already out of the way. And while making the piece to be featured, I stop to take pictures and I write down the steps one by one. When that's done, I start over again and make another bracelet, but this time I simply follow the directions I wrote, and edit as I go. The goal is to make sure everyone can follow the steps.

This is not the way I used to write tutorials years ago. I have learned that doing it this way will save us lots of time in the long run. Less hassles for you, less questions, less emails for me to respond to...

So yes, I was all done ready for the final steps, an outside editor and the kit assembly... To assemble kits, cords have to be cut, beads measured and counted, clasp added, then it gets packaged and labeled. But late at night... 


Duo PIP Flower Design - Design 4

I decided to experiment once again with a new version of the flower design with a center bead and dual coated PIP beads, PIPs with one color on one side and another on the other side. 


So yes, the next design challenge, figuring out how to load the dual sided PIPs onto the cord to get them to face the right way... More charts, more spreadsheets, another addition to the tutorial, and three additional colors. I am finally done!


The flowers alternate, one with the transparent colored side up, the next with the metallic coated side facing us, and the flower has a bead at the center of each flower design.


Color Choices


And the colors with the dual sided PIPs...


You can find out more about this project HERE and if you interested in making these bracelets without having to spend the time experimenting, undoing and redoing... The 25 page manual, the kits with all the cord & beads, and tool bags are available at Marion Jewels in Fiber online store

I thought it would be nice to write about the process of creating a kit and a tutorial... and I could go on. I could speak about how the braid starts and endings evolved. The new way presented in this kit, not seen elsewhere, is so much easier and simpler than my early attempts. Simple and elegant seem simple, right, but that's when someone else has already done it and shows the way. Otherwise it is often only found after a long search. Simplifying is harder than it looks... You might have to get a kit or manual to understand what I am talking about. -Marion ;))

Oh, and read my next post comparing kumihimo to other beading techniques... It has newer pictures of the PIP bracelets.


Friday, September 21, 2012

Kumihimo with C-Lon and Beads - Samples

Braid shown coming out of the Disk
A while ago I noticed interest in kumihimo is often divided between fiber lovers and bead enthusiasts. Most of my customers when asking me questions about the best cord to use for their kumihimo first express their area of interest. Either it is all fiber, or all beads. I happen to love both so I went searching for ways to bring both into focus. 


Braid made with C-Lon Fine Weight Bead Cord

One of my first trial in this direction was a small braid done with C-Lon Fine Weight Bead Cord Tex 135 and Miyuki Size 11 Seed Beads. I used a Mini Kumihimo Beadsmith Disk, 4.5 inch in diameter and Small EZ-Bobs to hold the cord and beads. Gold was the only cord color chosen for the standard 8 strand round braid. The bead mix was added at random. The beads were added on all 8 cords at random.

The uniform color brings out the braid structure. A close up of the braid shows the segments with and without beads. The braid is 2mm in diameter. The look is delicate.

The plan is to make a bracelet, but as I only braid this sample as a demo, it is slow going as I have a number of braiding demos to choose from at shows. I will post a picture when it gets finished!


Another of my show samples is this 12 strand braid made with C-Lon Bead Cord. I also chose a uniform color scheme for this braid, Bronze, and Miuyki Duracoat Size 6 Beads. This sample braid shows some irregularity in the second segment. I will need to trouble shoot to se what exactly happened. I often braid at show on these sample pieces while talking to customers... so anything is possible. I may have to start all over, we will see.


12 Strand Braid with C-Lon Bead Cord

The 12 strand braid with the standard size of C-lon Bead Cord has about a 3mm diameter, so about the same diameter as an 8 strand round braid with C-Lon Bead Cord Tex 400. An 8 strand round braid done with the standard C-Lon Bead Cord measures about 2.5mm depending on tension.


12 strand and 16 strand round braids are set on the disk the same way as 8-strand braid, but place more cords on the disk and then braid counterclockwise each set of braids in sequence.


Set up for 12 strand braid

My next sample was made using knitted hand dyed rayon ribbon and Miyuki Size 6 beads added in sections. The sample was finished into a bracelet and a neckpiece. I wear them sometimes, and occasionally wear the necklace as a multiple pass bracelet. 

Sample Braid made with Variegated Hand Dyed Knitted Rayon Ribbon and Beads

Monday, May 28, 2012

Griffin Jewelry Silk Bead Cord - Making Your Own 2-Ply Cords out of Spools


Silk is traditionally the best material to use for stringing valuable beads such as pearls, coral, amber and jade. It is soft, strong and drapes well. It does not damage softer beads. The Griffin Jewelry Silk Bead Cord is made in Germany from 100% high-grade filament silk tightly twisted into a 3 ply cord. It is available in 13 colors created to coordinate with gemstones as suggested by their color names. It is a good silk to string beads, for bead crochet or any other projects requiring a strong high quality silk. It comes on spools with enough yardage for many projects.
Griffin Silk Cards


Griffin 100% Natural Silk is usually available on cards as a 2-ply cordon with a needle attached to its end. The cards are only 79 inches (2 meters) long. It is often too short for longer necklaces and for application needing longer cords such as bead crochet. One of the way to get around this, is to make your own cordon.

Use the Griffin Jewelry Silk to make your own 2-ply cordon, add a collapsible needle and get what is available on a Griffin Silk Card but with the exact length you need for your project. A cordon is a two-ply made with a cord, twisting in the same direction of the cord. So since the Griffin Jewelry Silk 3-ply cord is twisted counterclockwise, make sure to twist in the same direction as shown in the illustration below. For references as to size comparison check this post > Griffin Silk - Spools vs Cards


I find the easier way to make a 2-ply cord is with at least two stationary hooks. Tie one end of the cord to the first hook. Wrap the cord around the second hook. The tie the end to the hook on your mini-twister or your cordless drill. Twist the cord counterclockwise until it starts kinking. Fold it onto itself. Tie it together and let is twist clockwise by itself. If you need a needle, attach the needle before laying the odd together and place it at the center hook, where the cord will fold onto itself.


Two-ply cord can be made out of many different types of cords, not just the Griffin Silk. The mini-twister or corder shown above is a good hand tool to use. Reversible drills with a hook attached are best for long cords.

If you are interested to make 3 and 4-ply cords, check the Learn Cord Making Tutorial and Tool Kit. The tutorial is available by itself for $10.00 and it has direction on how to make the tools needed for the project, or you can get the tool kit for an additional $15.00.

Let me know if you found this info useful, or if it needs clarifications. Best, - Marion

> Griffin Jewelry Silk by the Spool

> Tools for Cordmaking


Tuesday, February 28, 2012

Set up to Demo the Leather Wrap Bracelet..


Lacis Macrame Board with a Bead Mat Covering


Here is the set up I used to demo the leather wrap bracelet at Stitches this weekend. The Lacis macrame board has several slits at the end of board. They are perfect to hold the ends of the leather in place. I used T-pins to hold the loop in place and empty bead tubes to raise the leather off the bead mat for easy access.

Close up showing how the pins are placed

Hey I am getting close... only a few more beads to add!


Close up... Demo showing the Confetti & Capri color combo


Monday, February 6, 2012

Leather Wrap Bracelets with Miyuki Tila Beads

I first heard of leather wrap bracelets or bead ladder bracelets a few years ago when customers asked my advice for the best cord to use for these bracelets. Ultimately I had to test the cords myself and play around with the concept. As a rule, I do not check how others approach a specific project, I prefer to work out my own technique. Adding beads with a wrap leather construction is a traditional Egyptian design, but its latest rendition has a few modern twists... So I started making some test bracelets with leather cord, beads I had around, such 6mm gemstones beads, fresh water pearls, Miyuki Size 6 Seed beads and a variety of cords from C-Lon Fine Weight Bead Tex 135, C-Lon Micro Cord and C-Lon Bead Thread Size D. I took them to my shows as I always like to test my customers responses and kept selling them without getting a chance to take any pictures. My friends and family all wanted them too, so I kept making more bracelets... It gave me a chance to refine my techniques.

Confetti & Light Purple
Along the way I decided to try some with Miyuki Tila beads. First I made my own mixes, with some iridescent, some flat and some metallic Tila beads, then matched the mixes with Greek leather and C-Lon Bead Thread Size D. The Miyuki Tila beads have nice smooth holes, but they are small. The C-Lon Bead thread Size D fits well through the bead holes especially with the use of English embroidery beading needles. I prefer these needles over the standard English beading needles as they are shorter and they have a blunt end, less likely to split the thread and damage it. A light application of beeswax over the thread is also helpful.

For the button closure, I adopted a bead rondelle instead of the more traditional metal button: Black Horn, Golden Horn, Frosted Quartz and Frosted Black Quartz mostly, with a size 6 Miyuki seed bead as final decoration.

Tila beads are flat, light and very smooth. They measure 5mm x 5mm x 1.9mm and they have 2 parallel holes about 0.8mm wide. They are a new shape of glass beads made by Miyuki. They remind me of little mosaic tiles found in Europe, especially in high end Italian bathrooms, but miniaturized. They have been described as chiclets shaped, I don't get that. I guess you would have to get a bubblegum color... just kidding.

The Tila beads make a very light bracelet, comfortable to wear especially when paired with a button made out of horn. Get a kit to get a jump start and make your own. These bracelets are fun, easy to wear and addictive, plus they can be stacked!

> Wrap Leather Bracelet Kits with Tila Beads
> Leather Supplies
> Set Up to Demo the Wrap Bracelet with good closeup pictures! 


Material included in the kit... in the Green Patina & Natural combo, enough to make 3 bracelets.


Wednesday, December 7, 2011

Playing with Kumihimo, Ribbon, Magatamas & C-Lon Bead Cord - Update


I just got the last skeins of nylon ribbon available from a New Mexico artist who has since retired and some rayon skeins from an artist in New York State. It is fun to create bead mixes for the ribbon colors. The names of the kits are evocative. 

Coffee & Denim (shown above) is made with rayon ribbon and the C-Lon Bead Cord Sepia. The bead mixes includes 4mm Magatamas in the following colors: Metallic Dark Blue Iris, Gunmetal, Matte Transparent Light Grey & Metallic Dark Bronze. Fine Micro/Nylon #69 cord is included to prepare the ends for insertion into a sterling silver clasp provided in the kit. 
Hand Dyed Ribbon from New Mexico, Magatamas Beads, C-Lon Bead Cord, Micro Cord & Sterling Silver Clasps

Amethyst & Silver Haze (shown on the left) has in addition some platinum tones. Five different types of beads create a lively mix. The C-Lon Bead Cord included is Lavender. 

Santa Fe Sunset (shown in the center) is just like its name... The bead mix is made up of four different types of Magatamas. The color of C-Lon Bead Cord is Sienna.

Sea Green, Lime & Purple (shown on the right) has lovely tones, but blues and greens are so touchy. The blues especially need to be exactly the right shades. I ended up ordering a bunch of new blue beads but none of them worked... so the mix is made up of greens, dark metallic blues (already in stock), bronzes. The color of the C-lon Bead Cord is Sage. 

Cornflower (shown below) is made with rayon ribbon, a bead mix that includes 7 bead colors and C-Lon Bead Cord - Capri. 

All the kits include directions, a sterling silver clasp, the fine micro cord for finishing the braids. A tool kit is optional. 

A limited number of the colorways shown above are now available > New Kumihimo Ribbon & Bead Kits


Saturday, April 9, 2011

Tips: How to Cut C-Lon Bead Cord and Get Rid of the Curls


This picture shows all four sizes of C-Lon Bead Cord and the
sizes of Miyuki beads that can be strung onto the cord using a beeswax self needle. See one of my earlier blog about the best way of loading beads onto cord. From left to right:
- C-Lon Tex 400 Bead Cord with Miyuki E's (twice/2x), 6/0s, and 8/0s

- C-Lon Bead Cord with Miyuki 6/0s (2x), 8/0s, and 11/0s
- C-Lon Fine Weight Cord with Miyuki 8/0s (2x), 11/0s, and 15/0s

- C-Lon Micro Cord with Miyuki 8/0s (2x), 11/0s, and 15/0s


C-Lon Bead Cord and to a certain extend C-Lon Tex 400 Bead Cord, the 'heavyweight bead cord', tend to curl. This can be especially annoying when working with micro macrame, as it makes the process of finding the right cord to work with more daunting especially when working with a multitude of cords. For applications such a crochet, knitting or kumihimo with EZ-Bobs, the cord having a memory of being on the spool all curled up does not matter. For anyone wanting the curls to go away, several solutions come to mind.

No More Curls Methods
  1. When unwinding the thread, give it a pull one arm's length at a time.
  2. Cut the cord the day before and add a weight to the ends overnight.
  3. Steam the cord.
  4. Iron the cord with a warm iron - a hot iron will damage the cord.
I use method #1 when stringing beads and method #4 when doing micro macrame and Cavandoli knotting. I have not tried the method 2, & 3, but they have been suggested by readers of my newsletters.

Alternative Method
Here is a another good method for micro macrame and Cavandoli knotting, when you need multiple cords, all of the same length. I use this method for workshops or when I plan my work a day ahead of time.
  1. Set up 2 winding posts, warping posts or cup hooks set into pieces of wood attached by a C-clamp to fixed positions at the distance desired for your cord ends.
  2. Attach the cord to the post/hook on your left (post/hook #1).
  3. Unwind the cord towards the second post/hook and give it a hard pull.
  4. Wind it around the second post/hook on your right (post/hook #2).
  5. Return to post/hook #1, unwinding, giving a hard pull and wind the cord around #1.
  6. Repeat steps 3-5 however many times until you have the desired number of cords.
  7. Tie the end back at post/hook #1.
  8. Optional - Let the cord sit on the posts/hooks overnight.
  9. Cut the cords at post/hook #1. Hold the cords by their fold at post/hook #2.
Example: For cords 48 inches long, folded in half, both ends (2 ends) will be 24 inches long. So set up your posts/hooks 24 inches apart and cut he cord only at one of the posts/hooks.

Best with your creative projects! - Marion

To purchase C-Lon Bead Cord > Marion Jewels in Fiber Store

Note on Ironing C-Lon Bead Cord
Use a warm setting. The lowest setting on my iron is acetate/nylon. I tested it with 6 - 48 inches long cords folded in half (24 inches long from fold/loop to ends). For speed I raise the setting to polyester, but then you need to iron quickly. Do not leave the iron in one spot with higher heat setting. Nylon will melt!

Blocking? More on the Knitted Bracelet...

When writing the pattern for the Knitted Bracelet with C-Lon Bead Cord & Pearls, my assistant offered to block one of my bracelet. I did not know much about blocking, but she insisted that it made all the difference and gave knitted goods a professional look. She offered to block a few knitted samples we had done with C-Lon Tex 400 and one of the bracelets knitted with C-Lon Bead Cord. She used wet blocking for the bracelet letting it dry overnight pinned in place, and steam blocking for the Tex 400 samples. Of course since bonded nylon has a mind of its own, it was totally unaffected by the blocking process.

Blocking knitting is a simple technique used mostly by professional knitters and knitting aficionados. The piece of knitting is pulled and stretched into the right shape, laid flat, and pinned in place. Then several methods can be used to actually block the knitted fabric: wet blocking, steam blocking, or spray blocking.

Regardless of the method chosen, the fabric can be shaped first, then pinned, then moistened, steamed or sprayed last. The sequence can be changed by wetting, steaming or spraying first, then shaping and pinning, then letting it dry. This process, if well done, makes the knitted pieces more even, making it easier to seam them together into garments. It evens the stitches out making them look more regular. It helps the knitted pieces hold on to their shapes.

Still intrigued by the idea of blocking the bracelet made with bonded nylon, I decided to experiment... by blocking with rubbing alcohol (see my blog about bond). So after first checking that alcohol did not affect the fresh water pearls, I was ready to test this process and isopropyl alcohol turned out to be the perfect blocking agent for bonded nylon.

To block your knitted bracelet, you will need the following tools:
  • A Macrame Board (a project board with measuring lines or a Lacis Board and a ruler)
  • 1 1/4 " Steel T-Pins
  • Isopropyl Rubbing Alcohol
  • Cotton Swabs (Q-tips) or Small Rag (in color similar to the item you are blocking)


Process:
Pin the bracelet right side up (with pearls up) to the board using the line or a ruler to shape the body of the bracelet into an even shaped rectangle. Pin the triangle leading to the donut button and the loop. Then after dipping the cotton swab into alcohol, dab the knitted nylon in between the pearls evenly. Let it dry. Remove the T-pins. The bracelet should now be nice and flat. If a bit stiff just shake it to loosen. It will loosen regardless as you wear it.

For more info on the knitted bracelet -> Knitted Bracelet with C-Lon Bead Cord & Pearls
To purchase a macrame board and T-pins -> www.store.jewelsinfiber.com/tools.html
To read more about blocking knitted items -> To Block or Not to Block...

Saturday, January 15, 2011

Knitted Bracelet with C-lon Bead Cord & Beads


While exhibiting at Stitches West as a vendor, I got many inquiries about knitting with C-Lon Bead Cord. Everyone wanted to see samples, so I proceeded to knit some, among them a bracelet with pearls. Then at the next show, equipped with samples, I got requests for the pattern for the knitted bracelet.

As I am getting ready for my third Stitches West 2011 in Santa Clara, in February, I will share my experience knitting with C-Lon Bead Cord and beads. I highly recommend using the Kollage Square Needles for knitting with C-Lon Bead Cord or any Bonded Nylon, it really helps prevent cramping of the hands. Bead & Tools Kits as well as the Kollage Square needles are available for purchase in my online store.

Since the first sample bracelet, I made a second one while in vacation in Mexico for my mother's birthday, then my aunt saw it and she wanted one... I have made many since then, all with fresh water pearls, natural or dyed, and gemstone chips. This pattern can be adapted to other types of beads.
Try it, have fun, and experiment! - Marion


Materials:
5-7mm Fresh Water Pearls
25 mm Donut
1 4-5 mm Small Rondelle
1 spool of C-Lon Bead Cord

Tools

2 Kollage Square Needles US Size 1 / 2.25 mm (DPN-7 inch long)
1 Kollage Square Crochet Hook US Size A / 2.00 mm
1 Tapestry Needle Size 22
1 EZ-Bob Small (Optional)
Scissors
Super Max Thread Burner (Optional)

Thread Conditioners & Adhesives
Beeswax
Fray Check or Poly Zap Super Glue (Optional)

Note: Once knitted in each bead will sits right in between two stitches. To really show the beads off, purl right before and right after inserting the bead. I also recommend working right off the spool rather than cutting the amount of thread needed before hand.

Step 1. Loading Beads
Wax the end of the thread right off the spool with the beeswax. Make a self needle by shredding the cord with the back of scissors. Re-wax several times. Cut the cord at an angle and twist the end. Load all the beads, re-waxing and/or remaking the self needle when necessary. For post on self needle made with beeswax, go to this post here and check the last option.


Step 2. Bracelet Body
Cast on 10 stitches loosely using the long-tail method and leave a 12 inch tail - it will be used for the button loop later on. Optional: wind the end on a small EZ-Bob.

Then knit the body of the bracelet with the following pattern:

Pattern:
Row 1: Purl
Row 2: * Knit 2, Purl 1, Slide Bead in, Purl 1, Repeat once* and Knit 2.
Row 3: Purl
Row 4: *Knit 1, Purl 1, Slide Bead in, Purl 1, Repeat twice* and Knit 1.

Repeat Row 1-4 ending with Row 2 until the body of the bracelet is the right length. See note on bracelet length below.

Step 3. Bracelet End
Decreasing stitches - continuing with a stockinette stitch:

Row 1: Purl the first 2 stitches together, purl the stitches in between, and purl the 2 last two stitches together.
Row 2: Knit
Repeat Row 1-2 until you have just 2 stitches left. Bind off the last 2 stitches leaving a 12 inch tail when cutting the cord.

Step 4. The Button
Pull the Donut/Button in place, by first pulling up right past the bead, then pulling the cord past the rondelle. With the tapestry needle stitch the cord in and out of the knitted end ending on the right side, right behind the donut/button. Knot off or bind the cord and weave in the end. Or another option is to burn the end of the cord using a thread burner and add a dab of Fray Check or Poly Zap for security. (The pdf version available with the bead kits includes a diagram.)

Step 5. The Buttonhole Loop
Use the cord tail (from Step 1) and crochet hook. Starting at the corner, attach the first stitch right into the knitting. Continue using a single chain stitch and work to the desired length (1" 1/4 for a 25 mm donut). Insert the crochet hook into the knitting right at the corner and draw the cord through. With a tapestry needle reinforce the binding. Knot or bind the cord and weave in the end, or burn the end and add a dab of Fray Check or Poly Zap for security.


Notes:
Casting on: Cast on loosely. As bonded nylon has no stretch, if you cast on too tightly, it will be difficult to knit the first row. The first row in this project is purled as it is a bit easier to catch the cast-on stitches when purling.

Bracelet Length: If the donut/button measures 1 inch in diameter, your wrist is 7.5 inches in diameter, you will need to make the body of the bracelet about 6.5 inches long. Even though the bracelet is knitted with bonded nylon and bonded nylon has no stretch, knitting tends to stretch a bit once it is worn so make allowances when measuring.

Alternative to Attach Donut/Button: Use a coated beading wire such as Softflex and crimp.

Want to Block the Bracelet? Go HERE for this info.

Shop for Bracelets Kits, Kollage Square Needles and get a printed pdf of this pattern: http://www.store.jewelsinfiber.com/knit.html

This information is for your personal use and enjoyment only. You are of course welcome to refer to this website. Thank you for your understanding! - Marion

Please do not copy or reproduce this information for commercial purposes without prior authorization. All rights reserved © 2010-17 by Marion Hunziker- Larsen.

Wednesday, November 3, 2010

Tips: Best Ways of Loading Beads onto Cords

I get several emails a week asking me for the best way to load beads onto nylon bonded cord such as the C-Lon Cords or Nylon #18.

Here are some suggestions:
  • Big eye needles
  • Tapestry Needles or Beading Needles preferably with blunt ends such as bead Embroidery Needles - Size depending on the cord and beads sizes
  • Collapsible needles such as a Griffin needles
  • Threaders such as fine cord to pull your cord through. For example using C-Lon Micro Cord to pull through C-Lon Bead Cord. You can also use a needle attached to the threader or make a self needle with the threader.
  • Self needles using Fray Check by dipping or rubbing some Fray Check onto the end of the cord. Let dry overnight or at least for a few hours. Cut the cord at an angle and use it as a needle. Re-cut at needed.
  • Self needles with beeswax. Shred the cord with the blade of a scissor or a razor blade. Wax it. Shred it again and wax it until you get a nice point. Cut the end at an angle. Roll it with you fingers into a nice point.
The first 4 methods let you insert the beads with an actual needle, so they can be a bit faster than self needles. But since you also have to get the folded cord through the bead, it is sometimes too bulky for finer beads or thicker cords.

Loading beads with a self needle is best for beads with fine holes such as pearls, or when you wish to insert more than one cord into a bead.


Beeswax has several advantages over the Fray Check method. The beeswax does not require waiting for drying time. Fray Check tends to thicken the cord, whereas the beeswax self needle with a little practice gets the cord into a fine point that can get through finer beads than any of the other methods described above.

Note: Not all beeswaxes are equal. Some are sticky as they have too much residue left inside. My beekeeper tells me that the beeswax quality also depend on the bees diet. His thrive on a varied diet from the hills of the California coastal range from South San Francisco to the Santa Cruz Mountains, making his beeswax nice and hard. I leave mine close to a light so it soften a bit with heat, and applies more easily to the cord. Then it can harden right onto the cord making a sturdy self needle.

Of course in the end it is best to try all the different methods, find your personal preferences and your favorite way for specific projects!

Tuesday, November 2, 2010

Playing with Kumihimo Braids


I first encountered the name 'kumihimo' in 1978 at a show when the Kliots, textile specialists from Berkeley exclaimed in front of my exhibit that I was doing kumihimo. I had learned my braiding techniques from a sailor's book on knots. Upon their recommendation, I got their booklet, the first publication in English on kumihimo and a marudai.  I tried the marudai but I preferred braiding by hand. I have since played with the disk, mostly for fun...


In July at Convergence in Albuquerque I picked up some hand dyed ribbon with gold metallic to play with. I incorporated this ribbon, C-Lon Bead Cord and 4mm Miyuki Matagamas beads and finished the ends with sterling silver end clasps. The way the Magatamas beads stick out of the braid is fun, but of course you can do this type of braids with regular seed beads.


Materials: Rayon Ribbon, C-Lon Bead Cord, C-Lon Micro Cord, 4mm Miyuki Magatama Beads, 5.8mm inside diameter Kumihimo Sterling Silver End Clasp

Tools: 1 Kumihimo Disk, 8 Small E-Z Bobs, 1 Big Eye Needle, 1 Mini-Clamp, Scissors, Gardening Shears or Heavy Duty Scissors, Poly Zap Super Glue.

Here are the basic steps:

1. Lay 7-strand of ribbon and 1 strand of C-Lon Bead Cord loaded with beads.
For the first braid shown in the foreground, I used 7 strands of ribbon
following the dye variations of the ribbon fairly closely so the ribbon strand would shift color at about the same time and 1 strand of C-Lon Bead Cord Medium Purple on which I inserted Magatama beads. I used a mix of two colors: Matte Black AB and of Metallic Dark Blue Iris from Caravan Beads (10 g. tube each). I loaded them at raandom, half of the beads onto the cord with a big eye needle and half way through the braid when I run out, I added the rest.

2. With a piece of C-Lon Micro Cord, tie all the strand together and wrap the end with a tight cork screw type of wrap, finished by a few half-hitches. This end is now ready for the end clasp. Clip the end with a mini-clamp.

3. Lay the 8 strands (7 ribbon strands, 1 C-Lon Bead Cord with the inserted beads) onto the Kumihimo Disk and insert them into the slots.

4. Wrap all the strand individually onto the small E-Z Bobs. For the C-Lon Bead Cord strand with beads have most of the beads inside the E-Z Bob with a few left on the outside ready to pop into the braid.

4. Braid using the very basic 8-strand round braid. After the first half inch, slide a bead in every time when braiding with the C-Lon Bead Cord and 'catch' the bead right behind the last strand.

5. Continue until desired length is achieved, leaving the last half inch without beads. Tie with a piece of C-Lon Micro Cord with a few half-hitches.

6. Remove from disk and make a tight cork screw wrap with the C-Lon Micro Cord, finished with a few half-hitches.

7. Glue the ends with Poly Zap Superglue after making sure the ends diameter fits into your end clasps.

8. Cut the ends with shears right into the glued area.

8. Glue into the end clasps.


Variations with 2 Strands of C-Lon Bead Cord with Beads:

The center braid was done with 6 strands of variegated rayon ribbon with gold metallic accent, 2 strands of C-Lon Bead Cord and 4mm Miyuki Matagama beads.
I chose Indigo C-Lon Bead Cord with Matte Light Topaz Magatamas and Celadon C-Lon Bead Cord with Matte Sea Glass Green Magatamas interspersed at random with occasional Matte Black AB Magatamas to add a bit of interest. I laid the C-Lon Bead Cord originally on two adjacent quadrants next to each other on the right of #32 and the left of #8.


Note about the basic round braid: The basic round braid is made by setting up your strands on the two slots on each side of #32, #8, #16 and #24. Then facing #32, move the bottom left strand up on the left of #31, the right strand down to the right of #15. Then turn the disk counterclockwise a quarter turn (90ยบ) and repeat the same movement: bottom left up, top right down without crossing the center line... and turn the disk counterclockwise... and repeat... bottom left up and top right down... turn counterclockwise...

With this braid once you get started, you do not need to pay attention to the numbers. The strands will actually turn around the disk.

If you stop, either leave 3 strands up to find quickly where to continue or just look at the center to see which 2 strands were the last ones to cross over and continue with the opposite group.

You can make this braid without the beads. One of my customer sent me a picture of a braid made without the beads with a central focal beads made by a local lampwork artist. I lost it in my inbox. As soon as I find it I will post it!

A limited number of Hand Dyed Rayon and Metallic Ribbon, C-Lon Bead Cord & Bead Kumihimo Kits are now available > New Kumihimo Ribbon & Bead Kits