Showing posts with label Crochet. Show all posts

Wednesday, August 27, 2014

The Princess Warrior Bracelet Collection

Variations of the Princess Warrior Bracelet - Golden Flowers done with C-Lon Bead Cord in Black & Tan,
Gold Miyuki Duracoat Galvanized Beads and Italian Metal Buttons


This is the next step up from the Turkish Flat Bead Crochet Bracelet. The Turkish Flat Bead Crochet is patterned after Turkish Oya, the beautiful crochet trims found mostly around scarves edges in Anatolia. 

This new bracelet is an original design. I have never seen it done anywhere, although that does not mean someone else did not stumble on this same design elsewhere. This wider bracelet is made with C-Lon Bead Cord and Miyuki 6/0 beads, whereas the Turkish Flat Bead Crochet Bracelet is made with C-Lon Bead Cord Tex 400 and 5/0 beads. This sophisticated bracelet is reminiscent of armor, the Viking or Greek, "Princess Warrior" look, so I decided to keep this collection with metallic beads. The kits are made with Miyuki duracoat galvanized beads and include Italian metal buttons collected over time. The duracoat finish gives the Miyuki beads a durable metallic coat, so you can expect the bracelet to last over time.

Princess Warrior Bracelet - Golden Flowers Bead & Button Pack & Spool of C-Lon Bead Cord 

Several of the bracelets I have been wearing are earlier prototypes made as I was refining the techniques to create the final bracelets. The final design adopted for this bracelet tutorial minimizes stretch, wear well over time, and includes technical aspects that will help if ever the buttons need to be moved, restitched, or the button loops repaired.

Picture from the tutorial

Once the final design was selected, I photographed each of the steps while making the bracelet. The next step was to make a second bracelet while writing the instructions and looking at the photos. Then, I revised the written instructions accompanying the photos, while making a third bracelet.  The full tutorial is a 15 page PDF document with over 20 large pictures. A paired and scaled down printed version comes with the kits and the larger PDF version is sent by email. Both include the Turkish Flat Bead Crochet Mantra, an easy way to remember the pattern. 


Princess Warrior Bracelet - Silver Zuni Circles Bead & Button Pack & Spool of C-Lon Bead Cord 

Matching materials for these kits has been a challenge. I can attest to it by the number of bead finishes and buttons I purchased over time that did not make the final cut. Most of the Italian buttons used in these kits are no longer available, so the number of kits available is limited to the stock on hand.


Princess Warrior Bracelet - Bronze Double X

While wearing the earlier and final versions of this bracelet at shows, shops, restaurants, I have gotten lots of comments from people at large. This bracelet attracts lots of attention from a wide range of people of all ages, so make one for yourself, one for your daughter, or some for friends.


Princess Warrior Bracelet - Pewter Bindu Circles 

Design variations can be done by adding attached elements, by changing the width of the bracelets and of course by altering colors, beads, and buttons. 

Princess Warrior Bracelet - Antique Copper Flowers

The Antique Copper Flower Bead & Button kit is the only one that comes with newly produced copper buttons. These flower buttons are a traditional button design. The Bronze Double X comes with Bronze Metallic Miyuki Beads Size 6 - the metallic finish on these beads is more susceptible to darkening over time than the Duracoat finishes. 

Complete Princess Warrior Kit with the Tool Bag including a Super Max Thread Burner
Bead & button packages are also available for the simpler version of this bracelet made with C-Lon Bead Cord Tex 400 and Miyuki Seed Bead Size 5.

Get kits, bead & button packages, and the tutorials > Turkish Flat Bead Crochet & Princess Warrior Bracelet Kits

Sunday, June 1, 2014

What I am working on - a sneak preview...


After several false starts, many pieces started and taken apart, materials not working out perfectly - button and beads not matching well enough, I am finally getting closer to finishing designing a new kit.  This process was halted for over a year when life got in the way in a major way. Now things are settling down and there is once again the time and desire to work on new designs. Here is one of the project I am working on. 


It is Turkish Bead Crochet taken to the next step. The concept came to me while experimenting with possibilities - I have not seen nor copied any designs I saw, nor is the concept a traditional approach as far as I know. The kit will include the instructions, the beads, buttons and the cord as well as recommendations for the best crochet hooks and tools for the project.  


I am just waiting for a few additional beads to arrive to make the final prototypes, then I will choose the best pieces and they will be made into kits.

Hints, the kits will have a fair amount of metallic beads & buttons. 


Wednesday, October 24, 2012

Turkish Flat Bead Crochet with C-Lon Tex 400 Bead Cord


A while ago, I was asked if C-Lon cord would work for Turkish Flat Bead Crochet. I had never heard of Turkish crochet, so I kept it in mind for future research. At the last Pacific International Quilt Festival - PIQF in Santa Clara a few weeks ago, I run into Eilene Cross, a teacher of this craft. She was wearing a neckpiece done with this technique with yarn and decided to try the same design with C-Lon Tex 400 Bead Cord, the heaviest C-Lon Bead Cord. She got a spool and returned to the show to show me her work in progress.


In this close up picture you can see the pattern created by the Turkish Flat Bead Crochet made with Green C-Lon Bead Cord. The background is made of spools of the standard C-Lon Bead Cord...


Eilene came back the next day with her neckpiece completed. She is a lovely person and I decided to take her class. She has a class this Saturday, October 27 at the Lacis Museum of Lace and Textile from 10:30 to 5:30.

Unfortunately I found out yesterday that I have a schedule conflict and will not be able to attend the class. So yesterday evening, slightly upset, I ended up researching Turkish crochet patterns on my own. Here are the first few bracelets I have done with this technique since.

C-Lon Tex 400 Bead Cord, Miyuki Seed Beads Size 5 and 6, a Kollage Square Crochet Hook Size B, some Vintage Italian buttons and voilĂ ...

- > Bracelet Tutorial

- > C-Lon Tex 400 Bead Cord - C-Lon Tex 400 Bead Cord is available in 56 colors now. 16 new colors are arriving soon, bringing the color choices up to 72!


To follow up - I would like to experiment with thinner sizes of C-Lon Bead Cord and gemstone beads... mix it up with other techniques, play around further... see what else I end up with. Also do more research on Oya - Turkish needle lace and crochet... In the meantime these bracelets are fun... and will make nice gifts.

As to the type of crochet being used on these bracelets, it is all standard stitches, slip, chain and single crochet stitches. It is known as Turkish Flat Bead Crochet because it is a traditional pattern used in Anatolia. This region in Turkey is renown for its Oya - needle lace and crochet with beads trims done around scarves. 


Monday, May 28, 2012

Griffin Jewelry Silk Bead Cord - Making Your Own 2-Ply Cords out of Spools


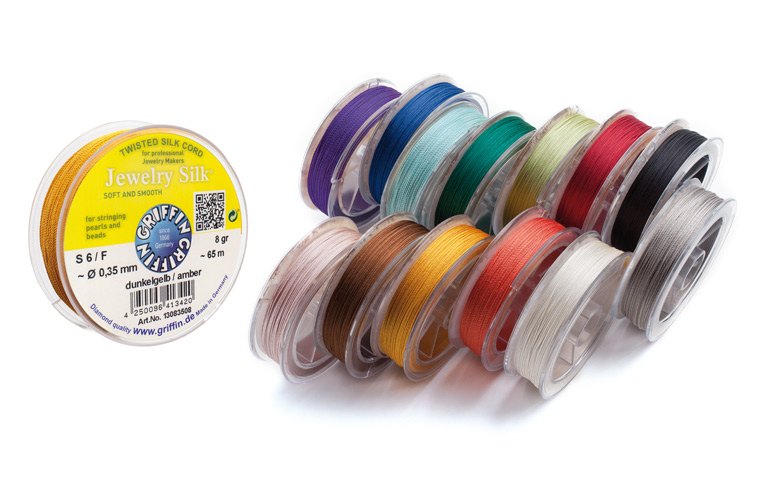
Silk is traditionally the best material to use for stringing valuable beads such as pearls, coral, amber and jade. It is soft, strong and drapes well. It does not damage softer beads. The Griffin Jewelry Silk Bead Cord is made in Germany from 100% high-grade filament silk tightly twisted into a 3 ply cord. It is available in 13 colors created to coordinate with gemstones as suggested by their color names. It is a good silk to string beads, for bead crochet or any other projects requiring a strong high quality silk. It comes on spools with enough yardage for many projects.
Griffin Silk Cards


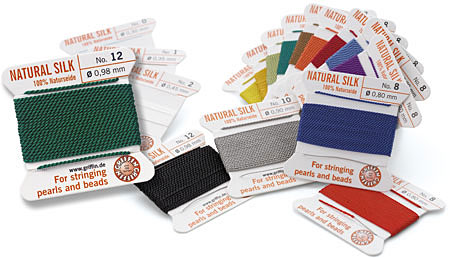
Griffin 100% Natural Silk is usually available on cards as a 2-ply cordon with a needle attached to its end. The cards are only 79 inches (2 meters) long. It is often too short for longer necklaces and for application needing longer cords such as bead crochet. One of the way to get around this, is to make your own cordon.

Use the Griffin Jewelry Silk to make your own 2-ply cordon, add a collapsible needle and get what is available on a Griffin Silk Card but with the exact length you need for your project. A cordon is a two-ply made with a cord, twisting in the same direction of the cord. So since the Griffin Jewelry Silk 3-ply cord is twisted counterclockwise, make sure to twist in the same direction as shown in the illustration below. For references as to size comparison check this post > Griffin Silk - Spools vs Cards


I find the easier way to make a 2-ply cord is with at least two stationary hooks. Tie one end of the cord to the first hook. Wrap the cord around the second hook. The tie the end to the hook on your mini-twister or your cordless drill. Twist the cord counterclockwise until it starts kinking. Fold it onto itself. Tie it together and let is twist clockwise by itself. If you need a needle, attach the needle before laying the odd together and place it at the center hook, where the cord will fold onto itself.


Two-ply cord can be made out of many different types of cords, not just the Griffin Silk. The mini-twister or corder shown above is a good hand tool to use. Reversible drills with a hook attached are best for long cords.

If you are interested to make 3 and 4-ply cords, check the Learn Cord Making Tutorial and Tool Kit. The tutorial is available by itself for $10.00 and it has direction on how to make the tools needed for the project, or you can get the tool kit for an additional $15.00.

Let me know if you found this info useful, or if it needs clarifications. Best, - Marion

> Griffin Jewelry Silk by the Spool

> Tools for Cordmaking


Saturday, January 15, 2011

Knitted Bracelet with C-lon Bead Cord & Beads


While exhibiting at Stitches West as a vendor, I got many inquiries about knitting with C-Lon Bead Cord. Everyone wanted to see samples, so I proceeded to knit some, among them a bracelet with pearls. Then at the next show, equipped with samples, I got requests for the pattern for the knitted bracelet.

As I am getting ready for my third Stitches West 2011 in Santa Clara, in February, I will share my experience knitting with C-Lon Bead Cord and beads. I highly recommend using the Kollage Square Needles for knitting with C-Lon Bead Cord or any Bonded Nylon, it really helps prevent cramping of the hands. Bead & Tools Kits as well as the Kollage Square needles are available for purchase in my online store.

Since the first sample bracelet, I made a second one while in vacation in Mexico for my mother's birthday, then my aunt saw it and she wanted one... I have made many since then, all with fresh water pearls, natural or dyed, and gemstone chips. This pattern can be adapted to other types of beads.
Try it, have fun, and experiment! - Marion


Materials:
5-7mm Fresh Water Pearls
25 mm Donut
1 4-5 mm Small Rondelle
1 spool of C-Lon Bead Cord

Tools

2 Kollage Square Needles US Size 1 / 2.25 mm (DPN-7 inch long)
1 Kollage Square Crochet Hook US Size A / 2.00 mm
1 Tapestry Needle Size 22
1 EZ-Bob Small (Optional)
Scissors
Super Max Thread Burner (Optional)

Thread Conditioners & Adhesives
Beeswax
Fray Check or Poly Zap Super Glue (Optional)

Note: Once knitted in each bead will sits right in between two stitches. To really show the beads off, purl right before and right after inserting the bead. I also recommend working right off the spool rather than cutting the amount of thread needed before hand.

Step 1. Loading Beads
Wax the end of the thread right off the spool with the beeswax. Make a self needle by shredding the cord with the back of scissors. Re-wax several times. Cut the cord at an angle and twist the end. Load all the beads, re-waxing and/or remaking the self needle when necessary. For post on self needle made with beeswax, go to this post here and check the last option.


Step 2. Bracelet Body
Cast on 10 stitches loosely using the long-tail method and leave a 12 inch tail - it will be used for the button loop later on. Optional: wind the end on a small EZ-Bob.

Then knit the body of the bracelet with the following pattern:

Pattern:
Row 1: Purl
Row 2: * Knit 2, Purl 1, Slide Bead in, Purl 1, Repeat once* and Knit 2.
Row 3: Purl
Row 4: *Knit 1, Purl 1, Slide Bead in, Purl 1, Repeat twice* and Knit 1.

Repeat Row 1-4 ending with Row 2 until the body of the bracelet is the right length. See note on bracelet length below.

Step 3. Bracelet End
Decreasing stitches - continuing with a stockinette stitch:

Row 1: Purl the first 2 stitches together, purl the stitches in between, and purl the 2 last two stitches together.
Row 2: Knit
Repeat Row 1-2 until you have just 2 stitches left. Bind off the last 2 stitches leaving a 12 inch tail when cutting the cord.

Step 4. The Button
Pull the Donut/Button in place, by first pulling up right past the bead, then pulling the cord past the rondelle. With the tapestry needle stitch the cord in and out of the knitted end ending on the right side, right behind the donut/button. Knot off or bind the cord and weave in the end. Or another option is to burn the end of the cord using a thread burner and add a dab of Fray Check or Poly Zap for security. (The pdf version available with the bead kits includes a diagram.)

Step 5. The Buttonhole Loop
Use the cord tail (from Step 1) and crochet hook. Starting at the corner, attach the first stitch right into the knitting. Continue using a single chain stitch and work to the desired length (1" 1/4 for a 25 mm donut). Insert the crochet hook into the knitting right at the corner and draw the cord through. With a tapestry needle reinforce the binding. Knot or bind the cord and weave in the end, or burn the end and add a dab of Fray Check or Poly Zap for security.


Notes:
Casting on: Cast on loosely. As bonded nylon has no stretch, if you cast on too tightly, it will be difficult to knit the first row. The first row in this project is purled as it is a bit easier to catch the cast-on stitches when purling.

Bracelet Length: If the donut/button measures 1 inch in diameter, your wrist is 7.5 inches in diameter, you will need to make the body of the bracelet about 6.5 inches long. Even though the bracelet is knitted with bonded nylon and bonded nylon has no stretch, knitting tends to stretch a bit once it is worn so make allowances when measuring.

Alternative to Attach Donut/Button: Use a coated beading wire such as Softflex and crimp.

Want to Block the Bracelet? Go HERE for this info.

Shop for Bracelets Kits, Kollage Square Needles and get a printed pdf of this pattern: http://www.store.jewelsinfiber.com/knit.html

This information is for your personal use and enjoyment only. You are of course welcome to refer to this website. Thank you for your understanding! - Marion

Please do not copy or reproduce this information for commercial purposes without prior authorization. All rights reserved © 2010-17 by Marion Hunziker- Larsen.

Friday, January 14, 2011

Knitting with Square Needles: Innovation or Gimmick?


When I first heard about a new kind of knitting needle on the market, Kollage Square Needles, I thought it was gimmicky. I had just completed my first knitted bracelet with C-Lon Bead Cord and was telling a friend with a lot more knitting experience that the small needles were hard to hold and gave me cramps. She thought these new needles might be the perfect solution and convinced me to try them.

The more I thought about the concept of a square design for a needle the more sense it made. We do not realize when knitting that we are constantly compensating for the needles turning and twisting thereby putting stress on our hands. We then set about trying to locate some to try and had no success at our local knitting stores.


While at Stitches West last year, we found them and I bought 2 sets of needles, DPN US Size 1 and 2/2.25-2.50mm, and two Kollage Square Crochet Hooks, US Size A & B/2.00-2.25mm. I fell in love with them after my first try. I have since used the Kollage Square Needles mainly for knitting C-Lon Bead Cord and C-Lon Tex 400 Bead Cord, the heavier weight cord, with beads on a jewelry scale. My friend has been knitting garments with larger needles and various yarns.

Kollage Square Crochet Hooks have become my favorite hooks to do single crochet chains interspersed with beads with C-Lon Bead Cord & C-Lon Tex 400 Cord. The square handle helps to rotate and to position the crochet hook without having look or thinking about it. I hope that Kollage will consider making square steel crochet hooks in the future for bead crochet ropes projects as I love their Rosewood handles!

These needles are recommended particularly for those of us with arthritis, carpal tunnel syndrome and stiffness in hands and fingers. In addition some knitters have found that their stitches are more consistent. As with all knitting projects, checking gauge is very important. Some people recommend going up a needle size to gain proper gauge but my friend and I have not observed this.

Kollage Square Knitting Needles are available in the following types: Straight, Double Pointed and Circular. The sizes are well represented. Two types of cable are available for the circular needles, soft and firm. We decided to carry the firm as they keep their shape and the joints between the actual needles and the cable are smoother.

The concept has been carried to crochet hooks using square wooden handles. The actual hook is made out of anodized aluminum, and the square shape of the handle helps orient the crochet heads at the right angle.

If you are interested got to > Kollage Square Needles


Friday, May 28, 2010

Tubular Bead Crochet Ropes, the Easy Way!

After I opened my online store for nylon cord, originally meant for my students, I encountered many questions about bead crochet and decided to learn about it in my spare time. First I educated myself with a few books, then took a class making a necklace with single chain crochet - See my earlier blog entry. I also tried to teach myself tubular bead crochet ropes with mixed result as I could never get the first inch to look like it should, so I gave it up and planned to try again at some future time.

The solution arrived when I met a Bay Area jewelry designer and teacher who got so frustrated trying to teach tubular bead crochet to her students that she found a better way. She created a small tool to support the beginning of the crochet tube and came up with a foolproof method. Her small tool, a jig, help stabilize the first few inches of the crochet rope and it make all the difference. She has a patent pending on her jig and method. In the meantime, she gave me a jig and tutorial to try. The tutorial has over 60 closeup color photos and clear instructions.

On my first try, the sample rope was perfect. When I moved on to make a full bangle, a few times I had to undo and redo a row as I had not placed a bead in the right place. If you get careless as I did, you will see it right away as the bead does not move to the right place when working the next row. Here is my first completed bracelet!

It is best to start with 6/0 seed beads and C-Lon Bead Cord (the standard size). The 6/0s are about 4mm in diameter. I started with Miyuki beads from Caravan Beads and mixed different finishes. I worked with 5 color groups of beads, with 80 beads in each group, but had to remove some of the beads as the bracelet was too long. I recommend sizing your bangle before the final stitching of the cord and adding or removing rows if necessary. Mine still ended up a bit large for my wrist. I will size the next one better. One of the color I used is a mix, another two colors used at random to add a bit of spice. Using 5 distinct colors on the first few bracelet is best as it help keep track the crochet stitches. I used one of the new C-Lon Bead Cord color Argentum. One spool has enough yardage to make over 8 bracelets. My focal bead is a piece of coral and the bead ropes are finished with antiqued brass bead caps I got from B'Sue Boutiques.


The crochet starter jig and the tutorial on the CD teaches not only tubular bead crochet but also how to make the bangle bracelet shown above from start to finish. The pdf document on the CD can be downloaded and looked on screen with a pdf reader or it can be printed of course. You will need seed beads size 6 in 5 colors, 2 12mm end caps, a focal bead, 30 feet of 0.5mm bonded nylon cord such as C-Lon Bead Cord, Bonded Nylon #18 or Tuff bead Cord Size 5 to make the bracelet. As to tools you will need a steel crochet hook, a big eye needle to load the bead unto the thread, a mini-clip to hold the loop when taking a break or removing the crochet tube from the jig, a tapestry needle to finish the piece.


The tutorial has in addition information on measurements, optional designs such as an endless ropes, adding findings and suggestions for design changes.

Of course as soon as you master the ropes with 6/0s beads, you can move to smaller seed beads or to random patterns. Here is sample made with seed beads size 8. I used the new C-Lon Fine Weight Bead Cord Tex 135 for easy loading of the beads, and of course smaller crochet hooks. I also found out that the ropes made with Miyuki size 8 seed beads fit perfectly included in one of the silver clasp I carry. It is a 9mm sterling silver kumihimo clasp. Yes, because it is made out of solid silver, it is a bit expensive, but it would be great for a special neckpiece. I will try as soon as I have some spare time to do additional samples and will come back here to post the results. In the meantime, I will return to my usual field of expertise, knotting, micro macrame, Cavandoli knotting, braiding and cord making interspersed by a few other fiber and jewelry techniques to keep me on my toes.

The jig and tutorial is still not widely available, but Randi at StudioDax has agreed to let me offer them for sale. So get one and be on your way to learn this wonderful method to make tubular bead crochet rope, the easy way!

Order the Bead Crochet Rope Starter Jig and Tutorial at www.store.jewelsinfiber/crochet.html

Additional note: I do not usually work with seed beads or haven't really since I was a teenager. I played then with recycled French beads recovered from beaded flowers at cemetery after the wire decayed from exposure to the elements. At the time I made bangle bracelets using an Afghan method or I embroidered seed beads on my jeans, but of course just for fun. I have always admired the work done by beaders with seed beads and the incredible patience it requires! - Marion

Wednesday, August 5, 2009

A Jaunt in the Crochet World

Julie's Class Project
Bead Crochet with D&E Nylon #18 Taupe, Various Beads and Tassels

After starting the online supply store with thread for my students, I got a lot of questions regarding bead crochet for which I didn't have any ready answer. I got a few books, played around with a few concepts such as crochet beaded ropes, but never finished a piece as most required a lot stringing ahead of time and when I experiment I often just try a few inches. So when one of my friend, Julie Goodenough, who teaches crochet came to pick up some spools of D&E for her class, I signed up.

Julie's project consisted of stringing beads one strand at a time, single bead crochet, joining the strands in a single bead crochet cording and ending the thread with a few beads. She shepherded us, her students, effortlessly through the project, spending extra time with the ones just learning to crochet for the first time. Her instructions were nice and clear. Most of us finished the neckpiece, sometimes with the help of a another student. I had extra time, so I added tassels for individualization.

Later in my studio, I decided to continue with the individualization of the process I had learned in Julie's class. I added other techniques I am more familiar with such as cordmaking and knotting, and made several pieces with turquoise chunks I had in my drawers. I found that I preferred C-Lon Bead Cord for this process over the softer D&E. The heavier bond of the C-Lon adds a bit of body to the single chain crochet, so you see, brand preference is individual. Julie said she will give C-Lon another try. My final decision is always all about color.


'Turquoise Crochet Neckpiece I'
Turquoise Nuggets, Turquoise Donut and Jade Toggle and Loops, C-Lon Bead Cord Bronze & Olive. Techniques used: Single Bead Crochet, Cordmaking, Knotting.
Neckpiece can be worn short, without the extender, or at adjustable length.

The "Turquoise Crochet Neckpiece III' (shown above on the right) has the same description as the piece above with Black Onyx instead of Jade and C-Lon Bead Cord Experimental Color #12, a possible future color, we will see... I sold the 'Turquoise Crochet Neckpiece II' at my last show before it was photographed, but 'Turquoise Crochet Neckpiece IV' is being work on as we speak.

If you are around the San Francisco Bay Area, take a class with Julie and visit her at one of her shows to see some of her beautiful pieces. Her classes are worthwhile and fun. Her jewelry pieces have very unusual combination of beads creating exotic and fresh compositions. In addition she also make purses, scarves and hats. Her motto is after all: 'Only the best is Goodenough...' So visit her website: http://www.juliegoodenough.com/index.html