Wednesday, December 7, 2011

Playing with Kumihimo, Ribbon, Magatamas & C-Lon Bead Cord - Update


I just got the last skeins of nylon ribbon available from a New Mexico artist who has since retired and some rayon skeins from an artist in New York State. It is fun to create bead mixes for the ribbon colors. The names of the kits are evocative. 

Coffee & Denim (shown above) is made with rayon ribbon and the C-Lon Bead Cord Sepia. The bead mixes includes 4mm Magatamas in the following colors: Metallic Dark Blue Iris, Gunmetal, Matte Transparent Light Grey & Metallic Dark Bronze. Fine Micro/Nylon #69 cord is included to prepare the ends for insertion into a sterling silver clasp provided in the kit. 
Hand Dyed Ribbon from New Mexico, Magatamas Beads, C-Lon Bead Cord, Micro Cord & Sterling Silver Clasps

Amethyst & Silver Haze (shown on the left) has in addition some platinum tones. Five different types of beads create a lively mix. The C-Lon Bead Cord included is Lavender. 

Santa Fe Sunset (shown in the center) is just like its name... The bead mix is made up of four different types of Magatamas. The color of C-Lon Bead Cord is Sienna.

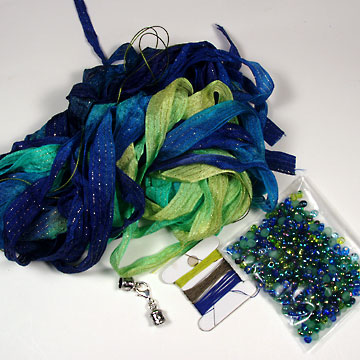
Sea Green, Lime & Purple (shown on the right) has lovely tones, but blues and greens are so touchy. The blues especially need to be exactly the right shades. I ended up ordering a bunch of new blue beads but none of them worked... so the mix is made up of greens, dark metallic blues (already in stock), bronzes. The color of the C-lon Bead Cord is Sage. 

Cornflower (shown below) is made with rayon ribbon, a bead mix that includes 7 bead colors and C-Lon Bead Cord - Capri. 

All the kits include directions, a sterling silver clasp, the fine micro cord for finishing the braids. A tool kit is optional. 

A limited number of the colorways shown above are now available > New Kumihimo Ribbon & Bead Kits


Thursday, November 3, 2011

Tips: Chinese Knotting Cord - Unwinding Skeins

Some of the Chinese Knotting Cord comes in skeins of about 82 yards each. The Medium Weight is about 1.2 to 1.5 mm in diameter and the Fine Weight, about 0.8 mm in diameter. The skeins are hand wound so yardage is approximate. Dye lot vary as the skeins are hand dyed. The dye lots of the Medium and Fine weight cord do not always match. For your convenience in addition to skeins, I also sell these cords by 10 yard cards bypassing your having to deal with skeins > Chinese Knotting Cord


If you get Chinese Knotting Cord by skeins, here is the best way to unwind them:

Untwist the skein carefully and place it on a umbrella swift or skein winder. I prefer my swift vertically as shown in this picture below. Lay the skein as evenly as possible before removing the ties. Untie the knots at the ends. It is fairly clear where the ends are, they are knotted together and create the tie that encircle the skein.  Before proceeding, tuck the end you are not using into the spoke so it will be out of your way. Then unwind the skein onto a spool or a card.

If you do not have a swift, use the arms of a friend, the back of a chair, or any other way to keep the skein open.


Occasionally the cord is hard to unwind. Resist the impulse to pull the cord over and under - do this as a last resort only. Sometimes moving the cord or turning the skein around on the swift does the trick. It loosens the cord, making unwinding easier again.

See Chinese Knotting Cord Selections > Chinese Knotting Cord
Get an Umbrella Swift/Skein Winder > Tool Section
Read a weaving entry written by Peggy Ostercamp >  Unwinding Skeins

Thursday, June 23, 2011

Circa 1975...


A visit from the past... I must have knotted this piece around 1975 with either Conso Natural or Macraworld Natural Nylon #18. I was still making traditional macrame jewelry.

It came back for minor repairs, plus an extension. Some of the paper thin shell heishis got broken overtime and needed replacing. C-Lon Bead Cord Wheat worked well for the repair as it is the closest color to the Natural circa 1975. I added a few light colored gemstone leaves at the end of the extender as I do not have anymore of these shells in stock.

The collectors were concerned with the neckpiece became a bit stiff over time. I gave the piece a nice wash. I use shampoo and a toothbrush to clean the surface, rinse with lukewarm running water and blot dry with a towel. Let dry overnight. The nylon became nice and soft again. Now I better ship it back. They have been patiently waiting!

Saturday, April 9, 2011

Tips: How to Cut C-Lon Bead Cord and Get Rid of the Curls


This picture shows all four sizes of C-Lon Bead Cord and the
sizes of Miyuki beads that can be strung onto the cord using a beeswax self needle. See one of my earlier blog about the best way of loading beads onto cord. From left to right:
- C-Lon Tex 400 Bead Cord with Miyuki E's (twice/2x), 6/0s, and 8/0s

- C-Lon Bead Cord with Miyuki 6/0s (2x), 8/0s, and 11/0s
- C-Lon Fine Weight Cord with Miyuki 8/0s (2x), 11/0s, and 15/0s

- C-Lon Micro Cord with Miyuki 8/0s (2x), 11/0s, and 15/0s


C-Lon Bead Cord and to a certain extend C-Lon Tex 400 Bead Cord, the 'heavyweight bead cord', tend to curl. This can be especially annoying when working with micro macrame, as it makes the process of finding the right cord to work with more daunting especially when working with a multitude of cords. For applications such a crochet, knitting or kumihimo with EZ-Bobs, the cord having a memory of being on the spool all curled up does not matter. For anyone wanting the curls to go away, several solutions come to mind.

No More Curls Methods
  1. When unwinding the thread, give it a pull one arm's length at a time.
  2. Cut the cord the day before and add a weight to the ends overnight.
  3. Steam the cord.
  4. Iron the cord with a warm iron - a hot iron will damage the cord.
I use method #1 when stringing beads and method #4 when doing micro macrame and Cavandoli knotting. I have not tried the method 2, & 3, but they have been suggested by readers of my newsletters.

Alternative Method
Here is a another good method for micro macrame and Cavandoli knotting, when you need multiple cords, all of the same length. I use this method for workshops or when I plan my work a day ahead of time.
  1. Set up 2 winding posts, warping posts or cup hooks set into pieces of wood attached by a C-clamp to fixed positions at the distance desired for your cord ends.
  2. Attach the cord to the post/hook on your left (post/hook #1).
  3. Unwind the cord towards the second post/hook and give it a hard pull.
  4. Wind it around the second post/hook on your right (post/hook #2).
  5. Return to post/hook #1, unwinding, giving a hard pull and wind the cord around #1.
  6. Repeat steps 3-5 however many times until you have the desired number of cords.
  7. Tie the end back at post/hook #1.
  8. Optional - Let the cord sit on the posts/hooks overnight.
  9. Cut the cords at post/hook #1. Hold the cords by their fold at post/hook #2.
Example: For cords 48 inches long, folded in half, both ends (2 ends) will be 24 inches long. So set up your posts/hooks 24 inches apart and cut he cord only at one of the posts/hooks.

Best with your creative projects! - Marion

To purchase C-Lon Bead Cord > Marion Jewels in Fiber Store

Note on Ironing C-Lon Bead Cord
Use a warm setting. The lowest setting on my iron is acetate/nylon. I tested it with 6 - 48 inches long cords folded in half (24 inches long from fold/loop to ends). For speed I raise the setting to polyester, but then you need to iron quickly. Do not leave the iron in one spot with higher heat setting. Nylon will melt!

Blocking? More on the Knitted Bracelet...

When writing the pattern for the Knitted Bracelet with C-Lon Bead Cord & Pearls, my assistant offered to block one of my bracelet. I did not know much about blocking, but she insisted that it made all the difference and gave knitted goods a professional look. She offered to block a few knitted samples we had done with C-Lon Tex 400 and one of the bracelets knitted with C-Lon Bead Cord. She used wet blocking for the bracelet letting it dry overnight pinned in place, and steam blocking for the Tex 400 samples. Of course since bonded nylon has a mind of its own, it was totally unaffected by the blocking process.

Blocking knitting is a simple technique used mostly by professional knitters and knitting aficionados. The piece of knitting is pulled and stretched into the right shape, laid flat, and pinned in place. Then several methods can be used to actually block the knitted fabric: wet blocking, steam blocking, or spray blocking.

Regardless of the method chosen, the fabric can be shaped first, then pinned, then moistened, steamed or sprayed last. The sequence can be changed by wetting, steaming or spraying first, then shaping and pinning, then letting it dry. This process, if well done, makes the knitted pieces more even, making it easier to seam them together into garments. It evens the stitches out making them look more regular. It helps the knitted pieces hold on to their shapes.

Still intrigued by the idea of blocking the bracelet made with bonded nylon, I decided to experiment... by blocking with rubbing alcohol (see my blog about bond). So after first checking that alcohol did not affect the fresh water pearls, I was ready to test this process and isopropyl alcohol turned out to be the perfect blocking agent for bonded nylon.

To block your knitted bracelet, you will need the following tools:
  • A Macrame Board (a project board with measuring lines or a Lacis Board and a ruler)
  • 1 1/4 " Steel T-Pins
  • Isopropyl Rubbing Alcohol
  • Cotton Swabs (Q-tips) or Small Rag (in color similar to the item you are blocking)


Process:
Pin the bracelet right side up (with pearls up) to the board using the line or a ruler to shape the body of the bracelet into an even shaped rectangle. Pin the triangle leading to the donut button and the loop. Then after dipping the cotton swab into alcohol, dab the knitted nylon in between the pearls evenly. Let it dry. Remove the T-pins. The bracelet should now be nice and flat. If a bit stiff just shake it to loosen. It will loosen regardless as you wear it.

For more info on the knitted bracelet -> Knitted Bracelet with C-Lon Bead Cord & Pearls
To purchase a macrame board and T-pins -> www.store.jewelsinfiber.com/tools.html
To read more about blocking knitted items -> To Block or Not to Block...

Saturday, January 15, 2011

Knitted Bracelet with C-lon Bead Cord & Beads


While exhibiting at Stitches West as a vendor, I got many inquiries about knitting with C-Lon Bead Cord. Everyone wanted to see samples, so I proceeded to knit some, among them a bracelet with pearls. Then at the next show, equipped with samples, I got requests for the pattern for the knitted bracelet.

As I am getting ready for my third Stitches West 2011 in Santa Clara, in February, I will share my experience knitting with C-Lon Bead Cord and beads. I highly recommend using the Kollage Square Needles for knitting with C-Lon Bead Cord or any Bonded Nylon, it really helps prevent cramping of the hands. Bead & Tools Kits as well as the Kollage Square needles are available for purchase in my online store.

Since the first sample bracelet, I made a second one while in vacation in Mexico for my mother's birthday, then my aunt saw it and she wanted one... I have made many since then, all with fresh water pearls, natural or dyed, and gemstone chips. This pattern can be adapted to other types of beads.
Try it, have fun, and experiment! - Marion


Materials:
5-7mm Fresh Water Pearls
25 mm Donut
1 4-5 mm Small Rondelle
1 spool of C-Lon Bead Cord

Tools

2 Kollage Square Needles US Size 1 / 2.25 mm (DPN-7 inch long)
1 Kollage Square Crochet Hook US Size A / 2.00 mm
1 Tapestry Needle Size 22
1 EZ-Bob Small (Optional)
Scissors
Super Max Thread Burner (Optional)

Thread Conditioners & Adhesives
Beeswax
Fray Check or Poly Zap Super Glue (Optional)

Note: Once knitted in each bead will sits right in between two stitches. To really show the beads off, purl right before and right after inserting the bead. I also recommend working right off the spool rather than cutting the amount of thread needed before hand.

Step 1. Loading Beads
Wax the end of the thread right off the spool with the beeswax. Make a self needle by shredding the cord with the back of scissors. Re-wax several times. Cut the cord at an angle and twist the end. Load all the beads, re-waxing and/or remaking the self needle when necessary. See earlier blog on self needle made with beeswax.
Step 2. Bracelet Body
Cast on 10 stitches loosely using the long-tail method and leave a 12 inch tail - it will be used for the button loop later on. Optional: wind the end on a small EZ-Bob.

Then knit the body of the bracelet with the following pattern:

Pattern:
Row 1: Purl
Row 2: * Knit 2, Purl 1, Slide Bead in, Purl 1, Repeat once* and Knit 2.
Row 3: Purl
Row 4: *Knit 1, Purl 1, Slide Bead in, Purl 1, Repeat twice* and Knit 1.

Repeat Row 1-4 ending with Row 2 until the body of the bracelet is the right length. See note on bracelet length below.

Step 3. Bracelet End
Decreasing stitches - continuing with a stockinette stitch:

Row 1: Purl the first 2 stitches together, purl the stitches in between, and purl the 2 last two stitches together.
Row 2: Knit
Repeat Row 1-2 until you have just 2 stitches left. Bind off the last 2 stitches leaving a 12 inch tail when cutting the cord.

Step 4. The Button
Pull the Donut/Button in place, by first pulling up right past the bead, then pulling the cord past the rondelle. With the tapestry needle stitch the cord in and out of the knitted end ending on the right side, right behind the donut/button. Knot off or bind the cord and weave in the end. Or another option is to burn the end of the cord using a thread burner and add a dab of Fray Check or Poly Zap for security. (The pdf version available with the bead kits includes a diagram.)

Step 5. The Buttonhole Loop
Use the cord tail (from Step 1) and crochet hook. Starting at the corner, attach the first stitch right into the knitting. Continue using a single chain stitch and work to the desired length (1" 1/4 for a 25 mm donut). Insert the crochet hook into the knitting right at the corner and draw the cord through. With a tapestry needle reinforce the binding. Knot or bind the cord and weave in the end, or burn the end and add a dab of Fray Check or Poly Zap for security.


Notes:
Casting on: Cast on loosely. As bonded nylon has no stretch, if you cast on too tightly, it will be difficult to knit the first row. The first row in this project is purled as it is a bit easier to catch the cast-on stitches when purling.

Bracelet Length: If the donut/button measures 1 inch in diameter, your wrist is 7.5 inches in diameter, you will need to make the body of the bracelet about 6.5 inches long. Even though the bracelet is knitted with bonded nylon and bonded nylon has no stretch, knitting tends to stretch a bit once it is worn so make allowances when measuring.

Alternative to Attach Donut/Button: Use a coated beading wire such as Softflex and crimp.

Want to Block the Bracelet? Go HERE for this info.

Shop for Bracelets Kits, Kollage Square Needles and get a printed pdf of this pattern: http://www.store.jewelsinfiber.com/knit.html

This information is for your personal use and enjoyment only. You are of course welcome to refer to this website. Thank you for your understanding! - Marion

Please do not copy or reproduce this information for commercial purposes without prior authorization. All rights reserved © 2010-17 by Marion Hunziker- Larsen.

Friday, January 14, 2011

Knitting with Square Needles: Innovation or Gimmick?


When I first heard about a new kind of knitting needle on the market, Kollage Square Needles, I thought it was gimmicky. I had just completed my first knitted bracelet with C-Lon Bead Cord and was telling a friend with a lot more knitting experience that the small needles were hard to hold and gave me cramps. She thought these new needles might be the perfect solution and convinced me to try them.

The more I thought about the concept of a square design for a needle the more sense it made. We do not realize when knitting that we are constantly compensating for the needles turning and twisting thereby putting stress on our hands. We then set about trying to locate some to try and had no success at our local knitting stores.


While at Stitches West last year, we found them and I bought 2 sets of needles, DPN US Size 1 and 2/2.25-2.50mm, and two Kollage Square Crochet Hooks, US Size A & B/2.00-2.25mm. I fell in love with them after my first try. I have since used the Kollage Square Needles mainly for knitting C-Lon Bead Cord and C-Lon Tex 400 Bead Cord, the heavier weight cord, with beads on a jewelry scale. My friend has been knitting garments with larger needles and various yarns.

Kollage Square Crochet Hooks have become my favorite hooks to do single crochet chains interspersed with beads with C-Lon Bead Cord & C-Lon Tex 400 Cord. The square handle helps to rotate and to position the crochet hook without having look or thinking about it. I hope that Kollage will consider making square steel crochet hooks in the future for bead crochet ropes projects as I love their Rosewood handles!

These needles are recommended particularly for those of us with arthritis, carpal tunnel syndrome and stiffness in hands and fingers. In addition some knitters have found that their stitches are more consistent. As with all knitting projects, checking gauge is very important. Some people recommend going up a needle size to gain proper gauge but my friend and I have not observed this.

Kollage Square Knitting Needles are available in the following types: Straight, Double Pointed and Circular. The sizes are well represented. Two types of cable are available for the circular needles, soft and firm. We decided to carry the firm as they keep their shape and the joints between the actual needles and the cable are smoother.

The concept has been carried to crochet hooks using square wooden handles. The actual hook is made out of anodized aluminum, and the square shape of the handle helps orient the crochet heads at the right angle.

If you are interested got to > Kollage Square Needles