Showing posts with label Kumihimo Kits. Show all posts

Friday, March 25, 2022

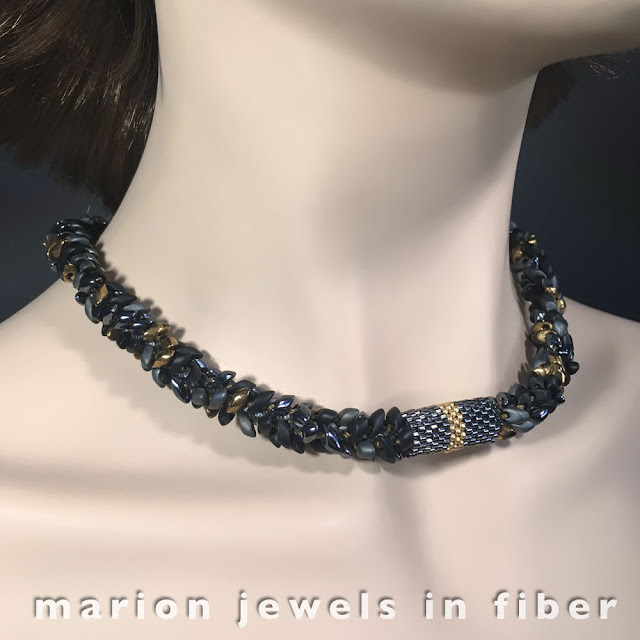
Kumihimo Necklace with Long Magatamas and C-Lon Tex 400 Bead Cord

Kumihimo Necklace with Long Magatamas and C-Lon Tex 400 Bead Cord


Occasionally a design needs to get revisited and updated. Originally in 2015, I designed this Kumihimo Kit with Long Magatamas and C-Lon Tex 400 as a bracelet kit. Now in 2022, kits for necklaces are available. This is due to a number of requests when I taught this project in a Zoom class. Many of the participants wanted to make necklaces instead of the bracelet offered in the class kit.  

The tutorial for this project has grown from 14 to 22 pages and now includes additional design options.
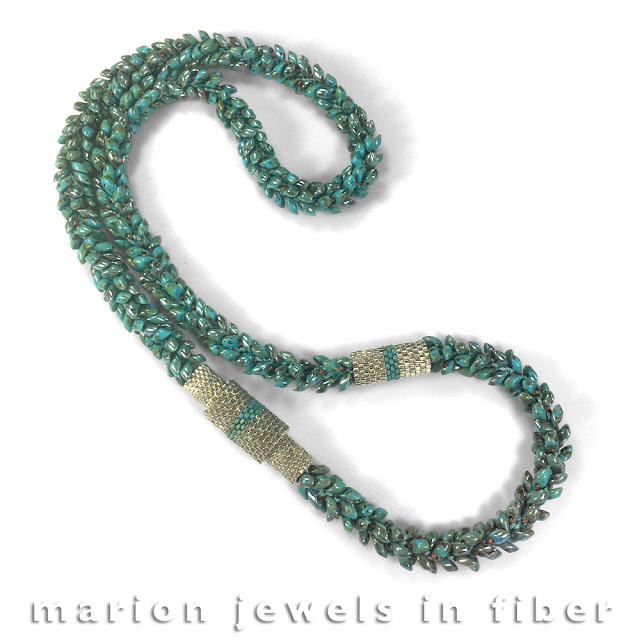
 

Kumihimo Necklace with Long Magatamas and C-Lon Tex 400 Bead Cord

One option shows how to extend the necklace length by adding a section. This way it can be worn at two different length. Here the bracelet is added to the necklace. 
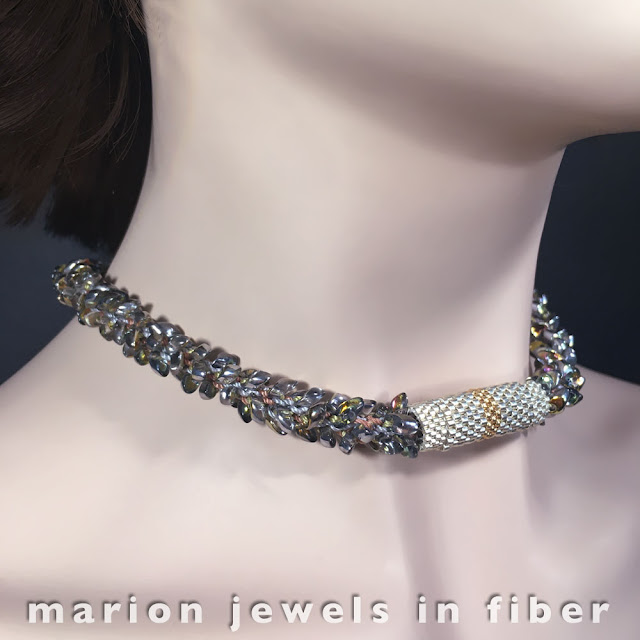
 

Kumihimo Necklace with Long Magatamas and C-Lon Tex 400 Bead Cord

Another option shown in the tutorial is how to extend the clasp and peyote sleeve cover width to create a stronger focal point. In this example, the clasp was extended by half and inch.
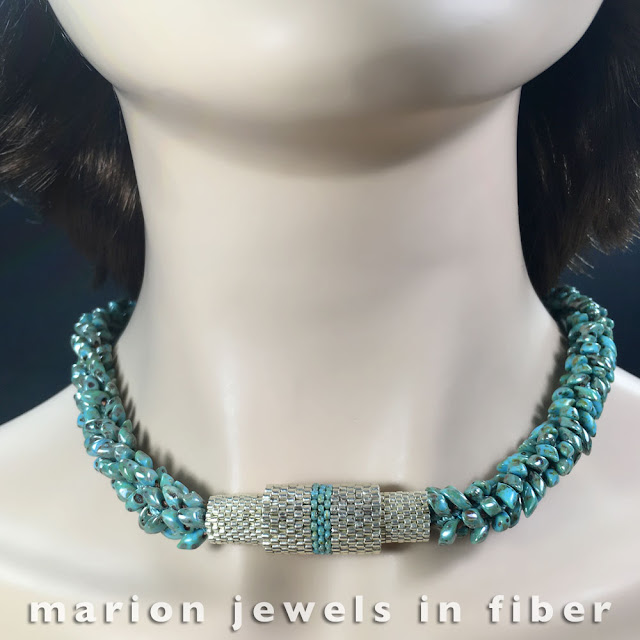

Kumihimo Necklace with Long Magatamas and C-Lon Tex 400 Bead Cord

Here it was extended by a full inch doubling the width and it has a double sleeve cover, widening the diameter at the center of the clasp.
 

Kumihimo Necklace with Long Magatamas and C-Lon Tex 400 Bead Cord

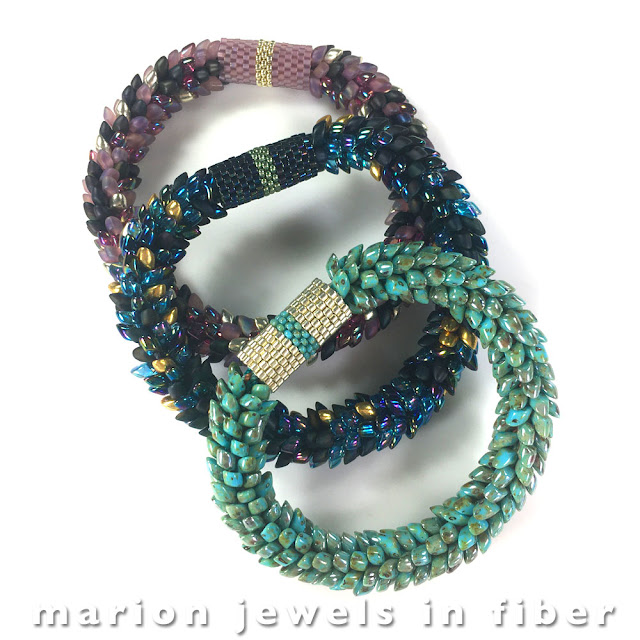
Another option now included in the tutorial is to make a more traditional beaded kumihimo bracelet with beads on every cord. The bracelet is a bit heavier, wider in diameter and less flexible. It also has twice as many beads as the regular design with space between the beads, so if you want to do this design, get an extra 20 g bag of Magatam Beads. 
Kumihimo Necklace with Long Magatamas and C-Lon Tex 400 Bead Cord

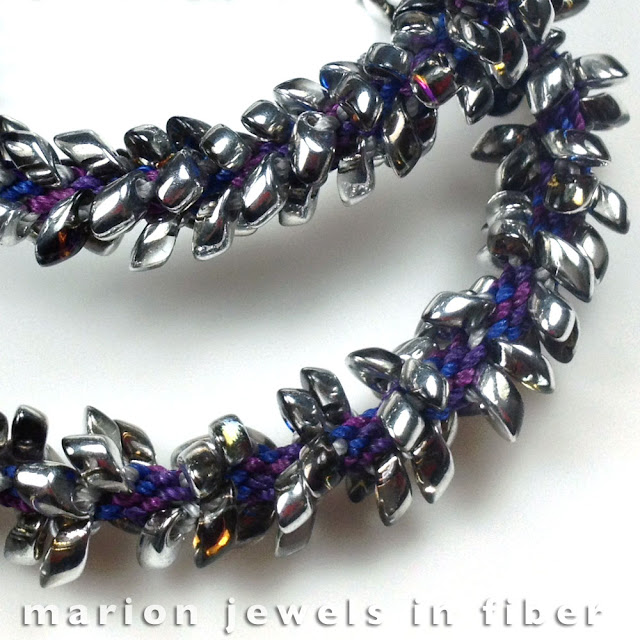
 Or change the cord placement to get a spiral design as shown on the lower kumihimo braid.
 

Watch Kumihimo Braiding on YourTube

Before getting a kit, you can view a live demo of the kumihimo braiding process on YouTube. This kit is a great starter kit if you have never done any kumihimo before. It is fun and the instructions are easy to follow. As to starting with a bracelet or a necklace, it really make no difference as to the difficulty level. The bracelet, however, takes less time to braid...


> Kumihimo Kits with Long Magatamas and C-Lon Tex 400 Bead Cord

> More Kumihimo Kits

>  Earlier Post about the Bracelets


Monday, September 11, 2017

Kumihimo Neckpiece with PIP Beads


Kumihimo Neckpieces with PIP Beads


Many kumihimo bracelet patterns can be lengthened to make a neckpiece, but not all of them successfully. A neckpiece or long necklace needs special considerations. Some beaded kumihimo braids will roll over and show their backside making them inappropriate for a neckpiece at the base of the neck or a long necklace. They might work for a tight choker, but who wants to wear a tight choker... 

So with this in mind, I took two of the patterns created for the PIP Beads Kumihimo Bracelets and made neckpieces with them. 


Kumihimo Neckpieces with PIP Beads


This Argento neckpiece is 17 inch long and made using the Half Round PIP Pattern. This pattern has PIPs only on the front and all 8s on the backside. This pattern would not work for a long necklace. For this piece, I doubled the C-Lon Fine Weight Bead Cord and the Satin Cord length, but increasing them by 1.5 is sufficient and multiplied the beads quantities by approximately 3. I used around 360 PIP beads, and about 12 g of Miyuki 8s for this neckpiece. I loaded the beads in 3 batches to keep the EZ Bobs from overflowing.


Kumihimo Neckpiece with PIP Beads


These two neckpieces shown here were made with the PIPSs All Around Pattern, so they are bit more dimensional than the pattern shown above.


Kumihimo Neckpiece with PIP Beads


References


For kits and tutorials go here: PIP Beads Kumihimo Kits and Tutorial

This post continues previous posts on Kumihimo with PIP Beads found here:

Kumihimo with PIP Beads

Compare Kumihimo with Bead Weaving and Crochet Techniques

Kumihimo Earrings with PIP Beads

Saturday, September 2, 2017

Kumihimo Earrings with PIP Beads DIY Kits & Tutorial


Kumihimo Earrings and Neckpiece with Preciosa PIP Beads


This post continues the series of posts about kumihimo with Preciosa PIP beads. The two previous posts are Kumihimo with PIP Beads and Kumihimo Bracelet with PIP Bead - Compare Kumihimo with Bead Weaving and Bead Crochet Techniques.

After designing the Kumihimo PIP Bracelets Kit and Tutorial, I made a few necklaces using the Half Round PIP and the PIPs All Around Design Patterns included in the bracelet tutorial. Both designs work well in a necklace form. The one shown here is 17 inch long and used the Half Round Design. I will be writing a post these necklaces next.

After making the necklace, I needed earrings to wear for a wedding I was attending, so I set all my other projects aside and went to work designing my very first kumihimo earrings. Please note that I went about it without doing any research online whatsoever. I did not want to be influenced by someone else’s designs.


PIP Beads Kumihimo Earring DIY Tutorial & Kit

The first earring I made was a PIP ball earring, but it was not quite distinctive enough, plus the finishing of the end cords was a bit complex for a DIY, so I decided to try for a design with a beaded tassel. The first ones were pretty good, but the bead placement was not quite right yet and the tassel was a tad short, but the Jellyfish design just needed a bit more refinement.


PIP Beads Kumihimo Earrings


Everything gelled in the next attempt. The earring had a nice distribution of the PIP beads in the kumihimo body, and the beaded tassel, the tentacles, was just right. This is the design I adopted for the kit and tutorial. > Kumihimo Jellyfish Earrings with PIP Beads

The tutorial is very comprehensive and includes 15 pages with over 30 pictures, tables and charts. Please note the tutorial assumes you have prior knowledge of the braiding steps and beaded kumihimo. The manual does not included the basic steps. If this is your first kumihimo project, make sure to get the Kumihimo PIP Bracelets Kit and Tutorial first. Make the bracelet first as the bracelet manual includes very detailed pictures showing the braiding steps.

The earring tutorial includes 3 design variations and several options for the beaded tassels. The kits are available in the following color and design variations:


Design 1

That's the basic design... This earring style works well with the neckpiece or by itself.


Copper Venus

The PIP beads are transparent with an AB finish. The 8s and 11s are Miyuki Duracoats in a dark copper finish. The leverbacks are gold filled. The necklace is made with the PIP All Around Design. 


Argento

The PIP beads have a silver metallic coating all around. The 8s and 11s are Miyukis in a gunmetal finish. The leverbacks are sterling silver. The necklace is made with the PIP Half Round Design. 


Azuro Metallico

The PIP beads have a blue metallic coating all around. The 8s and 11s are Miyukis in a AB gunmetal finish. The leverbacks are sterling silver with an oxidized finish. The necklace is made with the PIP All Around Design. 


Sapphira

The PIP beads have a dual finish, transparent colors on one side, with a graphite metallic coating on the other side The 8s and 11s are Miyukis in a gunmetal finish. The leverbacks are sterling silver with an oxidized finish.

Design 2

Design 2 as a shorter kumihimo body. Any of the earring kits shown above can be made into Design 2... You will have a few PIP beads leftover for another project. As to the tassels, I started playing with the individual beaded cord length. The tassels can have blunt cuts, staggered or uneven beaded cord lengths... Your choice.


Coppertone - Design 2

The PIP beads have a dual finish, transparent colors on one side, with a copper metallic coating on the other side The 8s and 11s are Miyuki Duracoats in a bright copper finish. The leverbacks are sterling silver with a light oxidized finish.

Design 3

Design 3 as a longer kumihimo body and the tassels are made with Delicas...


Coppertone - Design 3

Same as above earrings but with a longer kumihimo body, so more PIP beads, and the 8s and 11s have a darker patina copper finish. The tassels are made with Miyuki Delicas with staggered lengths.


Opalesque - Design 3

The PIP beads have a dual finish, transparent colors on one side, with a silver metallic coating on the other side. The 8s and 11s are Miyukis in a gunmetal finish. The leverbacks are sterling silver.


When these earrings were all designed and the samples all finished, I searched online to see if anyone else had designed any earrings similar to these and I could not find anything already published on the internet thus far. I am super happy as I love to pioneer a new style!


The kits and the tutorial are available HERE. Check back soon for the next post on making the necklaces...

Sunday, July 30, 2017

Kumihimo with PIP Beads

Kumihimo with PIP Beads


I bought some Preciosa PIP Beads a while ago... and thought they would be perfect for kumihimo. I decided to play around with them and to do a quick project... Many bracelets later, I have now 4 design variations, a 25 page manual with all the steps, the beads sequences for each variation, the bracelet length versus wrist size, and bead numbers charts, all broken down in easy to follow steps with over 50 clear and easy to understand pictures and charts. 


How did this happen?


Kumihimo with PIP Beads


While working on this project, I fell in love with the PIP beads. They are shaped like small petals and perfectly suited for kumihimo. They lend themselves to flower designs and to dimensional geometrical designs. 


Here is what I learned along the way... 


Kumihimo Bracelet Tutorial with PIP Beads


PIPS  All Around - Design 1

My first design, very dimensional, sculptural and geometrical, has a simple bead placement with Preciosa PIPs and Miyuki 8s.

Choices
While making these, I experimented using the standard C-Lon Bead Cord and C-Lon Fine Weight Bead Cord. The result is the same, even I cannot tell which one was done with which cord, but the Fine Weight is a lot easier to work with. The beads slide up and down the cord more freely. And since I add a central cord at the braid center for my bracelets, the C-Lon Fine Weight Bead Cord with a 24 lb breaking strength is plenty strong enough. So that's settled, Fine Weight is the way to go.

Then of course there is the choice of central cord size, I played around a bit and the 1 mm Nylon Satin Cord works well. It does not add bulk to the bracelet, and it keeps the bracelet nice and flexible.

Next I decided to try a bracelet with a smaller flatter profile. The PIP All Around is round...


Kumihimo Bracelet Tutorial with PIP Beads


Half Round PIP Design - Design 2

So I designed one with PIPs (mixed with 8s) on one side and 8s on the other side. That required careful notes, charts to keep track of the bead pattern and ultimately the creation of a system to keep track of the bead sequences. I ended up coming up with a great way using spreadsheets and charts. It makes following bead patterns very simple and easy.

The bracelet is very modern, with a lower profile than the first design... It is half round.

At this point, I was really intrigued, I had developed a system to keep track of the bead placement and sequences, and I really wanted to make something with a flower design with kumihimo... So more experimentation and later... The result...


Kumihimo with PIP Beads

PIP Flowers - Design 3

Flowers like little cluster of petals placed at regular intervals on the beaded braid. So yes, now I was pretty happy, I had three design variations in three colors. I did a demo at an art center and everyone loved the bracelets. Lots of woman wanted to buy one, but they are samples not for sale... So next - time to write the manual.


Kumihimo with PIP beads


By the time I write a manual, I have already made the piece that will be in the tutorial many times. The process by then has been refined, all the production kinks are already out of the way. And while making the piece to be featured, I stop to take pictures and I write down the steps one by one. When that's done, I start over again and make another bracelet, but this time I simply follow the directions I wrote, and edit as I go. The goal is to make sure everyone can follow the steps.

This is not the way I used to write tutorials years ago. I have learned that doing it this way will save us lots of time in the long run. Less hassles for you, less questions, less emails for me to respond to...

So yes, I was all done ready for the final steps, an outside editor and the kit assembly... To assemble kits, cords have to be cut, beads measured and counted, clasp added, then it gets packaged and labeled. But late at night... 


Duo PIP Flower Design - Design 4

I decided to experiment once again with a new version of the flower design with a center bead and dual coated PIP beads, PIPs with one color on one side and another on the other side. 


So yes, the next design challenge, figuring out how to load the dual sided PIPs onto the cord to get them to face the right way... More charts, more spreadsheets, another addition to the tutorial, and three additional colors. I am finally done!


The flowers alternate, one with the transparent colored side up, the next with the metallic coated side facing us, and the flower has a bead at the center of each flower design.


Color Choices


And the colors with the dual sided PIPs...


You can find out more about this project HERE and if you interested in making these bracelets without having to spend the time experimenting, undoing and redoing... The 25 page manual, the kits with all the cord & beads, and tool bags are available at Marion Jewels in Fiber online store

I thought it would be nice to write about the process of creating a kit and a tutorial... and I could go on. I could speak about how the braid starts and endings evolved. The new way presented in this kit, not seen elsewhere, is so much easier and simpler than my early attempts. Simple and elegant seem simple, right, but that's when someone else has already done it and shows the way. Otherwise it is often only found after a long search. Simplifying is harder than it looks... You might have to get a kit or manual to understand what I am talking about. -Marion ;))

Oh, and read my next post comparing kumihimo to other beading techniques... It has newer pictures of the PIP bracelets.


Sunday, August 23, 2015

Kumihimo Bracelet Duo & Necklace Plus Continued - Santorini Colorway


Kumihimo Bracelet Duo & Necklace Plus - Santorini

In the previous post, the colorway featured was Place Vendome. 
Here are the photos of the kumihimo bracelets and necklace done with the Santorini colorway.

Oh, and why Santorini? The colors reminds me of the Minoan murals in Crete. Then I thought of the lost Minoan civilization of Atlantis, but the Atlantis has a bit too much attached to its name, so Santorini seemed much more appropriate as a name as it is the island where Atlantis may have been, before being destroyed when its volcano exploded… 


Kumihimo Bracelet Duo & Necklace Plus - Santorini
Here is the materials for the Kumihimo Bracelet Duo…

Kumihimo Bracelet Duo Kit

The start of bracelet #1


Bracelet #1
Left shows the back side of the bracelet, nice a soft against the wrist with no beads.
Right shows the front side with the small bead ridge in the center. 

Kumihimo Bracelet Duo - Santorini

Here are the two bracelet done with this kit. 
Bracelet #1 on the right; bracelet #2 on the left. 


What's intriguing is the texture and color differences between these two bracelets. It is also possible to switch and start with bracelet #2 first, then the color arrangement would be changed. 
Kumihimo Bracelet Duo  - Santorini

Bracelets stacked


Kumihimo Necklace Plus - Santorini


The Necklace Plus makes a long necklace and a bracelets, or two necklaces, your choice. 
A handmade glass bead can be added. 


 Kumihimo Necklace Plus - Santorini

The large bead can sometimes slide on over the clasp and beads. 


Kumihimo Necklace Plus - Santorini

Other times, depending on the actual diameter of he inside hole, the beads needs to be integrated into the braid. Each bead is handmade one at a time, so inside diameter are not exact. 


Kumihimo Necklace Plus - Santorini - Focal Glass Bead

The borosilicate bead contains silver globs and dichroic fragments within, giving it life when it moves. 

This pieces were braided with Rayon Bouclé that is space dyed, C-Lon Bead Cord, 4mm Magatamas, these beads are in the form of a droplet, Size 8 seed beads for bracelet #1, gold tone magnetic clasps covered by Peyote Sleeves. The focal large glass bead is an optional add on to the kit. > Get a kit

Kumihimo Bracelet Duo & Necklace Plus

Kumihimo Bracelet & Necklace Kits

Occasionally a new kit starts with a skein of yarn. 
I fell in love with the texture of the rayon boucle and its colors. 
It is a space dyed yarn with gorgeous colors, but would it work for kumihimo?


Kumihimo Bracelet & Necklace Kits


I started with the necklace...


Kumihimo Bracelet & Necklace Kits


Then tried a flat looking bracelet with beads only on the side - it is shown on the left.
It is made with the standard round braid but it looks like a flat braid.
Then I altered it by adding a ridge of smaller beads down it center… See bracelet on right. 


When I finished the first bracelet, I had lots of yarn left, so I added a second bracelet.

Kumihimo Bracelet & Necklace Kits

The second bracelet has a different bead placement. 
It makes it more interesting when both bracelets are worn together. 

Kumihimo Necklace Kit

Then I added a focal bead to the necklaces and Peyote sleeves over the clasps. 
This one is Black Starburst - a borosilicate glass with silver globs and dichroic chips inside. 
It is handmade in the USA. 


Kumihimo with Focal Bead
This one is Silver Moon. Not sure which one I like best… 


Kumihimo Bracelet & Necklace Kits

Here is what comes with the Bracelet Duo and the kumihimo tools that are needed. 


This colorway is Place Vendome > Get a kit or if you already have all the materials for this project, just the PDF of the instructions.  

Of course this process took some time. I got the skeins in two colorways in February and now it is August. And I still have to package the Necklace Kit Plus and finish the instructions for the Necklace Plus. Necklace Plus? Oh, that's because you can make two necklaces, or one long necklace and a bracelet with the kit.  

I brought this kit to my last show, last weekend in Portland. I only had the Bracelet Duo ready in the two colorways, Place Vendome and Santorini. Santorini sold out… Now, of course I need to post all the pictures showing the Santorini color way. See next post entry. 


Oh, why Place Vendome? The colors reminded me of Paris, the classy colors of the architecture and Place Vendome came to mind. I looked again at pictures of this beautiful square in Paris off Rue Rivoli and yes the colors are similar, with soft greys, soft rusts, some charcoal and some golds and bronze…