Showing posts with label Peyote Stitch. Show all posts

Sunday, July 30, 2017

Kumihimo Bracelet with PIP Bead - Compare Kumihimo with Bead Weaving and Bead Crochet Techniques

Kumihimo compared with other Beading Weaving Techiniqes and Bead Crochet


When you look at these pieces, they simply look like beaded bracelets. Which actual technique was used to make them is not so obvious nor important when you wear them. They could have been made using a bead weaving technique, tubular bead crochet, or a fiber technique known as kumihimo taken over by beaders and fiber artist who like beads. Kumi means braided, Himo, cord in Japanese. The braiding technique using tools such as wood stand (Maru Dai) or a disk or board was developed tin Japan. With beads, kumihimo is now known as Bead Kumihimo or Beaded Kumihimo. 

What's the difference between these techniques? The process.

Kumihimo compared with other Beading Weaving Techiniqes and Bead Crochet

Bead Weaving requires multiple passes through the beads and working with a needle. Each bead is stitching one at a time to the finished piece. The thread takes multiple pass through the bead, plus it has to fit into a needle, so it needs to be thin. Thin also means not as strong... but, hey, this technique has many fans. 

Interested in bead weaving techniques and thread? If so start HERE. The links takes you to a series of posts on Peyote Stitch, one of the most popular beading technique and a good place to start. 


Kumihimo compared with other Beading Weaving Techiniqes and Bead Crochet

Tubular Bead Crochet requires a crochet hook and good eyes. Catching the thread in the middle of the beads can be annoying after a while, but the work is highly portable, once the beads are loaded onto ONE cord, the crochet process begins.

Interested in Tubular Bead Crochet? If so, get this tool and tutorial. I would never have been able to get over the start of the crochet tube without them.  


Kumihimo compared with other Beading Weaving Techiniqes and Bead Crochet

Bead Kumihimo requires a few tools, but $12 will get you everything you need in a nice bag so you can take your project around. The beads get loaded up to 8 cords. Self needles or needles can be used to this process. The braiding process is easy to learn, it requires moving the cord from one place to another. And if you doing bead kumihimo dropping a bead at the same time. Period.

Basic 8 Stand Round Braid Kumihimo with or without beads does not require amazing skills. Anybody can learn. I do it watching TV, listening to conversations, and while doing demos and explaining the process. 

Oh, one more comparison, the cord size for Tubular Bead Crochet and Kumihimo is usually the same, thick enough to hold well, and thin enough for the beads to slide down easily. 

For more info on these bracelets - go to my previous post or go to Kumihimo Bracelets with Pip Bead Kits.

Leave comments if you have any questions! - Marion


Friday, June 26, 2015

Beading Thread - Comparing Fireline, Power Pro, WildFire, C-Lon Bead Thread, KO and Miyuki Beading Thread

Compare Beading Thread, KO, Miyuki, C-Lon Bead Thread, FireLine, WildFire & PowerPro


Choosing beading thread can be complex as each of them has their pluses and minuses, and of course it all depends on the type of beads and the beading technique you are using, as well as what you are making.

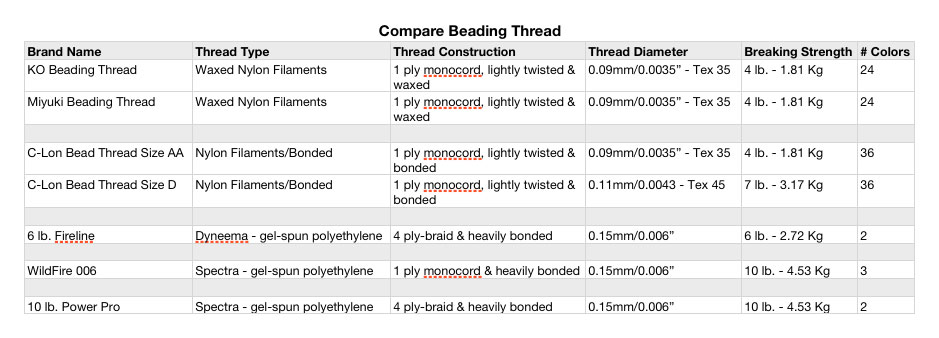
Here is a chart and some notes on the best beading thread available. All fit onto beading needles Size 10-12 and can be melted with a thread burner.

Beading Thread - Comparing Thread Chart


Brand Names
KO and Miyuki Beading Thread must be made by the same factory. The thread quality, spools, and colors are exactly the same. The labels are the only differences.

C-Lon and S-Lon or Superlon are also, as far as I know, made in the same factory for different producers. They may have yardage difference in the D size and C-Lon has 3 additional colors of the AA size.  - More in post about C-Lon vs S-Lon


Thread Type & Construction

Nylon Monocord
Nylon was invented to replace silk for silk stocking. It is strong, can be pulled and has a bit of stretch. The original nylon stocking were so strong that they did not need to be replaced… and guess what, over time the quality was lowered on purpose so they would snag and need replacing… Back to nylon, the nylon filaments can be twisted into a 1-ply, 2-ply or 3-ply cord, or braided. C-Lon Bead Cord is a 3-ply bonded nylon. Chinese Knotting Cord is a braided nylon.

For the KO, Miyuki and C-Lon Beading Thread, the filaments are lightly twisted into a 1-ply cord, known as a monocord, not to be confused with monofilament, that's the original fishing line.  In addition to its good abrasion resistance and excellent strength, the monocord has a flat, ribbon-like cross section and it flattens against beads making this type of thread great for doing multi pass through the bead holes. The thread is either waxed as in KO & Miyuki, or lightly bonded in the C-Lon Beading Thread to hold the filaments together. The multifilament monocord was originally designed as a low profile sewing thread.

Dyneema & Spectra
Both are Ultra High Molecular Weight PolyEthylenes. Dyneema is made by DSM in the Netherlands and Spectra by Honeywell in the USA. UHMWPE, for short, is know for its strength, low stretch and low weight. As a fiber, it is used for fishing lines, parachute cord, sailing lines, personal armor, puncture resistant clothing for fencing and more.

As to the differences between 6 lb. Fireline, 10 lb. WildFire and Power Pro, FireLine and Power Pro are braided whereas WildFire has a monocord thread construction. The 6 lb. Fireline has a thinner fiber braided core and a very thick thermally applied bonding. The bond material coats the fiber core, and the texture of the braid is non existent, whereas Power Pro has some texture, even through the bonded coat.

Thread Size or Diameter
Many beading techniques require multiple passes through the same bead hole, so the thread diameter is very important. The number on the chart represent the official diameters, but here is my list done by touch. The diameters are too thin to measure with a ruler or a caliper.

Thinnest to less thin:

1. KO - Miyuki Beading Thread
2. C-Lon Bead Thread Size AA ~ by just a tad, maybe… 
----------------------------------------
3. C-Lon Bead Thread Size D
----------------------------------------
4. 6 lb. FireLine
5. WildFire 006
6. 10 lb. Power Pro ~ maybe by a tad, or the thread texture might makes the thread feel thicker… 

I separated them in groups to delineate clear diameter size differences. Please note that FireLine, WildFire and Power Pro come in larger sizes, but they are a bit too thick to allow for multiple passes and they become harder to thread on the needles Size 10 or 12. 

Ease of Threading onto a Needle
The thinner thread are easier to thread on a needle. I use beeswax at the end of the nylon thread to keep the filaments from separating. The hardest thread to insert into the needle are the braided ones, as they need to cut nice and clean and threaded immediately before the braid starts separating. PowerPro is the hardest one to thread into the needle, but once in, because of its texture, it stays in place, whereas the other threads, being more slippery, fall off the needle more easily.

Easier to Hardest to Cut 
The nylon threads are easy to cut with sharp scissors. The Dyneema & Spectra thread are hard to cut, with FireLine being the easiest of the three, and PowerPro being the hardest. I tried regular embroidery scissors, wire cutters, and a thread burner, but that left a small bead at the end of the thread. A pair of titanium scissors worked best, especially when holding the thread taut when cutting.

Breaking Strength
See the chart, the thread lines up the following way, from lowest to highest:
4 lb. - 1.81 Kg - KO - Miyuki, C-Lon Bead Thread Size AA
----------------------------------------
6lb. - 2.72 Kg - 6 lb. FireLineC-Lon Bead Thread Size D
----------------------------------------
10 lb. - 4.53 Kg - WildFire 006, 10 lb. Power Pro

Colors and Notes on Thread
I have been told repetitively that with most beading techniques, the thread color does not show, but with peyote for example, the thread shows up on the edges… I can see it!


Compare Beading Thread, KO, Miyuki, C-Lon Bead Thread, FireLine, WildFire & PowerPro

KO - Miyuki Beading Thread has 18 colors. Some of the colors are perfect. The Gold for example is absolutely perfect for gold seed beads. The Lilac, Denim, Light Grey, and Apricot are fabulous choices… 

The thread is pre-waxed, making it easy to use. It is thin, easy to cut and threads easily onto a needle. The breaking strength is the lowest, but for pieces that are not structuraly under stress and for beads with smooth edges, it is very nice to work with. It flattens against the beads, making multiple passes easy as long as you hold the thread that is already in the beads taut while you insert the needle back in. 


Compare Beading Thread, KO, Miyuki, C-Lon Bead Thread, FireLine, WildFire & PowerPro

C-Lon Bead Thread Size AA & D come in 39 and 36 colors respectively. Many of the colors are amazing. I love the Light Brown, Purple, Chocolate, Grey, Burgundy, Seafoam, Turquoise & Teal, and it doubles up as a great thread for leather wrap bracelets/ladder bracelets especially in Size D.

Size D has a higher breaking strength and would be my first choice between the two. It functions very much like KO/Miyuki Beading Thread as to ease, especially with a light addition of beeswax. But stay away from low quality wax that is sticky. A good clean hard beeswax is what's needed here. Another thread conditioner option would be a light coat of Fray Block, not Fray Check that is too thick. 

The colors on the nylon beading thread listed above are colorfast, washable, but may bleach with long exposure to sunlight. The Dyneema and Spectra beading thread listed below are basically white and cannot be dyed. The color is added to the bonding material. If you peel the bonded coat, the fiber underneath is white… 

Compare Beading Thread, KO, Miyuki, C-Lon Bead Thread, FireLine, WildFire & PowerPro

FireLine comes in two colors, Smoke and Crystal. Crystal is white. It seems a bit translucent, but when placed on a dark color, it does not change. Smoke is dark grey. The thread is quite strong, it can be pulled on and it will flatten somewhat against beads, but not as much as the nylon beading thread. FireLine and WildFire are fairly slippery, so watch the thread tension.


Compare Beading Thread, KO, Miyuki, C-Lon Bead Thread, FireLine, WildFire & PowerPro

WildFire comes in 3 colors: Frost, Black and Camouflage Green. I nicknamed it Camouflage because the green seems to blend with many other colors somehow and it is also a color used in the military and for fishing…. For some strange reason I think I like WildFire better than FireLine, but that may be just this week… 


Compare Beading Thread, KO, Miyuki, C-Lon Bead Thread, FireLine, WildFire & PowerPro

And last but not least, Power Pro has just 2 colors. It has a few more colors, available in fishing stores, like a bright yellow, blue, red… but none have made it into the beading world yet, so try your local fishing store… This thread is strong and has a bit of a texture, so the needle does not fall off, but it also tends to stay rounder; it does not flatten much. 

Consideration about Beads
The type of bead used is a major consideration. Check your beads, make sure that the bead edges are nice and smooth, or as smooth as possible. I found along the way that some beads are simply not suitable for cord and thread, and maybe not even wire. Some beads are simply not well cut enough to be used in any project. With natural materials such as gemstones, often the difference between an inexpensive strand and a more expensive one is the quality of the bead edges.

With any beads that have a sharper edge, I would stay away from any of the nylon thread, as the sharp edges may abrade the filament one at a time. The heavy bonds on the Spectra and Dyneema thread will hold up better over time.

Structure or Drape?
I have read that drape or structure is based on the thread you use, but I have not found it to be the case. The thread tension is responsible for the drape or tight structure. In peyote stitch, for example, adding extra turns around beads can help hold the thread tension. It takes practice to hold the tension even. So yes, with your first piece, regardless of which thread you use, you may not have total control over the tension, but over time it gets easier.

Other Stress Factors
Consider what the end use will be and how much stress will be put on the piece you are making. In conventional jewelry, rings, for example, are considered more at risk than a pendant, bracelets somewhere in between… One should also consider how much pull there will be on the piece. If it is a bail, it will need to be able to hold up some weight and movement over time… So yes, the more stress, the higher breaking strength…

Personal Preferences
Some beaders are adamant about their preferences. For Peyote, I run into entrenched camp of FireLine vs PowerPro… I am still in the process of discovering and playing around. Color is a great consideration for me, and I have worked with C-Lon Bead Thread for a long time on leather wrap bracelet, so I am used to working with it. Cost is also a consideration as nylon beading thread is a lot less expensive than Spectra and Dyneema bonded thread. Well that is for another post… This one is already way too long!

–> Nylon Thread & Cord

Monday, June 15, 2015

Peyote Stitch History

Why is it named 'Peyote Stitch'? 

I got curious… in all the hours spent beading… I think I found some answers in an article in the Examiner and a blog entry and a short paragraph in Beading Daily.

Image Courtesy of The Bead Lab

This beading technique can be traced all the way to Ancient Egypt.

Naming this off-loom technique 'Peyote' originated in the 19th century in the USA due to its popularity among Plain Indian beadwork and it's ties with objects beaded in such a manner used in Peyote ceremonies by the Native American Church. 

It is also known as 'gourd stitch' and as 'running-bond stitch'. The naming of this technique 'gourd stitch' comes from the use of this beading technique to decorate gourd containers. This technique is found all over the world, in West Africa, in Huichol beadwork in Mexico, and of course in contemporary beadwork around the world. 

Sunday, June 14, 2015

Peyote Stitch - The FAST & Sometimes Frustrating Method

While searching for info on Peyote stitch, I run into the FAST method on this site: http://wildsallyroad.blogspot.com/2011/09/fast-f-s-t-peyote.html. I was intrigued and tried it. 

This alternate method can be used for even or odd count peyote. It is shown here with an odd-count.

Someone with much more experience with Peyote than I have, nicknamed it the FAST and FRUSTRATING method as whatever time might be saved is quickly lost if any mistakes are made along the way as undoing is time consuming. When I read her email, I laughed so hard, as I had the same experience. I have already nicknamed this method the Double F method… As to time saving I don't know, I have not timed it yet. 

So far, I am a bit lukewarm about this method, mostly because it does not have the peaceful rhythm of regular Peyote… picking up a bead, catching a bead, picking up a bead and catching one… The rhythm becomes a meditation. 

Regardless this method has merit, but especially for odd-count peyote as it bypasses the odd-count turnaround. Myself, I prefer the 2 Needle Method for Odd-Count Peyote, but you can mix the 2 methods within the same sleeve project and find out which way is best for you.

Do the first 4 rows
Start using either the traditional method or the 2 needle start. 2 needles are used for this method, so you might as well start with the 2 needles. > Peyote Stitch - 2 Needle Start. Then add 1 row (4th Row, 3 rows were made at once with the start).

FAST Peyote Method

1. Place a mini-clamp on one thread end. 

FAST Peyote Method

2. Insert 6 Delicas Size 10, 3 Seed Beads Size 11, and 6 Delicas Size10. 

FAST Peyote Method

3. With the Needle #2, go through the first bead on right. 
This is actually the last bead you threaded on Needle/Thread #1

FAST Peyote Method

4. Place the mini-clamp on Thread #1, right at bead.
Catch the 2nd bead on left side, that's the protruding bead.
Then go through the 3rd bead on right side and pull the thread.
The two beads are positioned diagonally from each other. See the angle of the needle. 

FAST Peyote Method

5. Repeat step 4, catching the next protruding beads on left side, 
and go through to the right, skipping the next bead and catching the one after that.


FAST Peyote Method

 6. Continue. 

FAST Peyote Method

 7. Here are the beads of Row 5 & 6 all added in. This method adds 2 rows at once.
Peyote Stitch rows are counted in a diagonal, or zig-zag fashion. 

FAST Peyote Method

 8. Remove the mini-clamp and adjust the tension. 

Here the same sequence started for row 7 & 8

FAST Peyote Method

9. Insert 6 Delicas 10s, 3 Seed Beads 11s, and 6 Delicas 10s. 

FAST Peyote Method

10. With the Needle #2, go through the first bead on right. 
This is actually the last bead you threaded on Needle #1

FAST Peyote Method

11. Place the mini-clamp on Thread/Needle #1, right at bead.

FAST Peyote Method

12. Catch the next 2 beads. 

Continue integrating the 2 sides by catching 1 bead on each side, and skipping 1 in between.
Once the rectangle is finished it can be joined into a tube by zipping the 2 sides together. See the other tutorials for the peyote sleeves listed below for instruction on finishing. 

This sleeve was done with 0.06 WildFire in Camouflage Green. The Miyuki bead mix is Green Patina with Delicas Size 10 and Duracoat Gold Seed bead Size 11. This is my final post for the Peyote Sleeves, Yay. Look for an upcoming review on Beading Thread. Otherwise, at least for the time being… I am switching back to other projects next. 

References

Other Peyote Stitch Tutorials
Even-Count Peyote Sleeves with Delicas Size 11
Even-Count Peyote Sleeves with Seed Beads Size 11

Get Kits, Materials & Tools
Peyote Beaded Sleeves
Kumihimo Bracelet with Long Magatamas & C-Lon Tex 400 Bead Cord
Magnetic End Clasps in Gold or Silver Tone


Friday, June 12, 2015

Peyote Stitch - The 2 Needle Method for Odd-Count Peyote

 This tutorial is for an alternate way of making the Peyote Sleeve with a Mix of Miyuki Delicas Size 10 and Miyuki Seed Beads Size 11. It is part in the series of tutorials for the Peyote Sleeves for the Kumihimo Bracelet with Long Magatamas & C-Lon Tex 400 Bead Cord. Start at the beginning with this post: Peyote Beaded Sleeves.

Start by beading the first 3 rows, using either the Traditional Method shown here or the 2 Needle Start

Traditional Start
Go to Step 2 on the Odd-Count Tutorial

2 Needle Start
It makes sense to use the 2 Needle Start, since you will need 2 needles to proceed anyways. 


2 Needle Method for Odd-Count Peyote

1. The first 3 rows are completed. The bead count by columns:
6 Delicas Size 10, 3 Seed Beads Size 11, 6 Delicas Size 10

2 Needle Method for Odd-Count Peyote

2. Place the mini-clampon lower thread, right at bead. 
With the top thread go through the bead at the arrow.

2 Needle Method for Odd-Count Peyote

3. Add 1 bead. Insert the needle into the next beads, and repeat.
Sorry the in-between picture was too blurry to use...

2 Needle Method for Odd-Count Peyote

4. Continue until the end of the row, switching beads for center stripe.
Remove mini-clamp and pull on both thread to tighten the work.

2 Needle Method for Odd-Count Peyote

4. Place mini-clamp on the thread on the right side. 
Proceed with peyote with the thread on left side, going to the right. 
Add a bead and catching the beads that protrude in between additions. 

2 Needle Method for Odd-Count Peyote

5. Add the last 'loose' bead on this row


2 Needle Method for Odd-Count Peyote

6. Place the mini-clamp against the last bead. 

2 Needle Method for Odd-Count Peyote

7. Switch to top thread/needle. Go though the last bead added. 
Continue as in above steps. 

2 Needle Method for Odd-Count Peyote

8.  Continue until you have 14 beads on each edges.
The thread ends are coming out on opposite sides. 

2 Needle Method for Odd-Count Peyote

9. End one side of the thread. There is several ways to do this:
You can travel the thread to the other edge. 
Or go around 4 beads repetitevely in a circle. 
Let the thread end hang out the edge. 

2 Needle Method for Odd-Count Peyote

10. Check for fit. Oops, best done before the last step...

2 Needle Method for Odd-Count Peyote

11. Zip both side together catching the protruding beads on each side one at a time. 
Check other tutorials to see zipping close-ups. Repeat step 9 for the second thread end. 

2 Needle Method for Odd-Count Peyote

12. Melt the ends with a thread burner.
Caution: Test this first with extra beads and thread. 
Do not burn your work or your fingers. 
I cut the thread first a few millimeters away from the bead edge, then hold a good thread burner towards the thread without touching the actual thread. The heat is enough to melt the thread and it creates a drop of molten thread. When it touches the bead edge, push the melted spot right unto the bead hole. 

Peyote Sleeve for Kumihimo Bracelet with Long Magatamas & C-Lon Tex 400 Bead Cord

13. Here is the bead edge finished. The melted ends are barely noticeable. 

Kumihimo Bracelet with Long Magatamas & C-Lon Tex 400 Bead Cord

14. Attach the Peyote sleeve to one side of the clasp by stitching it in a few places into the braid. Use a leftover piece of beading thread to do that. The finished peyote sleeve, now attached to one side of the magnetic clasp, when the bracelet is closed, becomes the focal point for the bracelet. 

This 2 Needle Method has instantly become one of my favorite Peyote technique, even though I am usually reluctant to work with 2 needles. The finished product may not as tight as the regular odd-number peyote method, but both edges feel alike, whereas with the regular odd-method, one edge usually feels stiffer than the other due to the addition of the extra turn around beads. 

This sleeve was done with 6 lbs PowerPro in Green. Check this review on beading thread.

References

Peyote Stitch Tutorials
Even-Count Peyote Sleeves with Delicas Size 11
Even-Count Peyote Sleeves with Seed Beads Size 11

Get Kits, Materials & Tools
Peyote Beaded Sleeves
Kumihimo Bracelet with Long Magatamas & C-Lon Tex 400 Bead Cord
Magnetic End Clasps in Gold or Silver Tone


Tuesday, June 2, 2015

Peyote Sleeves Tutorial - Odd-Count with Miyuki Delicas Size 10 and Seed Beads Size 11

Kumihimo Bracelet with Long Magatamas, C-lon Tex 400 Bead Cord & Peyote Stitch Sleeves
Left from top down: Mahogany with Soft Copper & Gold Mix Sleeve
Starlight with Silver & Gold Mix Sleeve
Tuxedo with Gunmetal & Gold Mix Sleeve
Center: Burnt Umber with Plum & Gold Mix Sleeve
Right from top down: Pink Shadow with Matte Pink & Silver Mix Sleeve
Cote d'Azur with Blue & Gold Mix Sleeve
Razzleberry with Dark Plum & Copper Mix Sleeves
For this sleeve we will be working with an odd count of beads, thus odd-count peyote. It makes one of the turn a bit more challenging, but it is well worth the effort as that center bead line is nice for symmetrical designs. we will also be working for a beads mix of Delicas and seed beads for added texture.

This tutorial assume that already made 1 or 2 sleeves from the two previous blog posts.  

Materials & Tools

Peyote Stitch Tutorial Material List
Miyuki Delicas Size 10, Miyuki Seed Beads Size 11, KO or Miyuki Beading Thread Lilac, a bead Embroidery Needle Size 10 or 12 & a Mini-Clamp

Peyote Stitch Tutorial
1. Thread the needle. Clamp the thread at 24 inch.
Load 6 Delicas, 3 Seed Beads & 6 Delicas, so a total of 15 beads. 


Peyote Sleeves Tutorial - Odd-Count
2. Work the first 3 rows as in the two previous tutorials. But you will be ending this row with a loose bead without a next final to anchor it to as in even-count peyote. 
Or see 'Alternate 2 Needle Start' in References listed below. 

Peyote Sleeves Tutorial - Odd-Count
3. To anchor this last bead, go through #1, then #2, then #3. Change direction and came back through #4, then #2, then #1. 

Peyote Stitch Tutorial - Odd-Count
5. Go through #5 and add the beads for the next row.
The turn on the next edge will be just like in even-count  peyote.


Peyote Stitch Tutorial - Odd-Count
6. Succeeding rows turns: Once again you end up with the last beads #4 in need of anchoring. Go through #1, #2, return through #3 and come out through #1. 


Peyote Stitch Tutorial - Odd-Count
7. Go though # 4 and start the next row. Proceed until the rectangle is the right size to cover the clasp.  


Note: When the thread gets too short, go in a circle around 4 beads a few times and let the end of the thread out on edge. Switch to the other end of the thread. 

Peyote Stitch Tutorial - Odd-Count
8. The rectangle is completed with 14 beads on each edge.

In my note book, I keep track of the number of beads along the length and the number of beads on the edge. For this particular clasp I need a peyote rectangle of Delicas 10s  and Seed Bead 11s Mix of  - 6D, 3S, 6D long x 14b.

Peyote Stitch from Flat to Tubular
9. Fold the rectangle into a tube and zip  the two sides together catching the outer beads on each side. 

Peyote Stitch Tube
10. Go around beads in a similar fashion as the odd count turn several times and melt the ends with a thread burner as in the two previous tutorials. 

Peyote Stitch Sleeves for Kumihimo Bracelet with Long Magatamas & C-Lon Tex 400 Bead Cord

11. Attach the sleeve to one side of the braid using one of the leftover thread by stitching it to the braid.

Here it is shown on the bracelet. The other 3 sleeves are alternative sleeves made with Miyuki Seed Beads Size 11 and Delicas Size 11. There are shown in the previous blog entries. 

References

Peyote Stitch Tutorials
Even-Count Peyote Sleeves with Delicas Size 11
Even-Count Peyote Sleeves with Seed Beads Size 11

Get Kits, Materials & Tools
Peyote Beaded Sleeves
Kumihimo Bracelet with Long Magatamas & C-Lon Tex 400 Bead Cord
KO/Miyuki Beading Thread
C-Lon Beading Thread Size D
WildFire Beading Thread
Bead Embroidery Needles
Beeswax
Magnetic End Clasps in Gold or Silver Tone

Related Posts 
Why add Beaded Sleeves over Magnetic Clasps? Beside the esthetic…
Thread Burners Review