Showing posts with label Long Magatamas. Show all posts

Friday, March 25, 2022

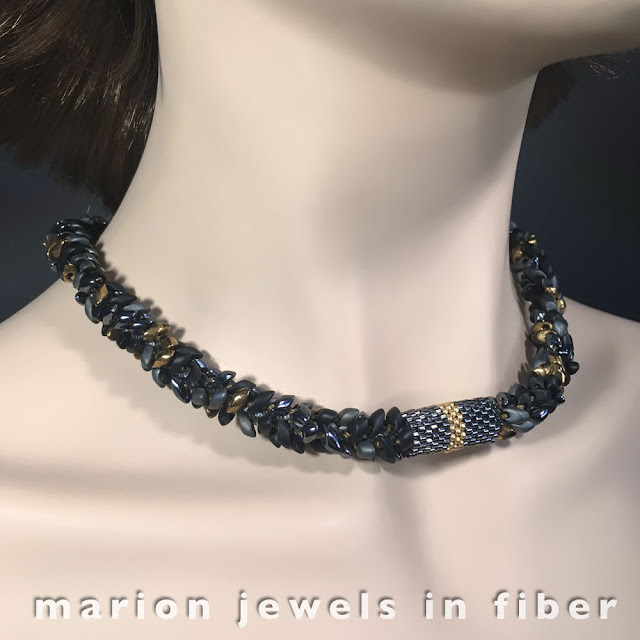
Kumihimo Necklace with Long Magatamas and C-Lon Tex 400 Bead Cord

Kumihimo Necklace with Long Magatamas and C-Lon Tex 400 Bead Cord


Occasionally a design needs to get revisited and updated. Originally in 2015, I designed this Kumihimo Kit with Long Magatamas and C-Lon Tex 400 as a bracelet kit. Now in 2022, kits for necklaces are available. This is due to a number of requests when I taught this project in a Zoom class. Many of the participants wanted to make necklaces instead of the bracelet offered in the class kit.  

The tutorial for this project has grown from 14 to 22 pages and now includes additional design options.
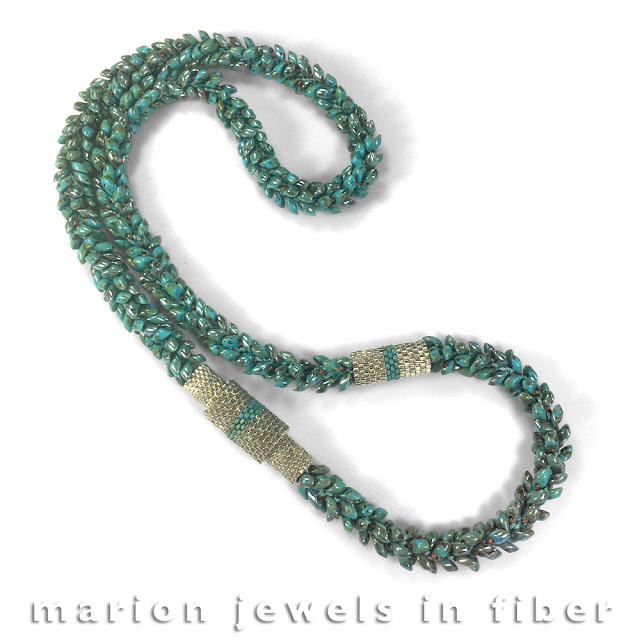
 

Kumihimo Necklace with Long Magatamas and C-Lon Tex 400 Bead Cord

One option shows how to extend the necklace length by adding a section. This way it can be worn at two different length. Here the bracelet is added to the necklace. 
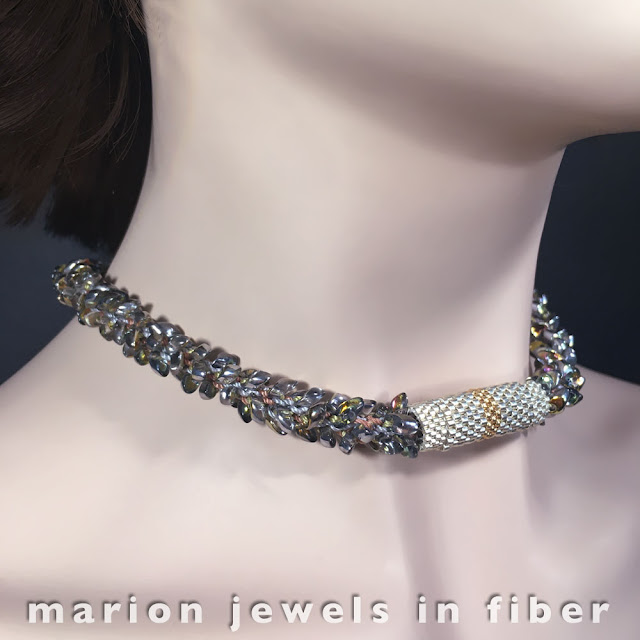
 

Kumihimo Necklace with Long Magatamas and C-Lon Tex 400 Bead Cord

Another option shown in the tutorial is how to extend the clasp and peyote sleeve cover width to create a stronger focal point. In this example, the clasp was extended by half and inch.
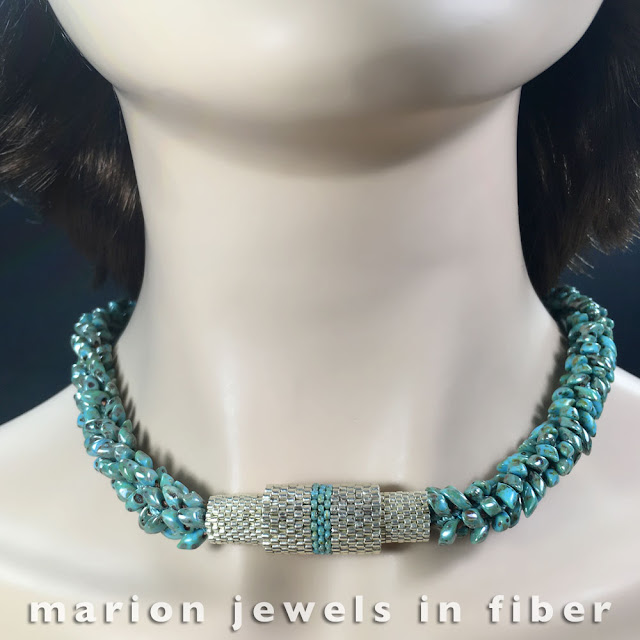

Kumihimo Necklace with Long Magatamas and C-Lon Tex 400 Bead Cord

Here it was extended by a full inch doubling the width and it has a double sleeve cover, widening the diameter at the center of the clasp.
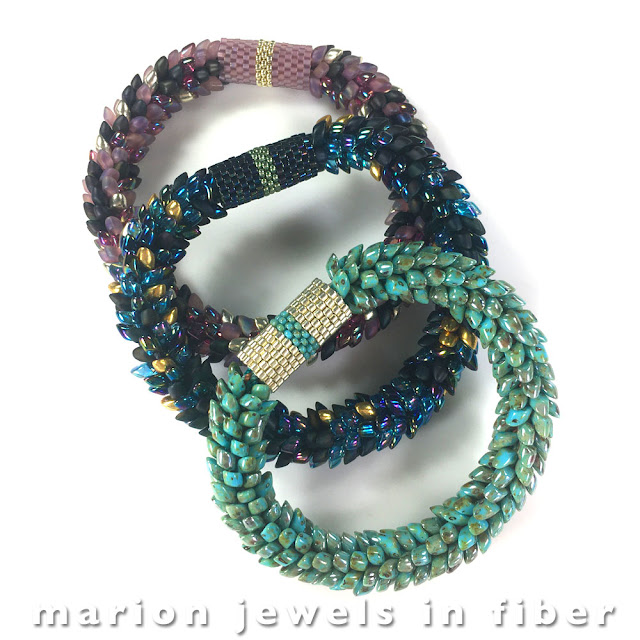
 

Kumihimo Necklace with Long Magatamas and C-Lon Tex 400 Bead Cord

Another option now included in the tutorial is to make a more traditional beaded kumihimo bracelet with beads on every cord. The bracelet is a bit heavier, wider in diameter and less flexible. It also has twice as many beads as the regular design with space between the beads, so if you want to do this design, get an extra 20 g bag of Magatam Beads. 
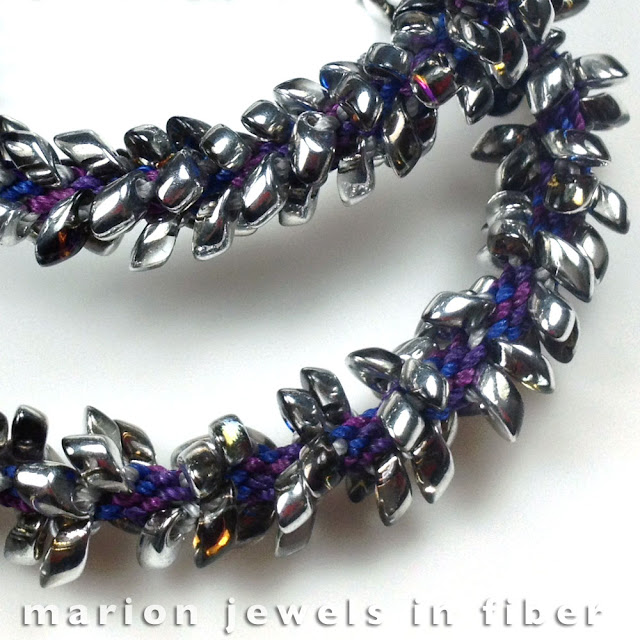
Kumihimo Necklace with Long Magatamas and C-Lon Tex 400 Bead Cord

 Or change the cord placement to get a spiral design as shown on the lower kumihimo braid.
 

Watch Kumihimo Braiding on YourTube

Before getting a kit, you can view a live demo of the kumihimo braiding process on YouTube. This kit is a great starter kit if you have never done any kumihimo before. It is fun and the instructions are easy to follow. As to starting with a bracelet or a necklace, it really make no difference as to the difficulty level. The bracelet, however, takes less time to braid...


> Kumihimo Kits with Long Magatamas and C-Lon Tex 400 Bead Cord

> More Kumihimo Kits

>  Earlier Post about the Bracelets


Friday, June 12, 2015

Peyote Stitch - The 2 Needle Method for Odd-Count Peyote

 This tutorial is for an alternate way of making the Peyote Sleeve with a Mix of Miyuki Delicas Size 10 and Miyuki Seed Beads Size 11. It is part in the series of tutorials for the Peyote Sleeves for the Kumihimo Bracelet with Long Magatamas & C-Lon Tex 400 Bead Cord. Start at the beginning with this post: Peyote Beaded Sleeves.

Start by beading the first 3 rows, using either the Traditional Method shown here or the 2 Needle Start

Traditional Start
Go to Step 2 on the Odd-Count Tutorial

2 Needle Start
It makes sense to use the 2 Needle Start, since you will need 2 needles to proceed anyways. 


2 Needle Method for Odd-Count Peyote

1. The first 3 rows are completed. The bead count by columns:
6 Delicas Size 10, 3 Seed Beads Size 11, 6 Delicas Size 10

2 Needle Method for Odd-Count Peyote

2. Place the mini-clampon lower thread, right at bead. 
With the top thread go through the bead at the arrow.

2 Needle Method for Odd-Count Peyote

3. Add 1 bead. Insert the needle into the next beads, and repeat.
Sorry the in-between picture was too blurry to use...

2 Needle Method for Odd-Count Peyote

4. Continue until the end of the row, switching beads for center stripe.
Remove mini-clamp and pull on both thread to tighten the work.

2 Needle Method for Odd-Count Peyote

4. Place mini-clamp on the thread on the right side. 
Proceed with peyote with the thread on left side, going to the right. 
Add a bead and catching the beads that protrude in between additions. 

2 Needle Method for Odd-Count Peyote

5. Add the last 'loose' bead on this row


2 Needle Method for Odd-Count Peyote

6. Place the mini-clamp against the last bead. 

2 Needle Method for Odd-Count Peyote

7. Switch to top thread/needle. Go though the last bead added. 
Continue as in above steps. 

2 Needle Method for Odd-Count Peyote

8.  Continue until you have 14 beads on each edges.
The thread ends are coming out on opposite sides. 

2 Needle Method for Odd-Count Peyote

9. End one side of the thread. There is several ways to do this:
You can travel the thread to the other edge. 
Or go around 4 beads repetitevely in a circle. 
Let the thread end hang out the edge. 

2 Needle Method for Odd-Count Peyote

10. Check for fit. Oops, best done before the last step...

2 Needle Method for Odd-Count Peyote

11. Zip both side together catching the protruding beads on each side one at a time. 
Check other tutorials to see zipping close-ups. Repeat step 9 for the second thread end. 

2 Needle Method for Odd-Count Peyote

12. Melt the ends with a thread burner.
Caution: Test this first with extra beads and thread. 
Do not burn your work or your fingers. 
I cut the thread first a few millimeters away from the bead edge, then hold a good thread burner towards the thread without touching the actual thread. The heat is enough to melt the thread and it creates a drop of molten thread. When it touches the bead edge, push the melted spot right unto the bead hole. 

Peyote Sleeve for Kumihimo Bracelet with Long Magatamas & C-Lon Tex 400 Bead Cord

13. Here is the bead edge finished. The melted ends are barely noticeable. 

Kumihimo Bracelet with Long Magatamas & C-Lon Tex 400 Bead Cord

14. Attach the Peyote sleeve to one side of the clasp by stitching it in a few places into the braid. Use a leftover piece of beading thread to do that. The finished peyote sleeve, now attached to one side of the magnetic clasp, when the bracelet is closed, becomes the focal point for the bracelet. 

This 2 Needle Method has instantly become one of my favorite Peyote technique, even though I am usually reluctant to work with 2 needles. The finished product may not as tight as the regular odd-number peyote method, but both edges feel alike, whereas with the regular odd-method, one edge usually feels stiffer than the other due to the addition of the extra turn around beads. 

This sleeve was done with 6 lbs PowerPro in Green. Check this review on beading thread.

References

Peyote Stitch Tutorials
Even-Count Peyote Sleeves with Delicas Size 11
Even-Count Peyote Sleeves with Seed Beads Size 11

Get Kits, Materials & Tools
Peyote Beaded Sleeves
Kumihimo Bracelet with Long Magatamas & C-Lon Tex 400 Bead Cord
Magnetic End Clasps in Gold or Silver Tone


Tuesday, June 2, 2015

Peyote Sleeves Tutorial - Odd-Count with Miyuki Delicas Size 10 and Seed Beads Size 11

Kumihimo Bracelet with Long Magatamas, C-lon Tex 400 Bead Cord & Peyote Stitch Sleeves
Left from top down: Mahogany with Soft Copper & Gold Mix Sleeve
Starlight with Silver & Gold Mix Sleeve
Tuxedo with Gunmetal & Gold Mix Sleeve
Center: Burnt Umber with Plum & Gold Mix Sleeve
Right from top down: Pink Shadow with Matte Pink & Silver Mix Sleeve
Cote d'Azur with Blue & Gold Mix Sleeve
Razzleberry with Dark Plum & Copper Mix Sleeves
For this sleeve we will be working with an odd count of beads, thus odd-count peyote. It makes one of the turn a bit more challenging, but it is well worth the effort as that center bead line is nice for symmetrical designs. we will also be working for a beads mix of Delicas and seed beads for added texture.

This tutorial assume that already made 1 or 2 sleeves from the two previous blog posts.  

Materials & Tools

Peyote Stitch Tutorial Material List
Miyuki Delicas Size 10, Miyuki Seed Beads Size 11, KO or Miyuki Beading Thread Lilac, a bead Embroidery Needle Size 10 or 12 & a Mini-Clamp

Peyote Stitch Tutorial
1. Thread the needle. Clamp the thread at 24 inch.
Load 6 Delicas, 3 Seed Beads & 6 Delicas, so a total of 15 beads. 


Peyote Sleeves Tutorial - Odd-Count
2. Work the first 3 rows as in the two previous tutorials. But you will be ending this row with a loose bead without a next final to anchor it to as in even-count peyote. 
Or see 'Alternate 2 Needle Start' in References listed below. 

Peyote Sleeves Tutorial - Odd-Count
3. To anchor this last bead, go through #1, then #2, then #3. Change direction and came back through #4, then #2, then #1. 

Peyote Stitch Tutorial - Odd-Count
5. Go through #5 and add the beads for the next row.
The turn on the next edge will be just like in even-count  peyote.


Peyote Stitch Tutorial - Odd-Count
6. Succeeding rows turns: Once again you end up with the last beads #4 in need of anchoring. Go through #1, #2, return through #3 and come out through #1. 


Peyote Stitch Tutorial - Odd-Count
7. Go though # 4 and start the next row. Proceed until the rectangle is the right size to cover the clasp.  


Note: When the thread gets too short, go in a circle around 4 beads a few times and let the end of the thread out on edge. Switch to the other end of the thread. 

Peyote Stitch Tutorial - Odd-Count
8. The rectangle is completed with 14 beads on each edge.

In my note book, I keep track of the number of beads along the length and the number of beads on the edge. For this particular clasp I need a peyote rectangle of Delicas 10s  and Seed Bead 11s Mix of  - 6D, 3S, 6D long x 14b.

Peyote Stitch from Flat to Tubular
9. Fold the rectangle into a tube and zip  the two sides together catching the outer beads on each side. 

Peyote Stitch Tube
10. Go around beads in a similar fashion as the odd count turn several times and melt the ends with a thread burner as in the two previous tutorials. 

Peyote Stitch Sleeves for Kumihimo Bracelet with Long Magatamas & C-Lon Tex 400 Bead Cord

11. Attach the sleeve to one side of the braid using one of the leftover thread by stitching it to the braid.

Here it is shown on the bracelet. The other 3 sleeves are alternative sleeves made with Miyuki Seed Beads Size 11 and Delicas Size 11. There are shown in the previous blog entries. 

References

Peyote Stitch Tutorials
Even-Count Peyote Sleeves with Delicas Size 11
Even-Count Peyote Sleeves with Seed Beads Size 11

Get Kits, Materials & Tools
Peyote Beaded Sleeves
Kumihimo Bracelet with Long Magatamas & C-Lon Tex 400 Bead Cord
KO/Miyuki Beading Thread
C-Lon Beading Thread Size D
WildFire Beading Thread
Bead Embroidery Needles
Beeswax
Magnetic End Clasps in Gold or Silver Tone

Related Posts 
Why add Beaded Sleeves over Magnetic Clasps? Beside the esthetic…
Thread Burners Review


Monday, June 1, 2015

Peyote Stitch Beaded Sleeves Tutorial with Miyuki Seed Beads Size 11

Peyote Stitch Sleeves with Miyuki Seed Beads Size 11
Beaded Sleeves made with Miyuki Seed Beads Size 11

I have been obsessed by these little sleeves for the past month or so. Ordering beads matching the Kumihimo Bracelets with Long Magatamas & C-Lon Tex 400, trying different bead sleeve designs, wearing them constantly to test them and getting comments from friends and at large. So here is the next installment on my quest. 

The tutorial

We will be doing an even-count Peyote stitch similar to the previous blog entry but instead of using Delicas we will be using Miyuki Seed Beads Size 11. 

Peyote Stitch with Miyuki Seed Beads Size 11 and C-lon Bead Thread Size D
Gather your materials and tools… 

Note on Thread Options
For this tutorial, I used C-Lon Beadind Thread Size D in Light Brown as it contrasted well with the Miyuki Picasso Turquoise beads. Plus this color matches one of the color of C-Lon Tex 400 Bead Cord used in the bracelet braid. Another very good option is WildFire .006 in 'Camouflage' Green.

With the Duracoat Galvanized Silver Seed Beads Size 11, I use 6 Lb FireLine in Crystal. Other options for silver would be KO or Miyuki Beading Thread in Light Grey.

For Duracoat Galvanized Gold Seed Beads Size 11, I like KO or Miyuki Beading Thread in Gold. Keep in mind that the thread in Peyote stitch is only noticeable on the edge. Elsewhere only the beads are showing.


Peyote Stitch Tutorial for Sleeves with Miyuki Seed Beads Size 11
1.  Thread the needle. Place the mini-clamp at 24 inches from the thread end.


Note: If I have the full spool I tend not to cut the thread off the spool until I have completed the first half of the peyote rectangle just in case I damage the thread and need extra thread on the spool side. If you are working with a 48 inch thread length, clamp it at the middle. 

2.  Load 18 Size 11 beads for the Picasso Turquoise - 16 beads for the Silver, Gold or Copper. The Duracoat Galvanized beads have more bulk than the Picasso beads. Double-check the length of the beads against the clasp.


3.  Push the beads against the mini-clamp. These beads will become the row 1 & 2.  Add an extra mini-clamp is desired. The Picasso Turquoise Seed Beads are a bit more slippery than the Delicas and the Duracoat Galvanized 11s. 


4.  For row 3, load 1 bead and go back into row 1 & 2. Skip the first bead, insert the needle through the second bead and pull the thread. 


Peyote Stitch Tutorial for Sleeves with Miyuki Seed Beads Size 11
5.  Continue, skip a bead, insert the needle through the next bead and pull the thread through. 

Peyote Stitch Tutorial for Sleeves with Miyuki Seed Beads Size 11
6. Repeat until the end of the row. 
See alternate peyote start done with 2 needles listed below in references. 

7.  For row 4, add a bead, and go through the last bead added in the previous row. Finish the row by adding a bead and catching a bead on row 3. Finish row 4. Continue the rows the same manner. 

Peyote Stitch Tutorial for Sleeves with Miyuki Seed Beads Size 11
 8.  Once you have finished a few rows, you can remove the clip.

9. When you have made about 1/2 of the rows and have at least 7 beads on each edge, or your working thread is becoming too short, go around 4 beads in a circle a few times and leave the end hanging on the side. Remove the needle and switch it to the other thread end. (If your thread is still attached to the spool - Cut the thread at spool leaving a length of 24 inches). Continue your rows with this new thread end until you have 14 beads on each edge.


Note: Count the beads on the edge not the rows. It is easier. Keep track of the number of beads along the length and the number of beads on the edge. For the clasp, a peyote rectangle of Seed beads in Picasso Turquoise 11s,  18 bead long with 14 beads on edge, 18b x 14b will work.  The Duracoat Galvenized beads take a bit more width and the dimension of the rectangle is 16b x 14b. 

Peyote Stitch Tutorial for Sleeves with Miyuki Seed Beads Size 11
10.  Check the fit around the clasp. Join the sides the flat peyote rectangle turning it into a tube.
Catch the beads on the edges. 

Peyote Stitch Tutorial for Sleeves with Miyuki Seed Beads Size 11
11. Zip the two sides together by zigzagging through the beads on the edge of both sides.Catch 1 bead on one side, then 1 on the other side.

Peyote Stitch Tutorial for Sleeves with Miyuki Seed Beads Size 11
12. Tighten the beading thread & continue.

Peyote Stitch Tutorial for Sleeves with Miyuki Seed Beads Size 11
15.  Once you reach the other side, go in a circle between several beads several times or go back to the other side if any of your stitches are a bit loose. Leave the ends hanging on the side.

Peyote Stitch Tutorial for Sleeves with Miyuki Seed Beads Size 11
16.  Cut the thread a few millimeters from the edge. Melt the ends with a thread burner. There is no need to actually touch the thread if the burner if red-hot.


Note: If it is your first time using a thread burner, practice first on some extra beads and thread ends. It would be a shame to melt your hard work. Or use an alternate method listed below. 


Alternatives: Cut the thread after taking it around the same several beads over and over. Add a drop of Fray Check or GS Hypo Cement for added security is so desired. 

Peyote Stitch Tutorial for Sleeves with Miyuki Seed Beads Size 11
17.  See bead edge and melted end. 


Kumihimo Bracelet with Long Magatamas & C-Lon Tex 400 Bead Cord & Peyote Stitch Sleeves
Here is the Turquoise Moon bracelet with a Picasso Turquoise Seed Bead Size 11 Sleeve over the magnetic clasp.  


Finishing: The sleeve can be attached by stitching it to the one of the side of the kumihimo braid. Use a new thread to do that just in case you change your mind and want to remove the sleeve later on. It can also be left loose if you want to have several interchangeable sleeves.

References

Peyote Stitch Tutorials
Even-Count Peyote Sleeves with Delicas Size 11

Get Kits, Materials & Tools
Peyote Beaded Sleeves
Kumihimo Bracelet with Long Magatamas & C-Lon Tex 400 Bead Cord
KO/Miyuki Beading Thread
C-Lon Beading Thread Size D
WildFire Beading Thread
Bead Embroidery Needles
Beeswax
Magnetic End Clasps in Gold or Silver Tone

Related Posts
Why add Beaded Sleeves over Magnetic Clasps? Beside the esthetic…
Thread Burners Review


Beaded Tubular Sleeves made with Flat, Even-Count Peyote Stitch and Miyuki Delicas Size 11

Beaded Sleeve for Magnetic Clasp
Beads, Beading Thread, Bead Embroidery Needles, a Mini-Clip and a Thread Burner

List of Materials & Tools

Beads
Miyuki Delicas Size 11 work well. They are incredibly regular, have large holes and come in great color choices. 

Beading Thread
I have tried a range of beading thread for this project and now choose my thread solely based on best color match, not based on breaking strength as there is no need for great structural strength for this project, nor do I choose based on thread type. 

Here is the list of thread according to their breaking strength, : KO or Miyuki Beading Thread, 6 lb FireLine, C-Lon Bead Thread Size D, and WildFire .006. Respectively, they have 4 lb, 6 lb, 7 lb & 10 lb breaking strength. 

As to thickness of chread, they are all thin thread, but they list from thinnest to very thin in this order: KO/Miyuki, C-Lon Bead Thread Size D, 6lb FireLine, WildFire. The first two flatten the most, the last two are rounder, but will flatten a bit against a bead hole. 

KO and Miyuki Beading Thread are exactly the same product, nylon filaments laid side by side without being twisted in plies in a monocord waxed together. C-Lon Bead Thread Size D is similar but thicker and it has no wax, just a very light bond. WildFire is a thermally bonded nylon filament, white in its center with a black, frost white or camouflage green thermally bond over the filaments. FireLine is similar to WildFire, but it comes in a dark grey, smoke color and a white named crystal, both are slightly transparent. They all have their own feel, but in the end for this particular project all of them will work well. 

The major factor for a good result is an even thread tension, and that will improve with practice. Don't stress, this project is forgiving, even on the first try! 

Bead Embroidery Needles
Blunt ends are better than regular beading needles. The blunt ends lowers the likelihood of splitting the thread when going through the beads multiple times. Plus they are short and no length is needed for this project.

Mini-Clamp
I found a mini-clamp much better than using a bead as a stopper, plus I already had one laying around  on my desk from the tool kit of the Kumihimo Bracelet with Long Magatamas & C-Lon Tex 400 Bead Cord.

Thread Burner
Great for melting the end of the thread. Alternatives: Cut the thread after taking it around the same several beads over and over. Add a drop of Fray Check or GS Hypo Cement for added security is so desired. 

Optional - Beeswax
Good for the ends of C-Lon Bead Thread Size D. It prevents the ends from splitting when threading them into the needle. KO and Miyuki Thread is already waxed, but might need an additional waxing. WildFire & FireLine do not need any wax but the end needs to be flattened a bit before threading it. 

We will be covering the magnetic tube with a flat, even-count peyote stitch by first making a flat rectangle and then zipping it into a tube. Even-count means that the number of beads along the length of the peyote stitch is an even number, such as 18 beads, which is the number that will cover the length of the clasp in this instance. 

Even-Count Peyote Stitch
1.  Thread the needle. Place the mini-clamp at 24 to 36 inches from the thread end. 
 Note: If I have the full spool I tend not to cut the thread off the spool until I have completed the first half of the peyote rectangle just in case I damage the thread and need extra length on the spool side. If you are working with a 48 inch thread length, clamp it at 24 inches. 

2.  Load 18 Delica Size 11 beads as shown here, or 20 if you want a longer sleeve. Check the length of the beads against the clasp. 

Even-Count Peyote Stitch
3.  Push the beads against the mini-clamp. These beads will become the row 1 & 2.  

Even Count Peyote Stitch Instructions
4.  For row 3, load 1 bead and go back into row 1 & 2.
Skip the first bead, insert the needle through the second bead and pull the thread. 

Even Count Peyote Stitch Instructions
5.  Step completed. 

Even Count Peyote Stitch Instructions
6.  Continue, skip a bead, insert the needle through the next bead and pull the thread through. 

Even Count Peyote Stitch Instructions
7.  Step 5 completed, continue, skip a bead, insert the needle into the next bead and pull the thread.   

Even Count Peyote Stitch Instructions
8.  Rows 1, 2 and 3 completed. Rows in peyote stitch are counted diagonally.  
See 2 needle alternate start method listed in references below. 

Even Count Peyote Stitch Instructions
9.  For row 4, add a bead, and go through the last bead added in the previous row.
This will be the way you start all the future rows. 

Even Count Peyote Stitch Instructions
10.  Step 8 completed. Continue the row. 

Even Count Peyote Stitch Instructions
11.  It is helpful to add the first 2 beads of a new row prior to pulling the thread completely through.
It helps keep the thread tension even.  

12. Once your thread is becoming short, thread it in a circle around several beads a few times. Leave the end hanging on the side. Cut the thread at spool leaving a length of 24 inches. (Skip cutting if your thread is already cut.) Continue your rows with this new thread ends until you have completed 31 rows and have 16 beads on each edge

Note: It is easier to count the beads on the edge rather than counting rows. The beads on edge are easy to see. Rows need to be counted diagonally or in zigzag.
In my note book, I keep track of the number of beads along the length and the number of beads on the edge, thus for this particular clasp I need a peyote rectangle of Delicas 11s - 18 or 20 beads long with 16 beads on the edge, for short 18b x 16b or 20b x 16b


Peyote Stitch Tubular Sleeve
14.  Check the fit around the clasp. Join both sides for the flat peyote into a tube.
Zip the two sides together by 
zigzagging through the beads on the edge of both sides. 

Peyote Stitch Tubular Sleeve
15.  Catch 1 bead on one side, then 1 on the other side. It will create an invisible joint.
Once you reach the other side, 
go in a circle between several beads several times or go back to the other side if any of your peyote is a bit loose. Leave the end hanging on the side.
    

Peyote Stitch Tubular Sleeve for Kumihimo Bracelet with Long Magatamas & C-Lon Tex 400 Bead Cord
Here is the bracelet with the completed sleeve.
The bracelet color is Razzleberry.
The sleeve Dark Plum Delicas Size 11. 


Finishing: Attach the sleeve by stitching it to the kumihimo braid on one side. Use a new thread to do that just in case you change your mind and decide to remove the sleeve later on. It can also be left loose if you want several interchangeable sleeves. See alternative sleeves below. 


Peyote Stitch Tubular Sleeve for Kumihimo Bracelet with Long Magatamas & C-Lon Tex 400 Bead Cord
Same bracelet with Copper Delica Size 11 Sleeve

Same Bracelet with Copper Seed Beads Size 11 Sleeve. The count is 16 beads wide by 14 beads on the edges with Miyuki Duracoat Galvanized Size 11 Seed Beads.
> See tutorial for this sleeve
   
 
Note: See next blog entries coming soon showing this same process with seed beads and an odd-count peyote with mixed delicas and seed beads.

Peyote Stitch Tubular Sleeve for Kumihimo Bracelet with Long Magatamas & C-Lon Tex 400 Bead Cord
 Same Bracelet with Dark Plum Delicas Size 10 & Copper Seed Beads Size 11 Sleeve
> See tutorial for this sleeve 


Related Peyote Stitch Tutorials
Even-Count Peyote Sleeve with Seed Beads Size 11

Materials & Tools
Peyote Beaded Sleeves
Kumihimo Bracelet with Long Magatamas & C-Lon Tex 400 Bead Cord
KO/Miyuki Beading Thread
C-Lon Beading Thread Size D
WildFire Beading Thread
Bead Embroidery Needles
Beeswax
Magnetic End Clasps in Gold or Silver Tone

Related Posts
Why add Beaded Sleeve over a Magnetic Clasps? Beside the esthetic…
Thread Burners Review