This alternate method can be used for even or odd count peyote. It is shown here with an odd-count.
Someone with much more experience with Peyote than I have, nicknamed it the FAST and FRUSTRATING method as whatever time might be saved is quickly lost if any mistakes are made along the way as undoing is time consuming. When I read her email, I laughed so hard, as I had the same experience. I have already nicknamed this method the Double F method… As to time saving I don't know, I have not timed it yet.
So far, I am a bit lukewarm about this method, mostly because it does not have the peaceful rhythm of regular Peyote… picking up a bead, catching a bead, picking up a bead and catching one… The rhythm becomes a meditation.
Regardless this method has merit, but especially for odd-count peyote as it bypasses the odd-count turnaround. Myself, I prefer the 2 Needle Method for Odd-Count Peyote, but you can mix the 2 methods within the same sleeve project and find out which way is best for you.
Do the first 4 rows
Start using either the traditional method or the 2 needle start. 2 needles are used for this method, so you might as well start with the 2 needles. > Peyote Stitch - 2 Needle Start. Then add 1 row (4th Row, 3 rows were made at once with the start).
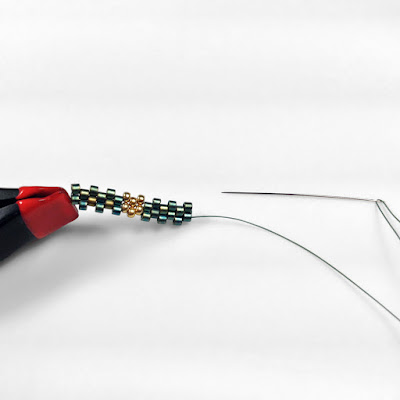
1. Place a mini-clamp on one thread end.
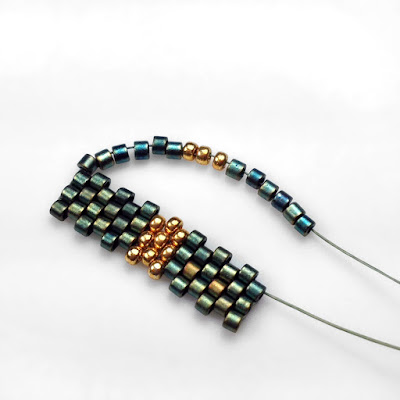
2. Insert 6 Delicas Size 10, 3 Seed Beads Size 11, and 6 Delicas Size10.
3. With the Needle #2, go through the first bead on right.
This is actually the last bead you threaded on Needle/Thread #1
4. Place the mini-clamp on Thread #1, right at bead.
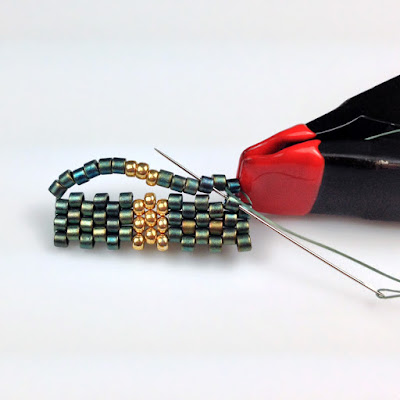
Catch the 2nd bead on left side, that's the protruding bead.
Then go through the 3rd bead on right side and pull the thread.
The two beads are positioned diagonally from each other. See the angle of the needle.
The two beads are positioned diagonally from each other. See the angle of the needle.
5. Repeat step 4, catching the next protruding beads on left side,
and go through to the right, skipping the next bead and catching the one after that.
6. Continue.
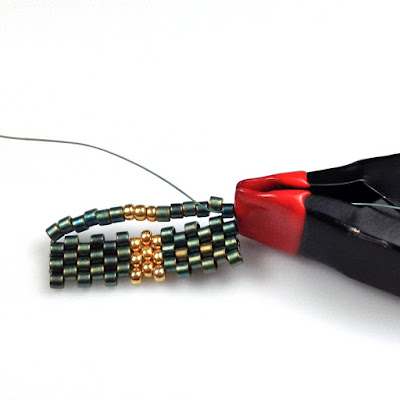
7. Here are the beads of Row 5 & 6 all added in. This method adds 2 rows at once.
Peyote Stitch rows are counted in a diagonal, or zig-zag fashion.
8. Remove the mini-clamp and adjust the tension.
Here the same sequence started for row 7 & 8
9. Insert 6 Delicas 10s, 3 Seed Beads 11s, and 6 Delicas 10s.
10. With the Needle #2, go through the first bead on right.
This is actually the last bead you threaded on Needle #1
11. Place the mini-clamp on Thread/Needle #1, right at bead.
12. Catch the next 2 beads.
Continue integrating the 2 sides by catching 1 bead on each side, and skipping 1 in between.
Once the rectangle is finished it can be joined into a tube by zipping the 2 sides together. See the other tutorials for the peyote sleeves listed below for instruction on finishing.
This sleeve was done with 0.06 WildFire in Camouflage Green. The Miyuki bead mix is Green Patina with Delicas Size 10 and Duracoat Gold Seed bead Size 11. This is my final post for the Peyote Sleeves, Yay. Look for an upcoming review on Beading Thread. Otherwise, at least for the time being… I am switching back to other projects next.
References
Other Peyote Stitch TutorialsEven-Count Peyote Sleeves with Delicas Size 11
Even-Count Peyote Sleeves with Seed Beads Size 11
Get Kits, Materials & Tools
Peyote Beaded Sleeves
Kumihimo Bracelet with Long Magatamas & C-Lon Tex 400 Bead Cord
Magnetic End Clasps in Gold or Silver Tone
Related Posts
Why add Beaded Sleeves over Magnetic Clasps? Beside the esthetic…
Thread Burners Review
Why add Beaded Sleeves over Magnetic Clasps? Beside the esthetic…
Thread Burners Review


1 comment:
I really like this quick method. Thanks
Post a Comment