Showing posts with label Chinese Knotting Cord. Show all posts

Monday, August 15, 2022

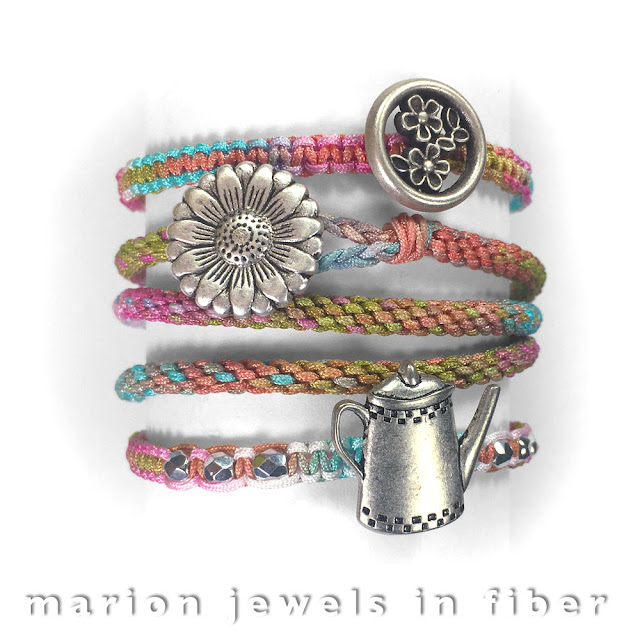
Bracelet Stack #2 made with Space Dyed Chinese Knotting Cord


Bracelet Stack made with Space Dyed Chinese Knotting Cord

This next bracelet stack is made with "Bright Spring Variation", the second colorway I experimented with. Bracelet #1 is not shown on this stack.


Space Dyed Chinese Knotting Cord shown as a Skein 


How is Space Dyed Yarn or Cord made?
 
The cord is first braided with nylon thread, then it is space dyed in skeins with several colors and/or color gradients creating a pattern around the skein. Most skeins are about 50 inch (128 cm) around with some, not all, space dyed with the same colors on both side of the folded skein so the pattern is mirrored on both sides of the skein and repeats with each turn of the skein. After the dying process, the cord is rinsed and dried. In the last step the cord is rolled on spools.
 

This colorway, Bright Spring Variation, is available in a 20 meter spool. Let's see what can be made with a spool. 


Kumihimo Bracelet #1
 

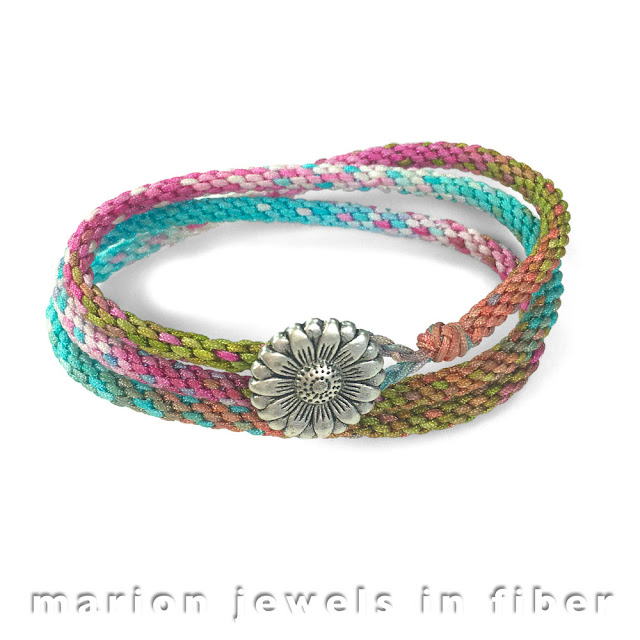
Double Wrap Kumihimo Bracelets made with Space Dyed Chinese Knotting Cord 

Double wrap kumihimo bracelet made with 7 Strand Braiding Method


The 7 Strand Kumihimo Method is explained in the last post and will be covered in a forthcoming tutorial. This was the second bracelet I made this way with the Space Dyed Chinese Knotting Cord. Previously I have experimented with this method with C-Lon Tex 400 Bead Cord. I started with 50 inch cords forded in half so 25 inch cords to braid with and this bracelet ended up a bit shorter than I hoped with a 12.5 inch total length, and a 6.25 inch bracelet length when worn as a double wrap bracelet. That's even a bit short for my small wrists.


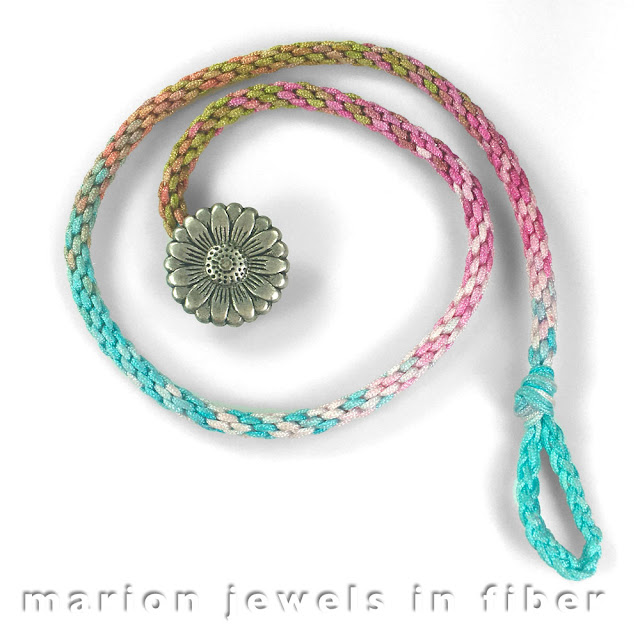
Kumihimo Bracelet #1

Triple Wrap Kumihimo bracelet made with Space Dyed Chinese Knotting Cord

Triple wrap kumihimo bracelet made with 7 Strand Braiding Method


This next experimental bracelet was more successful as I started with twice as much length with 100 inch folded in half to 50 inch. I ended up with a 24 inch length and adjusted the final length back to 21.5 inches to fit my wrist. The marigold (sunflower) button is available on this page, it is the 5th listing.


Square Knot Bracelet #1


This bracelet is made the same way as the shambhala bracelets, however with thinner cords, and with beads only at the sliding cords ends. I added a Fower and Leaves Button as a center charm. It's the 2nd listing on this web page.


Square Knot Bracelet #2

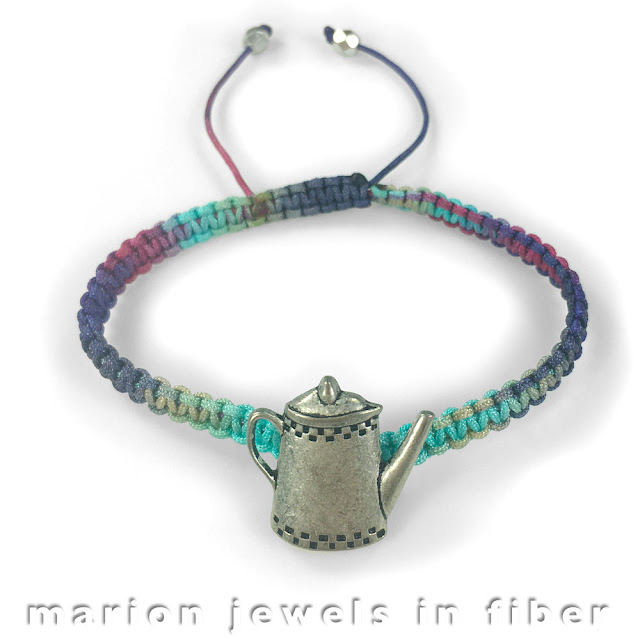
Oops I forgot to take a close up picture...  That's the one with the Teapot Button as a center charm. It's the first listing on this button page. and sliding bead clasp available here. It was made with the remnants leftover of this spool and I had to add beads as I did not have enough cords for all the square knots... 

For more info on these bracelets...

Check the previous post... 

> Space Dyed Chinese Knotting Cord


Space Dyed Chinese Knotting Cord Experimental Bracelets Color Variation #1


I love these new space dyed colors. They are so much fun to play with. Here is the bracelet stack I made with "Turquoise Variation", the first colorway I experimented with.
 
 
What is Space Dyed Chinese Knotting Cord? 
 
Chinese Knotting Cord is a braided nylon cord made in China available in a variety of thickness and usually dyed in solid colors. The cord is made on large braiding machine out of nylon thread, then it is wound on skeins, dyed, rinsed, and dried, then wound on spools. For more info on all the types and sizes of Chinese Knotting Cord, go HERE
 
When cord or yarn are dyed with different colors along a skein, the color changes repeat around each cord turn around the skein. This type of dyeing is called Space Dyed. This can be done by hand at an artisanal scale or in a factory setting with many skeins all dyed at the same time. It is a process that is more labor intensive than dyeing solid colors. 

Space Dyed Chinese Knotting Cord shown as a Skein

 
Why are Space Dyed Colors So Much Fun? 
 
If done correctly with interesting color shifts and variations, it lends itself to so many possibilities... So here are my very first experiments with the new Space Dyed Chinese Knotting Cords I just started importing from China. 
 

This colorway, Turquoise Variation, is available in a 20 meter spool. Let's see what can be made with a spool.

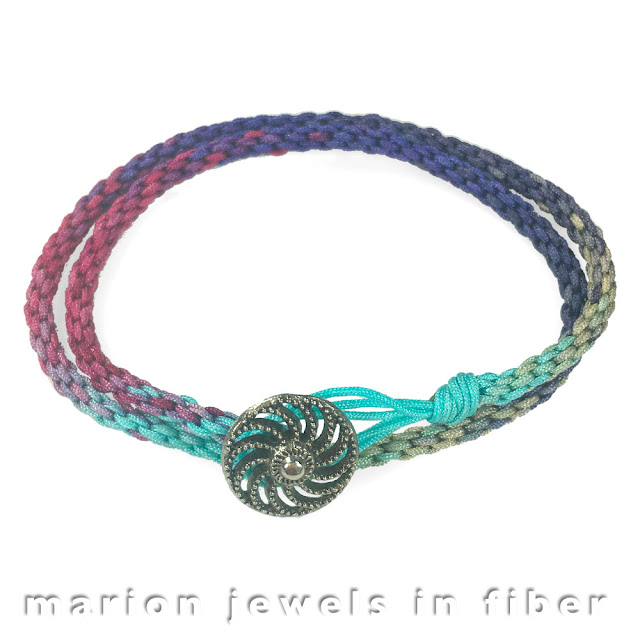
Kumihimo Bracelet 
 
Braided with the 7 strand method, started at the loop and ended with a Pinwheel Button. That's the 9th listing on this page.
 
 
I have been playing with a 7 stand kumihimo pattern and I plan to write a better tutorial on this method with a full step by step tutorial with photos and maybe a video and all the best ways to achieve a professional result on the first try... 
 
This braiding method is really easy. If your kumihimo disk has 4 dots, place 4 strands at the dots, then 3 in between the dots, that leave one space with no cord. Or add 4 extra dots in between the dots with a sharpie marker and place the 7 cords by the dots. There is one empty spot. 

Several ways explain the same cord movements of the braiding process:
 
1. The disk is like a clock. Place the empty slot at 1:30, and take the cord that's at 6 and insert it in the empty spot at 1:30. Then rotate the disk counterclockwise until the empty spot is at 1:30 again and repeat.

2. Count the cords from the empty spot clockwise*. 1, 2 and 3 cords, and taking the 3rd cord up to the empty spot. 
 
 3. By the numbers on the disk with a 32 slot disk. Place the 7 cords right in slots before #8, #12, #16, #20, #24, #28, #32. [Place #32 at the top. Take #16 cord to #4. Place #12 at top. Take #28 to #16. Place #24 at top. Take #8 to #28. Place #4 at top. Take #20 to #8. Place #16 at top. Take #32 to #20. Place #28 at top. Take #12 to #32. Place #8 at top. Take #24 to #12. Place #20 at top. Take #4 to #24.] Repeat []. 
 
* This can be done clockwise or counterclockwise. but you need to be consistent. For me since I am right handed, I prefer to hold the disk with my left hand and move the cord with my right hand. And I prefer to move the cord up rather than down... it;s easier, but it can be done the other way... so long as it is consistent.   
 
Left handed? 
With method 1, place your empty spot at 10:30 instead for 1:30. With method 2, count counterclockwise. With method 3, I will write it if anyone is interested...


Tibetan Knot Bracelet
 
 
I made this one with double stands and line the colors so the color shifts would happen at the same time... For the tutorial go here!


Square Knot Bracelet #1

 
Square Knot Bracelet made with Dyed Chinese Knotting Cord
 
This bracelet is made the same way as the shambhala bracelets, however with thinner cords, and with beads only at the sliding cords ends. I added a Teapot Button as a center charm. It's the first listing on this button page.


Square Knot Bracelet #2
 
Square Knot Bracelet made with Dyed Chinese Knotting Cord 
 
This second bracelet is finished with a sliding bead clasp available here
 
 
Square Knot Bracelet #3

 Square Knot Bracelet made with Dyed Chinese Knotting Cord
 
For this 3rd bracelet iI did not have a lot of cord left, so adding the beads was a perfect solution as it did not use as much cords as all square knots... The beads are 4mm Czech Fire Polished Beads

 
Chain Stitch Bead Crochet Sample


Crochet Sample made with Dyed Chinese Knotting Cord
 
After making all the bracelets above, I just had enough cord left to make a sample... I will make a bracelet of necklace with one of the next color variation.


Saturday, August 17, 2019

Knotted Bead Charms with Hematite or Halo Ring Beads | DIY Video Tutorial


Hematite and Halo Ring Beads are very inspiring... I just designed the Square Knot Bracelet Trio using these beads... and I wanted a small necklace to go with them, a small addition that could be made with either leftover beads or just a few additional purchased beads... the idea became the knotted bead charms.


Square Knot Bracelet Trio Tutorial


For making the charms use the following materials:

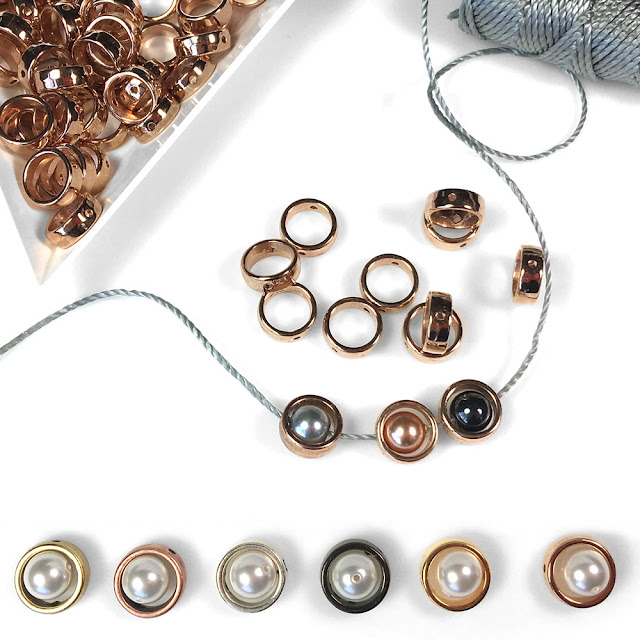
Hematite Rings Perfect Surrounds for 6mm Round Beads

Hematite or Rainbow Titanium Coated Hematite Ring Beads available HERE

or

Knotted Bead Charms with Hematite or Halo Ring Beads | DIY Video Tutorial

Halo Zamak Beads made in Greece available in Antique Brass, Copper or Silver, Gunmetal, Gold or Rose Gold finishes available HERE - All nickel and lead free and meeting European jewelry standards. 

6mm Hematite, Rainbow or Pearlescent Hematite Beads for the center, available HERE

or 
6mm Swarovski Crystal Pearls available HERE

+

4mm Hematite, Rainbow or Pearlescent Hematite Beads for the center, available HERE

or 
4mm Swarovski Crystal Pearls available HERE

Materials & Tools for the Knotted Bead Charm


As for tools, you will need a macrame board, a bead mat, 1 1 3/4" T-pin, beeswax, a large fine point reamer, a thread burner, beading tweezers, scissors. All these are available HERE

As to cords, use C-Lon Bead Cord with the Hematite Rings, and C-Lon Fine Weight Bead Cord Tex 135 with the Halos. You will need about 24 inches or 60 cm per bead charm. 

For the necklace cord for the charm, use Chinese Knotting Cord, it is a braided nylon and it look great as a neck cord and use a small sterling or gold filled clasp. Go to the next post for the video tutorial on how to make the necklace cord for the charms...

Sunday, January 6, 2019

Pantone Color of the Year 2019 compared to C-Lon Bead Cord and More

Pantone Color of the Year 2019 compared to C-Lon Bead Cord and More

Living Coral is definitively bright, lively, vibrant yet mellow at the same time. And yes it matches C-Lon Chinese Coral. 

To lighten it up, add a bit of Pink Lemonade to the mix. Darken it and make it unforgettable with Poinsettia. Add a bit of Sea Shell or Peach Glow for the bright edges and you capture the coral and clown fish perfectly.


Pantone Color of the Year 2019: Living Coral


Pantone 2019 Color of the Year


The background color is the exact Photoshop color swatch provided by Pantone. The color inside the square insert is their alternative color for printing. On the right are the cord and thread closest to Living Coral. 


C-Lon Bead Cord: Poinsettia, Chinese Coral, Pink Lemonade


C-Lon Bead Cord 

Chinese Coral is the C-Lon Bead Cord 2019 Color of the Year. It is available in the standard C-Lon Bead Cord with a 0.5 mm diameter. And it is available in the 0.9 mm C-Lon Tex 400 Bead Cord. Poinsettia on the left is a deeper rendition. Pink Lemonade on the right is a lighter variation. Sea Shell or Peach Glow can be used as highlights. 

C-Lon Bead Cord is a 3 ply twisted bonded nylon used for micro macrame, bead stringing, kumihimo, crochet and upholstery

Chinese Knotting Cord: 323-Chinese Coral, or 324-Guava, 322 Light Coral, 322.5 Pink Coral, 324.5 Light Guava


323-Chinese Coral

Chinese Knotting Cord is a braided nylon cord with a center core. It is used for square knot bracelets such as shambhala bracelet, plus much more. Size E and New E is a great size to make tassels
. 


323 Chinese Coral is available in the 0.4 mm New Size E,  0.6 mm Size H, 0.8 mm New Fine, and in 1.5 mm HDQ Size


322 Light Coral is available in the  0.6 mm Size Hand 0.8 mm New Fine. 


324-Guava, 322.5 Pink Coral are available in 0.4 mm Size E. 


324.5 Light Guava is available in 1.2-1.5 mm New Medium. 


Kanagawa-Fujix Tire Silk - KNK-91


Try these silk for tassels and for so much more... KNK-91 is the color shown above in the large photo. It is the closest match to Living Coral the Pantone color of the year. It has a beautiful sheen. This color can be found at the bottom right of this web page. KNK-93 and KNK-94 are good highlights and KNK-10 on the next page is a good darker deeper color. 


Griffin Jewelry Silk - Coral


Griffin Silk Coral Color
Griffin Jewelry Silk is a silk with a mat finish available in 2 sizes 6/F and 8/FFF. Coral is a good match for Living Coral. 

I hope this will help you choosing new colors for 2019! - Marion


> Pantone Living Coral Color of the Year Animation

Thursday, May 17, 2018

Celtic Bracelet DIY Tutorial | Knotted Bracelet made with Pretzel Knots, Josephine Knots, or Carrick Bend Knots

Celtic Knotted Bracelet DIY Tutorial | Bracelet made with Pretzel Knot, Josephine Knot , or Carrick Bend Knot


These bracelets are made with a repeated knot pattern. The actual knot follows a braided pattern and is sometimes called a Carrick Bend, a Josephine Knot, a Pretzel Knot, or Pretzel Link depending on which tradition you follow. The knot is easy to do once it is mastered. 

Metallic Braided Nylon Cord

For these Celtic Knotted Bracelets, I followed the DIY Ombre Knotted Bracelet Tutorial written by Beth on the Remarkably Domestic Blog with a few differences shown below. The Ombre Knotted Bracelet is made with Chinese Knotting Cord in Medium Weight available HERE. Whereas I used Metallic Braided Nylon Cord (Copper, Silver, and Gold) for the first bracelet I made shown at the top. Then I played around the the Metallic Cord and Black Chinese Knotting Cord. I really like how it emphasizes the Celtic look of the knot. I also altered the way the button is attached and how the cords are ended, using a thread burner rather than glue. It is nor permanent and faster. 

Here is how to make these Celtic Knotted Bracelets:

- 4 yard of Metallic Braided Nylon Cord - 0.9 mm in Ø
- 2 yard of Black Chinese Knotting Cord - 1mm Ø
-1 Heart Button - Available Here (8th down the page)
- A Thread Burner - Available Here

If you want to make all three bracelets, get a material kit here.

Cut two metallic cord and one 1mm chinese knotting cord in 2 yard lengths. 

Celtic Bracelet DIY Tutorial | Knotted Bracelet made with Pretzel Knots, Josephine Knots, or Carrick Bend Knots

Celtic Bracelet DIY Tutorial | Knotted Bracelet made with Pretzel Knots, Josephine Knots, or Carrick Bend Knots

Celtic Bracelet DIY Tutorial | Knotted Bracelet made with Pretzel Knots, Josephine Knots, or Carrick Bend Knots

Celtic Bracelet DIY Tutorial | Knotted Bracelet made with Pretzel Knots, Josephine Knots, or Carrick Bend Knots

Celtic Bracelet DIY Tutorial | Knotted Bracelet made with Pretzel Knots, Josephine Knots, or Carrick Bend Knots

Celtic Bracelet DIY Tutorial | Knotted Bracelet made with Pretzel Knots, Josephine Knots, or Carrick Bend Knots

Celtic Bracelet DIY Tutorial | Knotted Bracelet made with Pretzel Knots, Josephine Knots, or Carrick Bend Knots

Celtic Bracelet DIY Tutorial | Knotted Bracelet made with Pretzel Knots, Josephine Knots, or Carrick Bend Knots

Celtic Bracelet DIY Tutorial | Knotted Bracelet made with Pretzel Knots, Josephine Knots, or Carrick Bend Knots

Celtic Bracelet DIY Tutorial | Knotted Bracelet made with Pretzel Knots, Josephine Knots, or Carrick Bend Knots

Celtic Bracelet DIY Tutorial | Knotted Bracelet made with Pretzel Knots, Josephine Knots, or Carrick Bend Knots

Celtic Bracelet DIY Tutorial | Knotted Bracelet made with Pretzel Knots, Josephine Knots, or Carrick Bend Knots

Celtic Bracelet DIY Tutorial | Knotted Bracelet made with Pretzel Knots, Josephine Knots, or Carrick Bend Knots

Celtic Bracelet DIY Tutorial | Knotted Bracelet made with Pretzel Knots, Josephine Knots, or Carrick Bend Knots

Celtic Bracelet DIY Tutorial | Knotted Bracelet made with Pretzel Knots, Josephine Knots, or Carrick Bend Knots

Celtic Bracelet DIY Tutorial | Knotted Bracelet made with Pretzel Knots, Josephine Knots, or Carrick Bend Knots

Celtic Bracelet DIY Tutorial | Knotted Bracelet made with Pretzel Knots, Josephine Knots, or Carrick Bend Knots

The bracelet is all done. The silver and black one shown below has 14 consecutive knots and measure approximately 7 inch (17.5 cm). The copper and black one has 15 knots and measure 7.5 inch (19 cm). The gold and black one, 16 knots, 8 inch (20 cm). Your measurement may vary a bit depending on how tightly you tie the knots.

Celtic Bracelet DIY Tutorial | Knotted Bracelet made with Pretzel Knots, Josephine Knots, or Carrick Bend Knots


I hope you had a good time making this bracelet. Now try alternative materials, thicker or thinner cords, other colors... Find out what you like best, play around... This bracelet below is made with the 3 metallic colors Copper, Silver and Gold...


References


Materials

Heart Buttons - 8th down the page


Thursday, June 23, 2016

Making a Mala with a Tassel - DIY Instructions


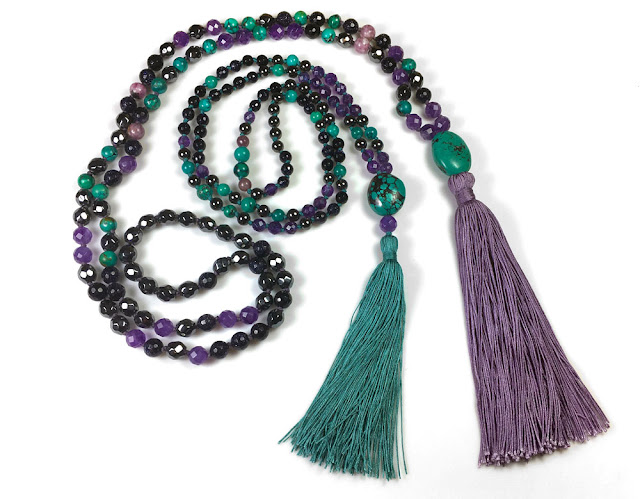
Mala with Tassel - DIY Instructions


Malas are Buddhist prayer beads used for meditation. Traditionally 108 beads are strung and hand knotted in between each bead. A central bead named Guru Bead and a tassel are often added to Malas. These elements, the 108 beads, the marker beads, the Guru bead, and the tassel, all have a symbolic significance explained at the end of this post. 

Material & Tools Needed


Mala with Tassel - DIY Instructions


• 108 Beads
The 8mm Mala shown on this tutorial is made with mostly 8mm beads, the marker beads are a bit larger than the other beads. The beaded part is 96 cm/38 inches long. The tassel and Guru bead add another 15 cm/6 inches. I used a larger oval Turquoise bead as the guru bead and added an amethyst bead above the tassel for color contrast. 

Here are some of the choices:

- All 108 beads are 8mm in diameter. 

- Or  104 8mm beads + 4 marker beads. The marker beads can be a different size, or have a different texture, or feel. 

- All 108 beads are 6mm in diameter.

- Or 104 6mm beads + 4 marker beads. The Mala shown on the right below, is made this way with 8mm marker beads. It is 76 cm/30 inches long and the Guru bead and tassel add 13.5 cm/5.25 inches. The male on the left is shown in the step by step of this tutorial. 


Mala with Tassel - DIY Instructions

The beads can include round and faceted gemstones, wood beads such as ebony, seed beads, metals beads, or a mix. For this Mala I chose a mix of round and faceted gemstone beads. 

• The Guru Bead
Larger bead, can a carved buddha bead, in between the 108 beads and the tassel. 

• The Cord
Although silk is more traditional, if you are using gemstones and planning on wearing your Mala, bonded nylon is a better choice. It is more durable than silk... and due to its 3-ply twisted cord construction, it does not stretch as much as braided nylon cord (Chinese Knotting Cord). 

C-Lon Bead Cord for 8mm beads - For stringing the beads, and knotting between each bead. 

C-Lon Fine Weight Bead Cord Tex 135  - Recommended for 6mm beads. With the 6mm beads consider using C-Lon Fine Weight Bead Cord Tex 135 instead of the standard C-Lon Bead Cord Tex 210. The knots between the beads are a bit more delicate and the Mala drapes better. 


Knots between 6mm beads. Top with the standard C-Lon Bead Cord Tex 21 doubled up.
Bottom strand is made with the C-Lon Fine Weight Bead Cord Tex 135 doubled up.
My next 6mm Malas will be made with the finer cord. 


Chinese Knotting Cord or Silk - For the tassel.

Tweezers - For knotting between beads.

Sharp Scissors - For cutting the C-Lon Bead Cord and trimming the tassel

Beeswax - For stringing beads onto the C-Lon Bead Cord. Optional - wire needles or big eye needle.

Fray Check - Optional if all the cords do not fit through the Guru bead.

• Bead Tray - A bead mat or towel will work too

Tapestry Needle - Size 22 or 20. To pull the cord through the tassel center

Chain Nose Pliers - Or any utility pliers to pull the needle through the tassel center.  

Step 1 - Laying the Beads


Mala with Tassel - DIY Instructions

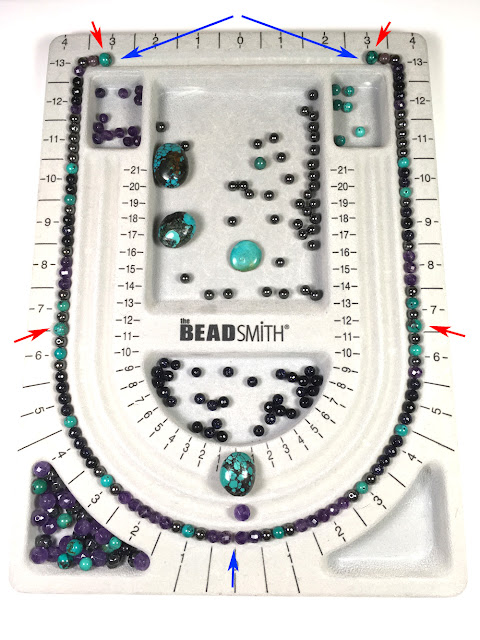
Lay out the beads. The small blue arrow at the bottom is where the Guru bead and tassel will be added. 26 6mm beads are laid out on each side, plus one 8mm marker bead for a 27 beads segment. Do that twice for a total of 54 beads on each side. The red arrows point to the 8mm marker beads. The blue arrows at the top is where the beads will be loaded onto the cord. 

I placed an extra amethyst bead below the Guru bead. I may or may not use it in between the guru bead and the tassel. I added it to the 6mm Mala, but not the 8mm Mala. It added contrast with the Teal tassel, but was not necessary for the French Lilac tassel. 

Step 2 - Stringing the Beads

Cut two lengths of C-Lon Bead Cord 235 cm/96 inches long. Stretch the cord between your hands. This will remove the 10% stretch of this cord. Make an overhand knot with the 2 cords together right at the center with 117 cm/48 inches on each side. 

(Use the Fine Weight size for 6mm beads.)

Make self needles at both ends of the double cord with the beeswax by shredding the ends of the cord with the blade of the scissors, then adding beeswax. Do that a few time until you have a nice point, and cut the end of the point at an angle. Refer to this post on how to load beads onto cord for step by step instructions on how to make a beeswax self needle. 

Mala with Tassel - DIY Instructions


Load a first group of beads. Start at one of the top blue arrows. Knot between the beads with overhand knots. Use tweezers to keep the knot against the bead and use your left index finger and thumb to keep the knot on place when pulling the tweezers off. 


Mala with Tassel - DIY Instructions

Then tighten the knot. You can separate the two cords to do the final pull on the knot. 


Mala with Tassel - DIY Instructions

Continue, loading either one bead or a small group of beads at a time, then knotting in between. 


Mala with Tassel - DIY Instructions


Loading one bead at a time and knotting seems slow, but it is easy. I find it easier and faster to load the beads in small groups, then knotting in between. If you are not sure about the bead layout, loading all the beads at once and on both sides is best for design purposes, but tying the overhand knots between the beads is a bit more awkward as all the beads need to be pulled though the overhand knot before it is tightened.  


Mala with Tassel - DIY Instructions

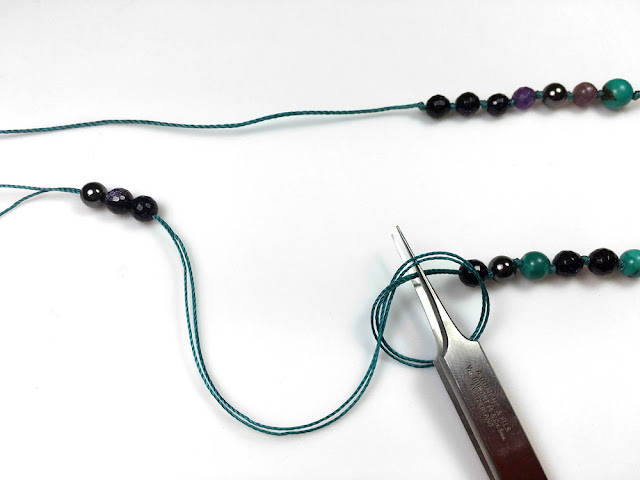
Here the first side has been done. 54 beads have been strung. Now load and knot the other side, starting at the top arrow. Two 8mm marker beads will be next to one another and will mark the back of the Mala. 

Step 3 - Joining at the Guru Bead


Mala with Tassel - DIY Instructions


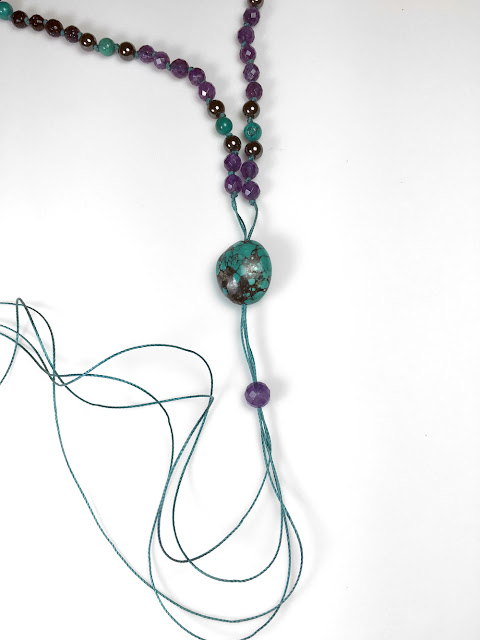
Join the ends together and load the Guru bead onto the 4 cords. Add an overhand knot after the bead(s).

If the Guru bead hole is not large enough to accommodate all 4 cords, here are some options. Ream the hole with a diamond reamer until it can accommodate the 4 cords. Or use only one cord from each side. Add a drop of Fray Check on the final knots. Let it dry. Cut one of the cords on each side off and load the Guru beads on the remaining 2 cords. 


Step 3 - The Tassel

Make the tassel > Go to Tassel Tutorial, but wait to trim it until it is in place. You can even get it in place onto the C-Lon Bead Cord prior to wrapping the neck. 

The Tassel Tutorial shows how to make the tassel for the 8mm Mala step by step. This tassel here shown below is made with Chinese Knotting Cord Size E (0.4 mm in diameter) wrapped 60 times around a cardboard box lid 24 cm/9.5 inches around. The finished tassel, once trimmed is 10 cm/4 inches long. 


Mala with Tassel - DIY Instructions


Using a tapestry needle size 22 or 20, pull the C-Lon Bead Cord though the tassel center. Do it one cord at a time so not to disturb the tassel top. If needed, use pliers to pull the needle through. 


Mala with Tassel - DIY Instructions


Load a 'stopper' bead onto the C-Lon Bead Cord. I use a 6mm ebony wood bead with a hole large enough to accommodate all 4 cords. The beads will be right under the tassel skirt.


Mala with Tassel - DIY Instructions

Make an overhand knot and tighten it against the bead, blocking the tassel in place. Then trim the tassel as shown in the tassel tutorial. 

Mala with Tassel - DIY Instructions


A Mala can be made in an afternoon or evening. The processes, choosing the beads, stringing beads, knotting in between the beads, and making the tassel can become a form of meditation. The gemstone beads chosen for the Mala are also important as gemstones have subtle energies that can be felt and should be honored while working on the piece. 

These Malas are made with the following gemstones:

Amethyst - Give strength. Helps healing. Increases intuition and helps overcome addictions.

Blue Goldstone - Man-made with copper. Protection stone. Good for meditation. Symbolizes light found in darkness. Good for long distance healing. 

Hematite - Grounding and protection stone. Calming. 

Turquoise - Helps promote clear communication from the heart. Relieve stress. Protect from pollution. 

Lepidolite - Known as the peace stone. Promotes calm and acceptance. Good for the heart chakra. Brings hope in dark times by bringing a sense of balance and calm. 

I hope you will find this tutorial helpful. I got a number of questions after writing the tassel tutorial about how to attach the tassel to the strung beads. Making Malas is very enjoyable and I plan to make more in the future. Many variations can be made. I have worn the larger Mala for several months now and it is doing very well. I have not noticed any stretching between the beads, although the knots seem to have relaxed a bit. The bottom of the tassel has flared a bit as the braid has opened, and the very tips of the tassel seem a bit lighter. I do not find it to be a problem, it looks good. The Mala  feels good on. And yes, I look forward to wearing the shorter one just made for this post. Namaste! - Marion

Symbolism

108 - The number 108 is considered sacred in Buddhism and Hinduism. This number represents 108 energy lines that converge to form the heart chakra; 108 Hindu Goddess names; 54 letters of the Sanskrit alphabet, each with a feminine and masculine side (Shakti and Shiva) and 54 times 2 equals 108.

Marker Beads - Often marker beads are added to Malas. They have either separate textures or a different diameter than the other beads, but in most instances they are counted in the 108 beads. When crossed while meditating they are there to remind us to stay focused, as a wake up call or gentle reminder. 

Japa Meditation - From Sanskrit. Meditative repetition of a mantra or a divine name, a practice found in Buddhism, Hinduism, Jainism, and Sikhism. The mantra or name may be spoken softly, enough for the practitioner to hear it, or it may be spoken within the reciter's mind.

Guru Bead - The center bead represent the teachers we had along the way or the teacher within. Out of respect one must stop at the guru bead and if you want to continue with the meditation counting beads, turn around to continue counting in the opposite direction. It is a good place to reflect on the intentions of your practice.

Tassel - Represents enlightenment, oneness as all the strands are connected together, connecting all to the divine, a symbol for prana and consciousness.

Meditation with the Mala -
The Mala beads are used to keep count of the mantras in Japa meditation. Recite your mantra on each bead, going around the entire mala until you get to 108 repetitions of that mantra. A separate mantra can be made when crossing over the marker beads. 


References & Links