Friday, July 14, 2017

8-Strand Flat Kumihimo Braid with Hearts and Metallic Accents Tutorial


These bracelets made with a flat braid can be done on a round kumihimo disk or a square plate. The flat braid is easy to learn and the movements of the cords become instinctual quickly. Four variations of this 8-strand flat braid are shown on page 68 in Braids, 250 Patterns from Japan, Peru & Beyond, by Rodrick Owen, but none of the variations have the heart motif shown here. In this tutorial, this braid is done on a round disk, but instructions for the square plate will be forthcoming in a future post.


These bracelets can be worn singly or stacked. They are light and comfortable to wear. When stacked the magnetic clasps either attract or repel each other depending on the direction of their magnets, so take advantage of this property to stack them closely. Wear these bracelets triple stacked as shown on the top picture. 


Tutorial - Step by Step Instructions


This is a free tutorial... but it is copyrighted!
If you want to share the content with others, always refer to this original post... and visit Marion Jewels in Fiber online store for supplies. Thank you! - Marion

Braiding Materials

Rayon Satin #2, or 2 mm Nylon Satin - or 2 mm Chinese Knotting Cord - 3 yard (2.7 m)
Metallic Cord with Shiny Finish - 12 yard (10.80 m)
or Metallic Cord with Iridescent Iris Finish - 15 yard (13.50 m)
or Metallic Cord with Fine Finish - 20 yard (13.50 m)


These cords will be cut into 1 yd length. The satin will be used individually, the metallic cords will be used as a bundle or strand with multiple cord treated as 1 unit. These steps are described in Step 1 and 2. 

Finishing Materials
C-Lon Micro Cord - 1 yard (0.9 m) cut in 1/2 into 2 lengths of 18 inches (45 cm)
Magnetic Clasps with 6.2mm inner diameter


The tutorial shown below is made with Black Rayon Satin #2, Silver Shiny Metallic Cord, and a 6.2 mm Black Oxide Magnetic End Clasp. These materials are available by following the links in the material list.


Tools & Adhesives
4 inch Kumihimo Mini Disk
2 Mini-Clamps
2 EZ-Bobs (optional)
1 Paperclip
1 Weighted EZBob
Scissors
Micro Tip Pruning Snip or Shears
Pliers
Poly Zap Super Glue

All these tools can be found in Tools for Kumihimo, Tools, and the glue in Adhesives.

Step by Step


"Cord" refers to an individual cord or a strand - a group of cords is treated as a unit, as in the metallic strand.

Set Up the Braid


1. Cut 3 one yard length of Rayon Satin #2 or 2 mm Nylon Satin.
Fold in half and insert into the paperclip. 


2. Cut the Metallic Cord into 1 yard lengths, keeping them together as a strand. Fold at the center and add to the paperclip. Add mini-clamps at each end or roll the ends into the EZ-Bobs to keep the cords from intermingling.


3. Tie several half hitches 1 inch (2.5 cm) from the paperclip with C-Lon Micro Cord. 


4. Pull the paperclip through K-disk, the weighted EZ-Bob, and secure the paperclip with a mini-clamp. 


5. Place the cords and strands in the slots on each side of the black dots. The heart pattern is created by placing the metallic strands in the slots above dots #24 and #8. 

Braiding Steps


Left cord by #32 to slot below the 2 cords by #8


Right cord by #32 to slot below the 2 cords by #24 

Now 3 cords are on each side and 2 cords are by dot #16


Left cord by #16 to slot above the 3 cords by #8


Right cord by #16 to slot above the 3 cords by #24

Now 4 cords are on each side


Right cord above dot #8 to slot right of dot #16


Left cord above dot #24 to slot left of dot #16

Now 3 cords are on each side and 2 cords are by dot #16


Right cord below dot #8 to slot right of dot #32


Left cord below dot #24 to slot left of dot #32


Reposition the side cords to the closest slots on each side of #8 & #24


Now all the cords are in the slots on each side of black dots.
The metallic strands are now on each side of dot #16. 


Braiding Mantra
Top down
Bottom up
Center up
Reposition

Here is the Mantra shown in a graphic form:


Note: Move the left cord 1st


Note: Move the left cord 1st


The cords are back to the same position as before Move 1.
To continue, repeat the Mantra.


Turn the disk over often and check the progress of the braid. 

Tips
- Keep your tension even - I prefer mine on the loose side for this braid.
- Hold the flat braid on the back end of the disk with your left hand, braid with your right hand.


Repeat these steps until you have braided the cord to the desired length. Remove the cords from the disk while holding the braid with your left hand. With 18 inches (45 cm) of C-Lon Micro Cord, tie several half hitches right at the end of the braid.

The End Clasps


1. Prepare the part you just finished braiding - Wrap the cord ends in a corkscrew fashion with the Micro Cord. Do it very tightly but keep some space between the wraps. Wrap around 1 inch (2.5 cm). End the wrap with a few half hitches. For the end with the paperclip - Cut the cords first, then wrap the cord ends in a corkscrew fashion. 


2. Add a few drops of Poly Zap Superglue over the wrapped parts. Let the glue dry. Cut the ends with the snip or shears leaving 3/8 “ (1 cm) of wrapped cords. Check the fit. Round the braid with pliers if needed. Dab a drop of glue on the end clasp and insert. Let dry. 


Design Options


Peyote Sleeves
Add a Peyote Bead Sleeve over the magnetic clasp. Go the tutorials HERE and get the materials HERE.


Extra Colors
Add an extra color for the center of the braid as shown above. Grey Satin was used for the two satin cords by dot #16. This way the satin color at the center of the braid is different than the color on the sides.


Compare Materials

2 mm Nylon Satin: Shown on left. It has a bit more sheen than the Rayon Satin. It is strong and durable and devoid of the annoying little thread that sometimes stick out of the rayon satin. 

Rayon Nylon Satin #2: Shown at center. Beautiful sheen. Needs to be treated nicely. Harder to clean than nylon. Little threads stick out sometimes.

2 mm Chinese Knotting Cord: Shown on right. Matte. Textured. Strong and durable. Easy to wash. 


Enjoy this tutorial. Happy Summer! - Marion

Links to Materials


Friday, June 23, 2017

Sweet Spot - On Tour

Sweet Spot by Shawn Causey and Mark Daniell


Sweet Spot an installation by Shawn Causey and Mark Daniell made with C-Lon Bead Cord Tex 400 is currently in exhibit in San Diego at Wonderspace through the end of July. Wonderspace is a touring art show under a big tent featuring extraordinary art from around the world.

Tour Schedule:

San Diego, CA - through July 2017

Austin, TX - October through December 2017

Phoenix, AZ - February - April 2018

Denver, CO - June - August 2018

Check the tour schedule HERE as locations and dates may change

Read and see more images on this post on Sweet Spot.

If you are in any of the cities on the schedule, make sure to a visit this installation. I wish I was closer... Imagine seeing 19 miles of C-Lon Tex 400!

Wonderspace writes about Sweet Spot by Shawn Causey and Mark Daniell

A meditation on color and the pleasure of seeing, Sweet Spot is a shimmering color installation of 3700 thin multicolor nylon cords hanging ceiling to floor through handmade wood compartments. There are 19 miles of cord in the piece, which was handmade in Indianapolis with a team of 80 volunteers contributing 1000 hours. The motion of the viewer activates the piece as every change in perspective reveals new color harmonies. The flickering effect compels the viewer to slow down as the eye registers shifts in color. The viewer may find their own 'sweet spot' of resonating color relationships as they relate one perspective to another.

Shawn Causey and Mark Daniell live and work in Indianapolis. They focus on using low tech materials to explore color harmonies that are activated by viewer movement. You can learn more about them and their work on their website, Facebook ,or Instagram.

Sunday, June 11, 2017

Loading Beads onto Cord & Thread - Needle Types & Sizes, Thread Leader and Self Needles

I wrote a post quite a while ago on the best way to load beads onto cords. It is one of the most common questions I get. It is a lot easier to refer to a post than to answer everyone individually. It was also time to update the info with lots of visual aids. This info is crucial to so many techniques from Peyote Stitch, Bead Kumihimo, Micro Macrame, and just Stringing Beads or Making Malas.


Needles


Needles for Beaded Jewelry

From left to right:

Big Eye Needles - Super easy to use as the needle opens fully from tip to tip. The needle consists of two long needles soldered together at each end, so when you separate them, in the middle the needle eye is giant. On the negative side, the needle is fairly thick so it cannot go though many beads as their holes are too thin, plus it can snag fragile material such as monocords (C-Lon Bead Thread, Size D and AA, KO and Miyuki Beading Thread) or fragile ribbon such as the knitted Panaché ribbon. Occasionally the solder joint breaks, so have an extra on hand just in case.

Wire Needles with Collapsible Eyes - Such as the Griffin Needles. They come in three sizes, thin, medium, and heavy. They are a good choice for stringing lots of beads, and since the eye collapses, the needle does not take a lot of room, so it is possible to get a double cord or thread into a small bead hole. But as the eye collapses, most of the time the needles are not reusable. On the plus side, the packages have 25 needles. 

Tapestry Needles - They come in many sizes from Size 20 (the thickest) to Size 28 (the thinnest) and they all have blunt ends. Chenille Needles are similar to Tapestry Needles but have sharp ends. 

I try to use blunt ends always for loading beads onto cord and thread. I am less likely to poke myself and to get my project ruined by staining it with blood. Also if you are making multiple passes, blunt ends are best for lowering the likelihood of going through the thread of the previous passes. 

Bead Embroidery Needles
Bead Embroidery Needles - These beading needles in size 10 and 12 are similar to Beading Needles, but they are shorter, plus they have blunt ends. These are pluses all around for leather wrap bracelet, Peyote Stitch, and very fine thread. 

Guide for Needle Sizes


This is a general guide as to the best needle type and sizes for some common thread and cord used for beaded jewelry. It also give an indication as to the best needle size for finishing. 

I often use the next size down for finishing and a pair of pliers to pull the needle and cord through when finishing in micro macrame. I can squeeze a C-Lon Bead Cord in a Tapestry Size 24, thus making a smaller hole in my work, but the end of the cord that went through the needle will not be usable, it will have to be discarded. 


Pull Along Needle and Thread Leader Method


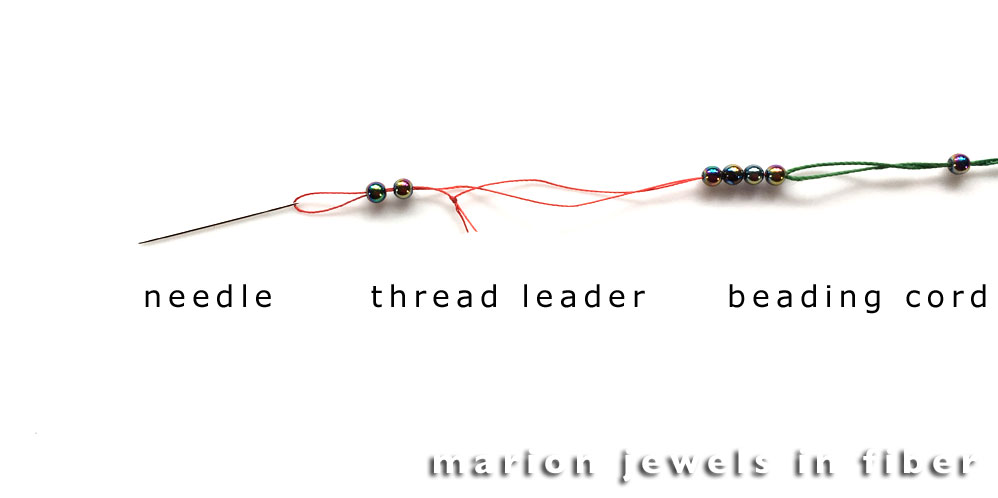
If the beads holes are too small to accommodate the cords and needles listed above, then a smaller pull along needle with a thread leader might be the best way. 

Pull Along Needle and Thread Leader


In this example, the 4mm hematite with an Aurora Borealis finish are loaded onto C-Lon Bead Cord. The bead holes barely accommodate the cord doubled over, so a big eye needle or a tapestry needle will not work. A collapsible wire needle might work, but it might damage the looped part of the cord. So this might be the best solution. The needle is a Tapestry Needle Size 26. The thread leader is a piece of C-Lon Micro Cord. A thinner needle and thread could be used such as a Bead Embroidery Needle and C-Lon Bead Thread Size D or KO/Miyuki Thread. 

If tying a knot does not work because the knot keeps the beads from sliding down, as I found out in my example, either choose a thinner thread or omit the knot as shown below. 

Pull Along Needle and Thread Leader


Self Needles


Fray Check for Self NeedlesBeeswax for Self Needles


 Self Needles can be made with Fray Check or Beeswax. 

The advantage for self needles is that there is no need to double the cord over to insert it into the bead holes. It can be done with a single cord or thread which is less bulky. Thus it allows a thicker cord into a bead hole.


Self Needle with Fray Check - Dip or rub some Fray Check onto the end of the cord. Let it dry. Cut the cord at an angle and use it as a needle. Re-cut at needed. 

Fray Check acts like a glue and coats the cord adding a bit of bulk to the cord. Making the self needle with beeswax (shown next) is the best way for loading beads onto cords when the size of the cord is close to the bead hole.  


Self Needle with Beeswax Method

This method is shown here with C-Lon Bead Cord Tex 400 as it is easier to photograph than thinner cords, but I use this method for the standard C-Lon Bead Cord or Nylon #18 bonded nylon cord and thinner bonded nylons,  for silks such as the Kanagawa or Fujix Tire Silk, and other cord and thread. 

Self Needles with Beeswax Method

Step 1. With the scissor blade edge shred the cord end. 


Self Needles with Beeswax Method

This picture shows the shredded material. 

Self Needles with Beeswax Method

Make sure to shred each of the 3 plies evenly. 


Self Needles with Beeswax Method

Step 2. Run the wax multiple times over the ends. 


Self Needles with Beeswax Method

Step 3. Roll the ends counterclockwise and cut the ends at an angle with sharp scissors. Occasionally as you load beads, you might need to re-wax and recut the end. 


The Beeswax Self Needle has many advantages:


• No need to double the cord over unless you want to use two cords, then join them together with the beeswax. The beeswax will hold cords together. 

• No drying time

Note: Not all beeswaxes are equal. If yours is a bit too soft or sticky place it in the refrigerator. It will help making it harder. If yours is too hard, keep it by a warm light.

I like my beeswax on the hard side... and I also often use pliers with this method to pull the cord through a tight hole. But of course sometimes a bead hole is just too narrow. Then the beads can be set aside for another project done with a thinner cord or it can be reamed.  A post about reaming beads will be on my list of next posts, so stay tuned. Follow my blog or sign up for newsletters to hear the latest news or visit my news page.  It has links to all my technical posts at the very bottom. 

In the end it is best to try all the different methods, and find your favorite way for your projects!

Links and References


-> Needles


Thursday, April 27, 2017

2017 Pantone Colors and C-Lon Bead Cord Colors

2017 Pantone Spring Colors

Pantone Colors for Spring 2017

C-Lon Bead Cord Colors/Pantone Colors Spring 2017

LMZ Light Maize, BLS Blush, AB Antique Brown, IB Ice Blue, MO Moss
OG Orange, LTM Light Magenta, CER Cerulean, GRO Green Olive, C Capri

Greenery is the Pantone color of the year. Moss is the closest C-Lon Bead Cord color. 


2017 Pantone Fall Colors

Two version of the fall colors are available. The first set is for New York, the second for London. Take you pick - Choose your favorite colors!


C-Lon Bead Cord Colors/Pantone Colors Fall 2017
SR Sanghai Red, BC Black Currant, PTL Petal, S Sable, N Navy
GR Grey, CER Cerulean, LMG Lemongrass, CB Caribbean Blue, LC Light Copper


C-Lon Bead Cord Colors/Pantone Colors Fall 2017


C-Lon Bead Cord Colors/Pantone Colors Fall 2017


RH Red Hot, PTL Petal, S Sable, BLM Blue Morning, AM Amethyst
SE Sepia, N Navy, TN Tangerine, LMZ Light Maize, GOLV Golden Olive

Links


Sunday, April 16, 2017

C-Lon Micro Cord - New Spool Size - New Colors


C-Lon Micro Cord - New Colors - New Spools Sizes


C-Lon is adding new colors and introducing a new spool size in the C-Lon Micro Cord Tex 70 size. The original spool size of the Micro is 320 yd - 293 m. The new spool size is 100 yd - 91 m. By switching to smaller spool sizes, it will be easier on our wallet all around to buy and invest in more colors. 


C-Lon Micro Cord - New 2017 Colors


C-Lon just released 8 new colors: 
Vanilla, Latte, Argentum, Charcoal
Gunmetal, Copper Rose, Turquoise, Antique Brown 

It is really great to have new colors in the Micro size of C-Lon. Vanilla, Latte, Argentum, and Charcoal were added in April. Gunmetal, Copper Rose, Turquoise, and Antique Brown just came in this week. Another 8 colors are planned for this year. 


In addition, all the existing colors of Micro are switching to the new 100 yd spool size as inventory of the original spools is sold. The color White, Gold, Grey, Oyster, Sea Shell have already switched to the new spool sizes. We still have some limited inventory of White, Gold, Oyster and Sea Shell in the larger spool, but Grey is now only available in the new spool size. 

Since I discovered C-Lon in 2005 when they had 24 colors of the standard C-Lon Bead Cord only, I have been an advocate for more colors and more sizes, always. Many of you have expressed the desire and need for more colors of Micro so I passed that along. We are very lucky that C-Lon is been open to adding more colors and more sizes to their cord offering. If not for financial constrains, I am sure, they would have all the colors in all the sizes... And having the same color available in all four sizes of C-Lon Bead Cord is very valuable when designing a jewelry line, so yes I am very excited about these new additions. I hope you are too!

Sunday, November 27, 2016

Comparing C-Lon Micro Cord and Tuff Bead Cord Size 1

A customer just asked me a question wanting to compare some colors of C-Lon Micro Colors and Tuff Bead Cord Size 1. Here is the first picture in this series. I will keep adding more pictures as time allows. 

CLMC = C-Lon Micro Cord Tex 70
TUFF= Tuff Bead Cord - Size 1

As to diameter and texture, both cords feel the same. Tuff may have a bit more bond. 

The official diameter of the Tuff Bead Cord Size 1 is 0.274mm whereas C-Lon Micro Cord official diameter is 0.115mm, but visually they seem very similar. The difference between these two measurements might just be because two different companies did the measuring and measuring diameter is not accurate as the thread is soft and might be compressed when measured. 

Because of this problem of compression, thread company do not usually measure thread by its diameter, but by its weight. The Tex system which is adopted widely, but not universally measures the thread by weight, grams for 1 kilometer of thread. thus 1 km of Micro Cord weight 70 gr. But Tuff does not provide Tex numbers for its cord. According to my calculations, it should be around Tex 78... so just a tad thicker than C-Lon Micro Cord. 


C-Lon Micro Cord versus Tuff bead Cord Size 1


C-Lon Micro Cord come in 32 colors. Tuff bead Cord in 16. So that a total of 48 colors. Here are the first 7. I hope this will help refine your choices! - Marion

Links


Wednesday, September 7, 2016

Playing with String Art - Designs with C-Lon Bead Cord

String Art with C-Lon Bead Cord


String art, also known as symmography, or filography, is best described as linear thread design merging geometry and art, or mathematical and geometrical design combined with artistic design. Essentially, it works by connecting two points with a straight line, and then by grouping and overlapping multiple points and lines. The design can be first drawn with pencil and a ruler on a sheet of paper or can be composed in a more spontaneous way directly with the cord and thread right onto a board or canvas. 

C-Lon Bead Cord is a perfect material to create string art pieces with its wide color range and different sizes, making it fun to play around and experiment with. 

Here are my first three pieces experimenting in this field. All are made with a 12 by 12 stretched canvas. 12 by 12 canvasses are inexpensive and easily available at your local art store or online. 


Shield - Playing with Symmetry


String Art with C-Lon Bead Cord


Materials: 1 12 x 12 Canvas, Gesso, Acrylic Paint, Small Nails, C-Lon Tex 400 Bead Cord
Tools: Pencil, Ruler, 1-2 Foam Brushes, Hammer, Scissors, and Thread Burner

1. First paint the canvas with white gesso, let it dry.

2. Add a coat of acrylic in a celadon tone and let it dry.

3. Tack small nails to the back of the stretcher bars, 1 cm apart, all around. If the nails are placed on the back of the canvas, they will not be seen. They will face the wall. Leave the head of the nails sticking out so the cords can be wrapped around the nails. 

For this piece I added 4 nails right at the center of each side and left these sticking out a bit more as lots of cords will be strung around these nails. 


From left to right: (darker to lighter colors) 
Group 1 - Persian Indigo, Hyacinth and Periwinkle
Group 2 - Myrtle Green, Fern and Mint - Oops Fern is missing and Celadon is shown instead
Group 3 - Navy, Indigo, and Light Blue
Group 4 - Marina, Teal and Turquoise

4. Start stringing the rays from the central nail outwards. Each of the rays are made with 3 C-Lon Tex 400 Bead Cord colors. Attach the darker color by making a knotted loop, melt the end of the cord right into the knot with the thread burner, and loop it around the first nail, just off center across the main center nail. Go back and forth around the nails making 8 central rays, 4 on each side of the center line. On one side go around two nails, the other side always around the central nail creating a symmetrical design.

5. Change to the next color in between two of the nails. Tie the darker color you just used to the middle color, melt the cord ends into the knot, and continue looping the cord back and forth. Change to lighter color and finish all the way to the last nail. Tie the cord off with 2-3 half hitches. Melt the cord end into the last half hitch. 

6. Repeat for all 4 sides. 

Variations: change colors, change cord size, add more cords... 

String Art with C-Lon Bead Cord

The photo montages may not show the pieces to scale. To get this effect, you may have to scale up to larger canvasses.


String Art with C-Lon Bead Cord

These close ups show how the piece is seen from the side, making them a good choice for wall art in a hallway... as they change as you move. 

String Art with C-Lon Bead Cord


Bridge - Balanced Asymmetry


String Art - with C-Lon Bead Cord


Materials: 1 12 x 12 Canvas, Gesso, Black Gesso, Small Nails, C-Lon Micro Bead Cord, C-Lon Fine Weight Bead Cord and C-Lon Tex 400 Bead Cord
Tools: Pencil, Ruler, 1-2 Foam Brushes, Hammer, Scissors, and Thread Burner


This piece is a bit more free form than the last one... Follow steps 1-3, but at step 2, coat the canvass with black gesso instead of an acrylic coat.


String Art - with C-Lon Bead Cord

Cord Colors: C-Lon Micro Cord in Grey ad Oyster, Fine Weight in Grey, Argentum and White and C-Lon Tex 400 in Shanghai Red. 

May have been Beige and Oyster for the Fine Weight. Not sure, the piece is at a show and all the colors were left on my desk, so I considered them... I can't remember which ones I ended up using for the Fine Weight exactly. 

Work the cord in layers starting with the Micro Grey and then the Fine Weight going from dark to light. Create movement and repetitions. 

Tie the bundles with the Tex 400 cord. Use the thread burner to melt the ends back into the knot. Then weave some Shanghai Red cords across using a tapestry needle. Size 20 is perfect for C-Lon Tex 400 Cord

For this piece I had no precise composition plan, other than creating an asymmetrical composition reminiscent of jazz with repetitions and surprises. I just followed my intuition and ending up with 3 repeated elements, the 3 triangles on left and the bundles on the right. All held up by the repeated diagonal lines going from left to right and the intersecting line on the right corner. The contrasting red color was the final touch bringing in dots as knots and woven lines.


String Art with C-Lon Bead Cord

Close up of the Tied Bundles


String Art with C-Lon Bead Cord

Close up of the Triangles


String Art with C-Lon Bead Cord

Close up of the Woven Lines


Tight Rope - Creating Tension


String Art with C-Lon Bead Cord


Materials: 1 12 x 12 Canvas, White Gesso, Small Copper Plated Nails, Black C-Lon Micro Bead Cord , Copper Wire, Electronic Wire

Tools: Pencil, Ruler, 1-2 Foam Brushes, Hammer, Scissors, and Thread Burner


String Art with Nylon Cord


This piece is a bit more planned than the last one... Gesso the canvas with white gesso. Let dry. Then mark the places where nails will go using a ruler and a pencil. 

Drill partial holes. It will make it easier to hammer the nails straight. Hammer the nails all at the same depth. Use a guide to keep the tops of the nails level. 


String Art with Nylon Cord


I placed 11 nails on the top left, nails all across the bottom, all 1 cm apart. The final nails on the top right were added afterwards once the thread composition was made with the Black C-Lon Micro Cord. 


String Art with Nylon Cord


Attach the cord right at the left bottom nail. Use 3-4 half hitches. Melt the cord end right to the knot. Pull tight to make sure it is secure. Create a composition with the Black Micro Cord, going back and forth. Think of it as music with rhythm. End the Micro cord with 3-4 half hitches and melt the cord end into the last knot. 


String Art with Nylon Cord


I added the extra nail on top right for the final touch, the opposing composition element and a contrast of materials. 


String Art with Nylon Cord


The copper wire is hand twisted - the galvanized electronic just pulled tightly. 


String Art with Nylon Cord


I hope that you will try this art form. It is easy and the results are fun. If you go ahead and make a piece, let me know how it goes. This is the perfect type of projects to do as a planned activity with kids incorporating art and geometry... And it can be done with cardboard cutting little slots on the edges instead of canvasses and nails. 

I will keep you posted on future pieces. I really want to make a few more! - Marion


Resources and References


Compare Thread Burners

Do a search on 'String Art', get books on the subject... There are many resources with info and instructions online relating to this subject, but please refrain from using cotton floss or cotton crochet yarn as many of these sites recommend. C-Lon Bead Cord is far superior as it can be dusted, washed, and the cord is durable!