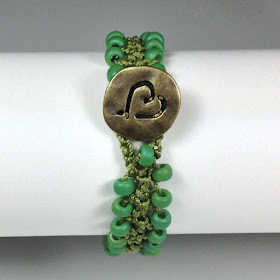
Turkish Flat Bead Crochet is easy and fun. A while ago posted this picture and got lots of requests for a tutorial. So here it is to celebrate the arrival of 16 new colors of C-Lon Tex 400 Bead Cord, bringing the total of colors of C-Lon Tex 400 Bead Cord to 72. (As of now there is 116 colors!). That is truly amazing to have all these color choices. It makes working with this cord a pleasure. This tutorial is my holiday present to anyone following my blog and to all my fabulous customers - Thank you!
Supplies: C-Lon Tex 400 Bead Cord, Beads, Button, Crochet Hook, Scissors, Tapestry Needle
Choosing the color of C-Lon Tex 400 Bead Cord to go with the Miyuki Seed Beads Size E...
With C-Lon Tex 400 Bead Cord, I use either Miyuki seed beads size 6 or 5 (E), a Hamanaka Double Pointed Steel Crochet Hook Size 0 & 2 (1.5-1.75 mm) or a Kollage Square Crochet Size B. The Hamanaka double pointed crochet hook is fabulous as one end, the larger one, works with Tex 400 Cord and the other end, the smaller one works with the standard size of C-Lon Bead Cord, so all I need is one crochet hook for both sizes of cord. The Kollage hook has the nice square ebony wood handle, but it is out of production at this time, so stock is low. I switch crochet hooks as I work, it is just like changing shoes...
1. Load about 50 beads on the C-Lon Tex 400 Bead Cord.
Make 1 slip knot.
Make 1 slip knot.
2. Crochet 2 chain stitches.
3. Slide 1 bead and crochet 1 chain stitch.
4. Turn the work around and make 1 single crochet stitch right into the first chain stitch.
Here is the single crochet stitch complete.
5. Slide a bead and make 1 chain stitch.
Shown in process above and completed below.
Shown in process above and completed below.
Step 5 complete.
6. Turn the work around. Make 1 single crochet stitch right above the previous bead (not the one you just added), slide 1 bead and add 1 single chain. This shows the step completed.
7. Repeat Step 6 until desired length is achieved. This process adds a bead on each side back and forth, with the crocheted part in the center.
In the picture below, the center part of the bracelet has an extra beads in the center. I experimented with this addition, but thus far I tend to prefer the bracelets without the addition.
8. Using single chain stitches make the button loop. Attach the button using a tapestry needle and the end tail at the beginning. Adjust loop and stitch ends in. Cut ends or secure them by melting them with the Super Max Thread Burner.
9. Hey, the bracelet is finished!!!!
On this piece, I added a bead right at the loop and played around with adding a bead every other row when on the right side. It created a ridge with the bead slightly at an angle. These additions are not necessary but it is fun to play around…
Get bead & button, and tool packages to make this bracelet > Turkish Flat Bead Crochet Kits
—> Check all the fabulous colors of C-Lon Bead Tex 400 Cord
—> Check Options for Metal Buttons
—> Check Bead Crochet Tools including the crochet hooks mentioned above and the Tubular Bead Crochet Starter Jig & Tutorial to make bead crochet ropes
—> Check the Super Max Thread Burner
—> Earlier post on Turkish Flat Bead Crochet
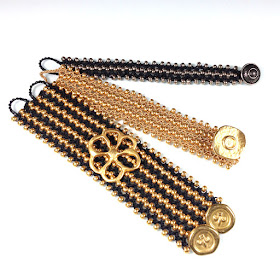
PLUS - Once the basic Turkish Flat Bead Crochet is mastered, take it to the next step to wider armor like bracelets reminiscent of Warrior-Princess ornaments > Princess-Warrior Bracelet Collection
—> Check Bead Crochet Tools including the crochet hooks mentioned above and the Tubular Bead Crochet Starter Jig & Tutorial to make bead crochet ropes
—> Check the Super Max Thread Burner
—> Earlier post on Turkish Flat Bead Crochet
Check this new tutorial for barefoot sandals made with the same technique > Barefoot Sandals - Jewelry for your Feet
PLUS - Once the basic Turkish Flat Bead Crochet is mastered, take it to the next step to wider armor like bracelets reminiscent of Warrior-Princess ornaments > Princess-Warrior Bracelet Collection
Leftover beads?
Make a key chain ornament, a zipper pull or a purse embellishment... Mix beads... Let your imagination soar and have fun with this technique.


Thank you! Love it! Merry Christmas!
ReplyDeleteThank you! Merry Christmas!
ReplyDeleteThank you. The instructions are very clear and the photos of each step are great. Can not wait to get started. Already loaded 8o beads on the C-Lon bead cord. Will be ordering some of the C-Lon 400. I now have a use for this huge stash of E beads. Yea!
ReplyDeleteThis is sooooo fun. I started with regular C-Lon bead cord and 8o sed beads. Makes for a dainty piece. Then I tried it using 1mm leather cord and E beads (dropping 2 beads instead of 1). There are just so many combinations of fiber and beads that can be used with this pattern.
ReplyDeletei bracciali sono proprio carini, brava e grazie del tutorial
ReplyDeleteHappy new year!!!
Donata
Love this pattern, so many variations !,,,,,,
ReplyDeleteThis comment has been removed by the author.
ReplyDeleteWow they are lovely, I have never tried bead crochet, but I think I just might give it a try now.
ReplyDeleteI have the beads, the hook and the thread/ cord...., great post !
Really lovely bracelets, I think I might try this, I have the beads, the cord and the hooks !
ReplyDeleteI have not tried bead crochet before!
Glad to have found your blog, it's great !
P.s I deleted my previous comment.. I made a daft grammar mistake ! :-))
Great post, great blog, bracelets are lovely !
ReplyDeleteBeautiful! Thank you for sharing !
ReplyDeleteReally it is a nice blog, I would like to tell you that your design and variations of Turkish Flat Bead Crochet Bracelet are very lovely.
ReplyDeleteoakland jewelry making classes
ı want to try thıs one..
ReplyDeleteso nıce and ı want to have ıt..
thanks for the ıntructıon very clear
and also the photo..
It is so nice of you to share this lovely pattern. Thanks! I'm curious -- why not attach the button at the very beginning? I find they're more secure when incorporated into the crochet than when added on (plus less threads to work in).
ReplyDeletePersonally, due to repairs, I often use a brand new cord to attach buttons and loops. It makes a bit more cords to finish, but if, for example, the button shaft wears out the cord, it can be replaced without compromising the integrity of the rest of the piece.
ReplyDeleteI have done bead crochet but have not seen this technique before. I love it and will try it soon! Maybe today.
ReplyDeleteThanks so much!
Hermosos gracias me encantan todo
ReplyDelete