I wrote a post quite a while ago on the best way to load beads onto cords. It is one of the most common questions I get. It is a lot easier to refer to a post than to answer everyone individually. It was also time to update the info with lots of visual aids. This info is crucial to so many techniques from Peyote Stitch, Bead Kumihimo, Micro Macrame, and just Stringing Beads or Making Malas.
Needles
From left to right:
Big Eye Needles - Super easy to use as the needle opens fully from tip to tip. The needle consists of two long needles soldered together at each end, so when you separate them, in the middle the needle eye is giant. On the negative side, the needle is fairly thick so it cannot go though many beads as their holes are too thin, plus it can snag fragile material such as monocords (C-Lon Bead Thread, Size D and AA, KO and Miyuki Beading Thread) or fragile ribbon such as the knitted Panaché ribbon. Occasionally the solder joint breaks, so have an extra on hand just in case.
Wire Needles with Collapsible Eyes - Such as the Griffin Needles. They come in three sizes, thin, medium, and heavy. They are a good choice for stringing lots of beads, and since the eye collapses, the needle does not take a lot of room, so it is possible to get a double cord or thread into a small bead hole. But as the eye collapses, most of the time the needles are not reusable. On the plus side, the packages have 25 needles.
Tapestry Needles - They come in many sizes from Size 20 (the thickest) to Size 28 (the thinnest) and they all have blunt ends. Chenille Needles are similar to Tapestry Needles but have sharp ends.
I try to use blunt ends always for loading beads onto cord and thread. I am less likely to poke myself and to get my project ruined by staining it with blood. Also if you are making multiple passes, blunt ends are best for lowering the likelihood of going through the thread of the previous passes.
Bead Embroidery Needles - These beading needles in size 10 and 12 are similar to Beading Needles, but they are shorter, plus they have blunt ends. These are pluses all around for leather wrap bracelet, Peyote Stitch, and very fine thread.
Guide for Needle Sizes
This is a general guide as to the best needle type and sizes for some common thread and cord used for beaded jewelry. It also give an indication as to the best needle size for finishing.
I often use the next size down for finishing and a pair of pliers to pull the needle and cord through when finishing in micro macrame. I can squeeze a C-Lon Bead Cord in a Tapestry Size 24, thus making a smaller hole in my work, but the end of the cord that went through the needle will not be usable, it will have to be discarded.
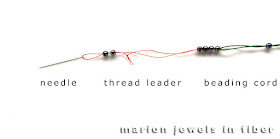
Pull Along Needle and Thread Leader Method
If the beads holes are too small to accommodate the cords and needles listed above, then a smaller pull along needle with a thread leader might be the best way.
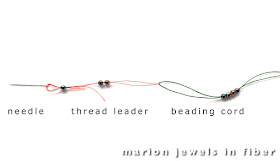
In this example, the 4mm hematite with an Aurora Borealis finish are loaded onto C-Lon Bead Cord. The bead holes barely accommodate the cord doubled over, so a big eye needle or a tapestry needle will not work. A collapsible wire needle might work, but it might damage the looped part of the cord. So this might be the best solution. The needle is a Tapestry Needle Size 26. The thread leader is a piece of C-Lon Micro Cord. A thinner needle and thread could be used such as a Bead Embroidery Needle and C-Lon Bead Thread Size D or KO/Miyuki Thread.
If tying a knot does not work because the knot keeps the beads from sliding down, as I found out in my example, either choose a thinner thread or omit the knot as shown below.
Self Needles
Self Needles can be made with Fray Check or Beeswax.
The advantage for self needles is that there is no need to double the cord over to insert it into the bead holes. It can be done with a single cord or thread which is less bulky. Thus it allows a thicker cord into a bead hole.
Self Needle with Fray Check - Dip or rub some Fray Check onto the end of the cord. Let it dry. Cut the cord at an angle and use it as a needle. Re-cut at needed.
Fray Check acts like a glue and coats the cord adding a bit of bulk to the cord. Making the self needle with beeswax (shown next) is the best way for loading beads onto cords when the size of the cord is close to the bead hole.
Self Needle with Beeswax Method
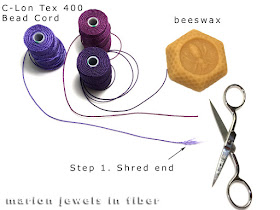
This method is shown here with C-Lon Bead Cord Tex 400 as it is easier to photograph than thinner cords, but I use this method for the standard C-Lon Bead Cord or Nylon #18 bonded nylon cord and thinner bonded nylons, for silks such as the Kanagawa or Fujix Tire Silk, and other cord and thread.
Step 1. With the scissor blade edge shred the cord end.
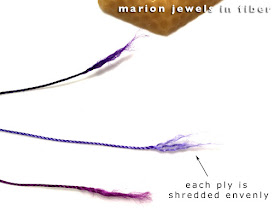
This picture shows the shredded material.
Make sure to shred each of the 3 plies evenly.
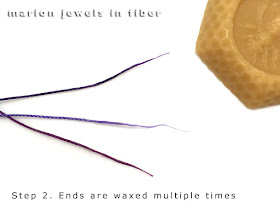
Step 2. Run the wax multiple times over the ends.
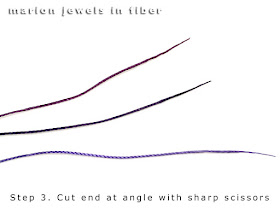
Step 3. Roll the ends counterclockwise and cut the ends at an angle with sharp scissors. Occasionally as you load beads, you might need to re-wax and recut the end.
The Beeswax Self Needle has many advantages:
• No need to double the cord over unless you want to use two cords, then join them together with the beeswax. The beeswax will hold cords together.
• No drying time
Note: Not all beeswaxes are equal. If yours is a bit too soft or sticky place it in the refrigerator. It will help making it harder. If yours is too hard, keep it by a warm light.
I like my beeswax on the hard side... and I also often use pliers with this method to pull the cord through a tight hole. But of course sometimes a bead hole is just too narrow. Then the beads can be set aside for another project done with a thinner cord or it can be reamed. A post about reaming beads will be on my list of next posts, so stay tuned. Follow my blog or sign up for newsletters to hear the latest news or visit my news page. It has links to all my technical posts at the very bottom.
In the end it is best to try all the different methods, and find your favorite way for your projects!


